Floor

Subtleties of mounting an electric floor heating

1 What are underfloor heating

Warm electric floor is a cable heating system of increased reliability, which can be used both as a system of comfortable floor heating and as the main heating system. The heating sections of underfloor heating systems are shielded single-core and two-core cables with two layers of insulation, as well as reliable couplings. From traditional methods of heating, where heat is transferred by convection flows, a warm floor has a number of advantages:

  • The heating part of the system is hidden in the floor structure, which allows to increase the usable area and diversify the design of the rooms, while the floor can be any: tiles, marble, carpet (except for parquet).
  • It does not dry the air in the room, since the heating cable does not have direct contact with the atmosphere.
  • Double insulation and shielding braid of cables allows the use of heated floors in rooms of any humidity.

First of all, choose your system.

Before you start installing a warm floor, we advise you to make sure that you have chosen exactly the system that is suitable for your room and the desired type of heating (comfortable or basic).

1. The main heating system in separate buildings, including in those cases when it is not possible to connect to the central heating system. The main heating system involves the use of a more powerful cable and a screed device with a thickness of at least 5 cm. Moreover, the area of ​​underfloor heating should be at least 70% of the total area of ​​the heated room. The recommended specific power of the system when using a heated floor as the main heating system is from 160–180 W / m 2. For example, a warm floor with a power of 0.19 kW, a heating area of ​​1.2 m 2, we check the power: 190 W / 1.2 m 2 = 158 W / m 2.

2. Additional (comfortable) heating system. It is installed in conjunction with other types of heating appliances and is designed to achieve thermal comfort. Most relevant in rooms with cold floors (bathrooms, bathrooms, kitchens, pools) and on the ground floors of buildings. Recommended specific power of the system for comfortable floor heating is 120–140 W / m 2. For example, a warm floor with a power of 0.19 kW, a heating area of ​​1.5 m 2, we check the power: 190 W / 1.5 m 2 = 126 W / m 2.

Follow regulations

Check if the wiring available in your room allows for additional power. Consider additional electrical devices that can be connected to the same network. Also check the permissible current of safety devices (circuit breakers). We recommend connecting electrical heating systems with a capacity of 2 kW or more through special wiring and a separate machine. We also recommend the use of RCDs with a rated tripping current of not higher than 30 mA. This is a small device mounted on an electrical panel that monitors the electrical insulation of your equipment. When heated floors are mounted in humid rooms (bathrooms, saunas, pools), the screen of the heating section must be connected to the ground conductor of the power supply network, which, in turn, must be connected to all available metal parts, such as: metal shower trays, metal frames of showers, etc.

How to choose a warm floor

  • Determine the free area not occupied by furniture and household appliances.
  • Step away from the walls and from the furniture 5-10 cm.
  • Select a heating mat or section for free space.
  • The area of ​​the heating mat or the heating area of ​​the section should not be larger than the free area.
  • It is allowed to lay a warm floor under furniture if the height of the legs is at least 15 cm.

Heating cables

The basis for the construction of underfloor heating is a heating cable. Outwardly, it resembles radio frequency cables for transmitting television signals, but its purpose is not to transmit electrical signals or power to a distance, but to convert all 100% of the power of the electric current flowing through it into heat. The allocation of this power per unit length of cable (specific heat) is the most important technical parameter of heating cables.


The composition of the system is underfloor heating

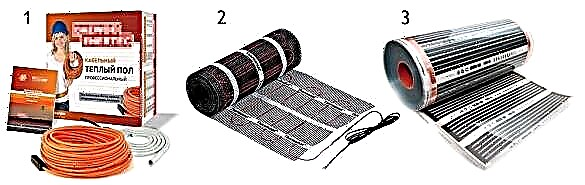
  • heating section or heating mat,
  • control equipment (thermostat with temperature sensor),
  • accessories to facilitate and speed up installation (mounting tape, corrugated plastic tube, etc.),
  • thermal insulation.


Section of a warm floor

Heating sections

The heating sections are structurally composed of a section of a heating cable of a certain length, and so-called "Cold ends" - pieces of ordinary wire connected to the heating cable with a sleeve. Sections can be made of a single-core and two-core cable, while at the ends you should visually see: in single-core sections - two wires on each side (screen and load), in two-core sections - three wires on one side (screen, load, load) .


Cable laying step

calculated as follows:
Laying step (cm) = (100 * S) / L,
where S is the area on which the warm floor is laid, and L is the length of the cable section.
Minimum installation step - 8 cm

Must remember

and single-core and two-core heating sections are necessarily shielded! They can be used both in dry and in wet rooms. Double-layer cable insulation is made of non-combustible and non-consumable materials.
These sections differ in design features and, accordingly, laying methods on the floor surface.

Installation of floor heating

1. Underfloor heating

To install the system you must:


training

1. Prepare a place in the wall for installing the thermostat.

2. Drill grooves for electrical wiring, mounting ends of the heating section and tube for the temperature sensor in the wall.


thermal insulation

3. Prepare the floor surface (level, clear of debris).

4. Install thermal insulation.


fasteners

5. Fasten the pieces of mounting tape.

mounting

6. Place and secure the heating section.

7. Mount the temperature sensor.

8. Install the thermostat.


screed

9. Make the necessary electrical connections. Check for damage to the heating sections and temperature sensor. Measure the resistance of the section and sensor. Their values ​​should correspond to the passport data. Record the measurement results in the protocol or on the layout diagram of the section.

coating

10. Pour cement-sand screed. After 72 hours, you can walk on the floor.

11. Lay the decorative floor covering to your taste.

12. After the screed is completely dry - 28 days, the “warm floor” system is ready for use.

2. Underfloor heating mats


mounting


check


thermostat setting


tile adhesive


training

1. Prepare a place in the wall for installing the thermostat.

2. Drill grooves in the wall for electrical wiring, mounting ends of the heating section and the tube for the temperature sensor.

3. Prepare the floor surface (level, clear of debris).

4. Prepare a groove in the floor for the temperature sensor with a connecting wire that fits in the corrugated tube.
5. Mount the temperature sensor.

6. Lay the heating mat, gluing it to the surface due to the adhesiveness of the lower side of the grid or using aluminum self-adhesive tape.

7. Make the necessary electrical connections. Check for damage to the heating mat and temperature sensor. Measure the resistance of the mat and sensor. Their values ​​should correspond to the passport data. Record the measurement results in the protocol or on the layout of the mat.

8. Install the thermostat.

9. Pour the heating mat with a layer of mortar for fixing tiles with a thickness of 5-8 mm and allow it to dry.

10. Close the groove on the wall with mortar and lay the decorative floor covering to your liking.

11. After the mortar for fixing the tiles has completely dried, the ultra-thin warm floor is ready for use.


Superthin heat-insulated floor


For rooms where a cement-sand screed has already been made, or it is not possible to lay it, ultra-thin heating mats are developed, which are an electric cable of reduced diameter (up to 3 mm), fixed with a constant pitch (about 5 cm) on a supporting fiberglass mesh. Heating mats are a ready-made design that excludes the procedure for laying and fixing the heating cable, so their installation is extremely simple. Mat can be easily cut into fragments (without violating the integrity of the heating cable), which allows you to decompose it on a heated area of ​​any shape. Installation is possible even on old tiles. Two-core heating mats are the most high-tech and environmentally friendly ultra-thin warm floors.

All information provided is advisory in nature. For installation, connection and maintenance of electrical appliances and / or circuits, refer only to professionals who have received appropriate training and are authorized to work.

Cable

This option of a warm floor was invented much earlier than other types. It is a wire (cable), due to which heating occurs. Such a warm floor can be of two types - directly cable and heating mats.

Cable heating system, as the name implies, is based on heating the cable. The system consists of a temperature controller, a temperature sensor and a double-insulated wire. This is the most time-consuming heating option, because it must be mounted in a cement screed.

Heating mats are a fiberglass mesh on which electric heating elements (cables) are already fixed. The advantage of mats is that you can install them without much effort. It is enough to lay heating mats on the base and connect it to the network.

Infrared film coating

A film coating is a thermal film consisting of a carbon base. An alloy of copper and aluminum acts as a heating element. All elements are connected in parallel and sealed in a film. Such heating does not require the use of cement screed, and the finish coating is applied directly to the film.

Advantages and disadvantages

Electric underfloor heating has a number of significant advantages:

  1. It is possible to use it both the main and auxiliary heating source,
  2. The surface is heated evenly,
  3. Possibility of installation with various floor coverings (linoleum, laminate, ceramic tile),
  4. You can independently adjust the temperature both in the entire apartment, and in individual parts,
  5. This is an environmentally friendly product that does not harm health,
  6. Long life
  7. It does not take up useful space in the living room, thereby the appearance of the interior does not change.

Minuses:

  1. High cost of production,
  2. Such heating should not be used under parquet or flooring, since under the influence of high temperatures the wood is deformed,
  3. Cables create an electromagnetic field,
  4. If installed incorrectly, there is a risk of electric shock.

Installation Features

There are three ways to install an electric floor:

  • Installation in a layer of screed followed by flooring,
  • Laying on top of the screed under the tile itself,
  • Mounting the system for flooring (film heating).

The first installation method is used for residential premises. In this case, the installation of cable underfloor heating is recommended. Under the heating system, layers of waterproofing and thermal insulation are mounted.

Installation consists of several stages:

  • Laying waterproofing material,
  • Heat insulation installation,
  • Fastening heating cables,
  • Create a screed.

When installing an electric heated floor (ETF) under the laminate, wood flooring and linoleum, film heating (infrared film) is used. Infrared rays efficiently pass through materials and warm the surface of the floor.

Installation technology:

  • The required surface is covered with foil material,
  • If necessary, waterproofing is additionally created,
  • Installation of heating elements (infrared film),
  • Checking the electrical system of the heating element,
  • Topcoat application.

Electric cables and heating mats are installed under the tile. The advantage of heating cables is that it is possible to independently determine the installation step (interval between cable cords). Electric heating elements are fixed with a mounting tape.

Foundation preparation

A properly prepared base for laying an electric floor is an indicator of the quality of future flooring.

Work algorithm:

  1. The base must be clean and even. The foundation is cleaned of contaminants and, if necessary, is leveled with a cement mixture. Cracks and crevices are carefully repaired. Concrete and porcelain tiles are leveled with a grinder.
  2. Room measurement. Correctly performed measurements help speed up the installation process.
  3. Primer on the subfloor surface. Priming allows you to better fasten the base with a cement screed.
  4. Next, a waterproofing layer is laid with polyethylene, which should go to the wall 10 cm.
  5. Placement along the perimeter of the base of the damper tape. It is intended for uniform distribution of heat over the surface.
  6. Insulation installation. Insulation is selected depending on the type of flooring.
  7. Reinforced mesh coating. If microfiber or plasticizer is added to the screed solution, you can do without additional strengthening.

How to calculate material and power?

Knowledge of the power factor is needed in order to find out if the room is sufficiently heated. It also allows you to correctly determine the size and amount of material.

To calculate the power, you must use the formula P1 = P2 * S * 1.3 (... 1.6), where:

  • P1 - power cable
  • P2 - heating power per square meter,
  • 1.3-1.6 is an indicator of the reserve that is needed so that the heating system does not only rely on its resources, but has spare power reserves.

The required power for heating a living room is 120-180 watts, and in cases with a balcony and loggias, the indicators increase to 180-250 watts per square meter. Also, the power can vary from whether the system was installed as an additional heat source or as main heating.

The cable length is calculated by the formula h = S x100 / L, where h is the cable length, S is the surface area, L is the total cable length.

When laying film heating, the power is determined much easier: the total number of heating elements should completely cover the required surface.

How to install thermal insulation?

To ensure that heat fluxes are distributed evenly, thermal insulation is used. A material with a reflective silver coating (penofol or expanded polystyrene) is suitable for this.

For apartments of multi-storey buildings, a heat-insulating layer 3-4 mm thick is suitable, and in private houses the layer should be thicker. Thermal insulation material is fixed with adhesive material.

If it is necessary to heat a room with a high level of humidity (bath), then the thermal insulation is also treated with waterproofing material.

How to do it yourself?

The step-by-step instructions for the various ETP models are slightly different. Let's consider in more detail how to mount different types of underfloor heating with your own hands.

Installation of cable underfloor heating:

  1. Preparation of the foundation to the required state (smooth, clean),
  2. In the bathrooms and bathrooms, waterproofing is installed,
  3. The mounting tape is installed and the cable is laid with the necessary step. The end of the cable wire is routed to the junction box where the thermostat will be located.
  4. A temperature sensor is installed in a corrugated pipe, one end of which is plugged, and placed between the cables at a distance of 70-100 cm from the wall. The second end of the pipe with the sensor is put into a box for connection to a temperature regulator.

The inclusion of the system in the network is possible only after the screed has dried.

Installation of heating mats:

  1. The mats are laid on the prepared base in such a way that they do not find each other, but are tightly in contact. If it is necessary to cut fiberglass, be extremely careful not to deform the heating cable. When installing a thermostat with a single-core cable, both ends of the cable wires should fit into the box with the thermostat. In the case of a twin-core cable, only one wire is sufficient for the temperature controller.
  2. Laying the mat is done on a special glue (glue layer - 2-3 mm), lightly pressing it to the floor.
  3. The temperature sensor is installed in a corrugated pipe between the turns of the heating elements. The second cable wire is connected to the temperature controller.
  4. After that, it is mandatory to check the functioning of the system with the help of a tester.

If the laying of the warm floor is intended for tiles, then after checking for operability, it is possible to switch to mounting the floor covering. In the case of laminate flooring and parquet board, after screeding, it is necessary to make a screed of 1.5-2.5 cm. The floor covering is spread only after the screed has completely dried.

Mounting the infrared film floor:

  • First you need to install a junction box with a thermostat. A strobe is cut in the wall to connect the film and the sensor to the thermostat. We carry the power cable to the junction box.
  • The base of the floor is covered with a heat-insulating layer (no more than 5 mm thick). The joints of the material are fixed with tape.
  • It is necessary to lay the infrared film with the heating elements down. The edges are also fixed with tape so that there are no shifts. The location of the strips should be made so that the contacts are closer to the thermostat.

  • Connecting electrical contacts and a mounting wire to the wall, further isolating them with bitumen insulation. Wiring leads to the junction box.
  • A temperature sensor is installed in the second section of the infrared floor to better receive information about surface heating.
  • Connection testing. If everything is in order, you must turn off the system.
  • Put a plastic wrap.
  • Laying the topcoat.

Electricity Connection Diagram

This part of the installation is the most responsible. Electricity connection requires sequential actions:

  1. Testing the cable and wires for system resistance (using a multimeter) and insulation of mats (using a megohmmeter).
  2. Connection of temperature sensor, temperature controller and power cable. This must be done according to the instructions included in the ETP system.
  3. Additional grounding of the cable and power cord, which is carried out by fixing these elements with a protective terminal.

The temperature sensor is connected to the thermostat according to the instructions, after which the heating system is connected to a circuit breaker. The first start-up of the system is carried out only after one hundred percent drying of the screed.

Depending on the model of the electric floor used as heating, the connection schemes differ. Connecting an ETP is much simpler than connecting a water floor. No extra connections are required (for example, to an electric boiler), but only to the mains.

Cable System Connection:

  1. The temperature sensor is installed in a corrugated pipe and placed in a prepared strob in the wall.
  2. The electrode wire is connected to the thermostat. The cord itself is fixed between the turns of the heating elements.
  3. At the final stage, the heating system is checked using a tester. Only if, after testing and reconciling the readings with the instructional readings, they match, you can put the screed.

Heating mats:

  1. To begin with, the area of ​​the thermostat is determined.
  2. Mats are laid according to the installation instructions.
  3. The temperature sensor, which is laid in the tube, is fixed between the turns of the system.

Film floor connection:

  1. First of all, it is necessary to connect all the rows of the film. You can use only those terminals that came in the configuration of the underfloor heating. Stripes of film are connected in parallel. All contacts must be insulated with overlays.
  2. In the center of the thermal insulation substrate, a pocket is made for mounting the temperature sensor.
  3. Connecting the temperature sensor and thermal film to the temperature controller and the entire system to the mains via a circuit breaker.

To make sure the system is functioning, it is necessary to turn on the heating at full power and wait a few minutes. There should be no sparks or unpleasant odors. After testing the performance of the system, you can proceed to the installation of flooring.

Control block

The regulation of the underfloor heating system is due to the electrical unit. You can turn the heating on and off, control the room temperature, and also adjust for periods of automatic turning on and off the system.

There are several varieties of electric floor control panels:

  • Electromechanical the regulator is the easiest way to control. His tasks include controlling the heating and shutting down the system. The regulator is controlled manually. There is a wheel connected to a controller that maintains the temperature of the floor. Due to its simple design, the electric regulator has the lowest cost and is less prone to breakage.
  • Digital panel The control functions in the same way as the previous control. The only difference is that the regulation is carried out not with a wheel, but with a button or touch panel. The control unit is equipped with electric sensors that measure the temperature of the air in the room. Temperature sensors transmit data to the thermostat.
  • Programmable temperature controller It is made by the most modern technologies. There are several temperature sensors available that transmit all indicators to a controller who maintains different temperatures in different rooms. You can control such a thermostat via a Wi-Fi network using a smartphone or laptop. When leaving the house, it can be completely turned off or turned on at the required temperature before your arrival.

It is recommended to give preference to modern control panels that can be configured manually. Convenience and practicality in use and various design color solutions will help to fit them into any interior style.

Common mistakes

The very first mistake can be considered installing an electric floor under a heavy massive headset. Under the weight of the materials there is insufficient cooling of the floor covering, which leads to overheating and damage to the heating elements.

Curvature and bending of the cable breaks the entire heating system. If a film heating method is used, system failure can occur due to damage to the heating film.

Incorrect monitoring of insulation resistance during installation is also a common mistake by beginners. The value should not differ from the declared manufacturer by more than 10 percent. Otherwise, an ETP malfunction awaits you.

Do not put the temperature sensor in the screed. It is installed in a corrugated pipe, which is placed in the screed. To eliminate the breakdown in the sensor flooded with a screed, a lot of effort will be required.

Installation of an infrared film requires the isolation of live parts of the film. If this rule is not observed, current leakage and power outage will constantly occur. The cable installed in the heating mat must not be cut. It is necessary to correctly measure the area for heating and it is better to leave part of the room not covered by a heater.

Recommendations

Installing an electric heated floor with your own hands is not so simple. In this case, some useful recommendations should be considered:

  • Be sure to follow the instructions from the manufacturer during installation,
  • The twin-core cable cannot be cut,
  • During installation, do not step on the cable, this can lead to breakage,
  • Installation of a warm floor is recommended in the warm season,
  • The size of the film of the electric floor should be no more than 15 m,
  • Grounding when connecting the electronic circuit is a prerequisite,
  • It is prohibited to fasten film materials with metal products,
  • Film heating is not recommended to be installed near heaters, fireplaces.

If you follow the instructions and responsibly treat the technology of installing electric floors, this type of heating will meet your expectations.

See how to install a warm electric floor in the next video.

Pros:

  • the ability to use both as the main and as an additional source of heating the home,
  • uniform heating of the entire area of ​​the room,
  • unlimited installation locations. Accessibility for installation, both in living rooms and in offices,
  • compatibility with most floor coverings (laminated board, ceramic tile, linoleum),
  • the ability to adjust the temperature regime - both throughout the apartment, and separately for each room. The system on / off time is also set at the discretion of users,
  • no need to install additional equipment (as, for example, in the case of a water heated floor),
  • relatively simple installation technology,
  • aesthetics. The system is mounted under the final floor, this eliminates any restrictions when designing the available space,
  • long term of operation.

Minuses:

  • significant cost of using the system. This type of heating is hardly economical,
  • risk of electric shock. Which puts forward special requirements for the calculation and installation of the heating element in all rooms, and in particular in the bathroom,
  • the presence of an electromagnetic field created by a heating element (cable),
  • the use of natural wooden flooring is excluded (laying under parquet, flooring is not possible), as under the influence of temperature changes, the wood will dry up, as a result, cracks and creaks of the floor appear,
  • reducing the height of the room due to the arrangement of the subfloor with a heating system,
  • additional power requirements for existing wiring.

What affects the power consumption for cable floor heating

Factors affecting the energy consumption of the “electric underfloor heating” system

  • climatic zone in which the house is built (private or multi-unit),
  • volume of the room (area),
  • type of floor (type of flooring),
  • thermal insulation level of the room (degree of fatigue),
  • the state of the warm circuit (windows, doors) and the level of heat loss through them,
  • the purpose of the premises (living room, industrial facility),
  • purpose and period of operation. Whether electric flooring is used as the primary or secondary heating system. Constantly or periodically,
  • the degree of heat perception by people living in the room.

What is a warm floor

Underfloor heating is a heating system in which conventional radiators are not needed. The heating element may be an electric cable or water circulating through the pipes. They are located throughout the floor area and evenly warm the room.

Left convective air heating, right - thermal radiation / pol-exp.com

Heating is due to radiation, not convection. Heat is distributed from the bottom up, which further increases the efficiency of heating. The hottest thing is at floor level, the coldest - under the ceiling. This allows you to reduce the temperature in the room by 2 ° C, and the person does not change the feeling of warmth. Even such a slight decrease saves energy by 12%.

How the underfloor heating system works

Depending on the technology used, the device of underfloor heating is somewhat different, but in general all types have a similar multilayer construction. A thermal insulation layer is placed on the ceiling or base, and heating elements are installed on it. Then, if necessary, a cement screed is arranged and a finishing floor covering is already laid on top.

Cable floor heating device / my-kvartira.com

Heating control in warm water floors is carried out through the mixing unit. In electric, a temperature regulator is used for this, to which a temperature sensor located inside the floor is connected.

1. Water floor heating

remontnik.org

The water heated floor is based on a closed pipe loop with a circulating coolant, which is heated from the boiler and enters the system through a mixing unit. Due to the requirements for adjusting the flow and the temperature of the coolant, this option is suitable exclusively for private houses or apartments with individual heating.

Such floors are usually installed at the initial stage of construction. The base is waterproofed and covered with a layer of insulation, and then pipes are mounted on it, which are connected to the manifold cabinet and poured with concrete. Next, a finishing coating is laid on top of the screed.

Pros:

  • The lowest operating costs.
  • The most uniform heating over the entire area.
  • Heating of the heat carrier is possible from different sources.

Minuses:

  • High cost of equipment compared to electric underfloor heating.
  • Constructive complexity and the complexity of installation.

3. Thermomats

termoradosti.com

In fact, thermomats are a variation of a cable floor heating. Here, the same cable is used as a heating element, only of a much smaller cross section and pre-mounted on a polymer mesh with large cells.

Often this type is chosen when finishing the floor with ceramic materials. Due to the thickness of less than 3 mm, thermostats are easily placed between the finished screed and tile, occupying the space inside the layer of tile adhesive. On sale there are thermometers with different cable laying steps, designed for a specific power.

Pros:

  • Easy installation.
  • Quick warm up.
  • Does not affect floor thickness.

Minuses:

  • High energy consumption.
  • Do not lay under furniture without legs.

4. Film underfloor heating

trans-mix.ru

Film is another type of electric underfloor heating. Structurally, it is a conductive element that is laminated between two insulating layers of polymer.

Installation of such a system is carried out on a heat-reflecting substrate. A warm floor is laid on top, and then a protective film. If linoleum or carpet is planned, an intermediate layer of plywood is mounted. A laminate can be laid immediately on the film.

Pros:

  • Easy installation.
  • Almost no effect on the thickness of the floor.
  • Energy efficient than cable flooring and thermostats.

Minuses:

  • Do not lay under furniture without legs.
  • Not suitable for wet rooms.
  • Easy to damage during installation.

Which floor to choose

In many ways, the choice of underfloor heating technology depends on the planned finish. It is important to take into account the specifics of the room, the presence and material of the rough floor, as well as the possibility of arranging the screed. Well, you need to decide whether you want to replace the heating system or just supplement it.

  • Water floor heating - Ideal for a country house, even as the main heating. It will help to save on bills. You can install in all rooms and use any coating, but you need to install it at the initial stages of construction or repair.
  • Cable floor heating - An alternative to a heated water floor for apartments, although it can be installed in private homes. Use in the form of heating is possible, but costly. Suitable for any room, requires pouring screeds. The best coating is tile, to a lesser extent a special laminate and linoleum are suitable.
  • Thermomats - an option for cases when it is impossible to make a screed. Otherwise, the same is true for them as for cable underfloor heating.
  • Film underfloor heating - the easiest to implement view. Suitable for comfortable heating, but not heating. Compatible with all types of coatings with high thermal conductivity and small thickness: laminate, linoleum, carpet.

How to mount a water floor heating

  1. Install the manifold cabinet and place the mixing unit with pump in it. Choose a place in the center of the house to reduce the length of the supply pipes of the individual underfloor heating circuits.
  2. Connect the main pipeline from the boiler to the cabinet. If you plan to install control automation, also lay the electric cable.
  3. Prepare a rough surface. Level out all differences of more than 5 mm, remove dust and cover the base with plastic wrap or other waterproofing.
  4. Install damper tape around the walls to separate them from the floor plate and compensate for thermal expansion. The tape should be above the finish and trimmed after installation.
  5. Lay polystyrene foam on the base, and on top of it mats with bosses or a grid for fastening pipes. Lay out the pipes in increments according to calculations. It is preferable to lay according to the "snail" scheme, so that the supply and return pipes are nearby for uniform heat transfer.
  6. Connect the pipe ends of each circuit to the distribution manifold. If necessary, install servos to adjust the temperature using a room thermostat.
  7. Turn off the taps in front of the mixing unit and check the installed system for leaks at 6 bar.
  8. Without bleeding, fill the concrete screed with a thickness of at least 3 cm from the top edge of the pipes. Wait 28 days until fully hardened.
  9. Install a decorative flooring compatible with underfloor heating.

How to install cable floor heating

  1. Check the cable resistance with a multimeter and make sure that it matches the rated value.
  2. Make a laying diagram, marking the location of furniture without legs and large equipment, as well as indentation from the walls by 5-10 cm. The wire does not fit into these places! Count the resulting area and make sure that the selected cable is designed for it.
  3. Install the mounting box for the thermostat and insert the power cable into it. Make a stub for laying the temperature sensor at a distance of 50 cm from the wall.
  4. Prepare and clean the rough surface. If the underfloor heating is used for heating, lay polystyrene foam on the base of the slab. If only for heating - a heat-insulating film. Glue the damper tape around the perimeter of the walls.
  5. Attach a mesh or mounting tape to secure the cable and lay it out with a snake. A single-core wire is inserted into the installation box with two ends, a two-wire one.
  6. Insert the thermal sensor into the corrugation, put on a cap and lay it in the prepared stub.
  7. Install the thermostat and connect power and a heating cable to it according to the diagram in the instructions. Turn on the system for a couple of minutes and make sure that it heats up.
  8. Turn off the power and pour a cement-sand mortar screed with a thickness of 3-5 cm. Wait until the concrete has hardened within 28 days.
  9. Install a finish that is compatible with underfloor heating.

How to mount thermostats

  1. Draw a laying pattern, excluding the space where the furniture and large equipment that fit snugly against the floor are. Provide 5-10 cm indentation from the walls. Depending on the resulting area, select a thermomat of suitable power.
  2. Mount the box for the thermostat and run the power cable to it. Cut the bar for the temperature sensor wire.
  3. Clean the surface of the floor and prime the surface. Mark the heated area for laying mats. 5-10 cm away from walls and stationary furniture.
  4. Starting from the wall with thermostat, lay the heating mats with the cable down and the net up. To fit the shape of the room, the mesh can be cut. It is impossible to violate the integrity of the cable and overlap the mats!
  5. Insert the thermal sensor into the corrugation, put on a cap on it and lay it in the prepared wall at a distance of 50 cm from the wall.
  6. Check the cable resistance and compare with the passport. Install the thermostat, connect the power and the mat wires to it in accordance with the circuit supplied with the device.
  7. Take a test run of the underfloor heating for a short time and check if the system heats up.
  8. Draw a ready-made scheme for laying mats and sign all the elements. This will be needed for warranty and service.
  9. Lay the tiles. Apply glue with a notched trowel to the grid of mats. A layer with a thickness of 8-10 mm should completely cover the surface without air cavities. Be careful not to damage the heating cable.
  10. You can turn on the warm floor only after the glue has completely dried.

How to install a film underfloor heating

  1. Think over the layout and draw up a drawing, noting the location of furniture and large household appliances without legs. Provide 5-10 cm indent from walls. Material does not fit into this space. Calculate the required amount of film and its power, depending on the resulting area.
  2. Fix the mounting box under the thermostat and route the power cable to it. Make a line for the temperature sensor wire.
  3. Prepare the base: align all differences over 3 mm to 1 m, clean and prime the surface. Lay on top a heat-reflecting substrate with a laminated base and secure with double-sided tape. Do not use foil materials!
  4. Divide the heating film into strips of the desired length, focusing on the marked cut lines. Indent 5-10 cm from walls and stationary furniture. The film must not be overlapped! Place it back to back or leave 1-2 cm between strips depending on the manufacturer's recommendations.
  5. Mount the contacts: insert one end between the layers of the film, and the other on top of the copper bus, squeeze them with pliers. Connect the wires to the terminals and gently but firmly crimp them. Connect all the segments of the film together according to the diagram in the instructions. Insulate the contacts and ends of the copper busbar with the bitumen tape supplied.
  6. Install the thermostat, connect the power cables and wires from the film. Glue the temperature sensor on the bottom of the thermal film with tape to the heating strip. Lay the wire from the sensor in a layer of heat-reflecting substrate and connect it to the thermostat.
  7. For 2-3 minutes, start the system and make sure that all areas of the film are heated.
  8. Lay the topcoat. Under the laminate, it is necessary to lay polyethylene. For linoleum or carpet, a protective layer of plywood or fiberboard should be placed on top of the film. During installation, be extremely careful not to damage the film with fasteners.

Mounting Methods

There are several variations on how to make an electric floor heating:

  • place it deep into the screed
  • mount directly on the screed,
  • install under the floor covering. Such warm floors are called film floors.

The first installation option, as a rule, finds its application in the arrangement of kitchens, loggias and balconies. The design is known as cable floor, the creation of which includes the following steps:

  • installation of a waterproofing layer,
  • installation of insulation
  • fixing of heated elements,
  • screed formation.

If the installation of an electric underfloor heating is planned in the apartment, under which the heated room is located, installation of the system without additional thermal insulation is allowed. In this case, the tile and fixing adhesive act as protection for the structure and all its individual elements. It is important to familiarize yourself with the manufacturer's recommendations of the selected underfloor heating to make sure that this type of installation is suitable for such a material.

Under linoleum or laminate, you can install an infrared type of heating. The equipment of this floor is very simple:

  • the working surface is covered with foil polyethylene,
  • if necessary, additional waterproofing is installed,
  • elements of the heating structure are installed,
  • the system is checked for connection to the mains,
  • the topcoat is laid.

Such a heating system must not be installed in the screed, and ceramic tiles cannot be used as the final finishing material.

Material selection

The construction market offers two options for warm electric floors:

  • the base of the system is represented by a heating electric cable (this category includes special heating mats),
  • the base is in the form of an infrared film.

Heated cable may occur:

  • self-regulating cable - the heating element is represented by a polymer matrix. When the system overheats, there is a decrease in current in the problem zone, while the remaining elements continue to perform their functions. As a result, the design is characterized by a long term of use, however, its cost remains high,
  • resistance cable - has one or two conductors where increased resistance is observed. Passing through them, the electric current is converted into thermal energy. The heating core is supplemented with an insulating layer and a metal braid, which is responsible for grounding and is a barrier to the path of the electromagnetic field. The disadvantages of the design include the fact that if one of the elements overheats, the operation of the entire system is disrupted.

The following materials can greatly simplify the process of how to install a warm floor:

  • heating mats - have the form of a mesh base made of fiberglass of various widths, on which heating cables are fixed with a predetermined step. The specific power per square meter of such mats varies, however, it is still inferior to that of a standard heating cable,
  • film electric floor (also called infrared). It is a canvas based on dense polyethylene with sealed graphite. Its width can reach one meter. The name of the material is determined by the principle of its operation: during operation, heat is generated within + 20-45 ° С. The film is divided into strips, and if one of them stops working, the system still continues to function properly.

The choice of material depends on the finish of the floor:

  • infrared material feels great under a parquet board, laminate, carpet or linoleum. There is no additional concrete screed
  • experts advise to lay heating mats under a ceramic tile. Tile installation is carried out directly on the mats, additional insulation is not required.

Heating cables are selected provided that heating is required for a large room. Installation of a cable of a warm floor is carried out in cement pouring, which will give the room additional heat. It should be understood that the arrangement of the screed “eats” up to 10 cm of the height of the walls of the room.

Power calculation

Knowledge of the power factor of the cable is necessary in order to understand whether the heating of the entire room will be sufficient. In addition, the indicator also plays a role in choosing the length of the material itself.

To calculate the power, you should use the following formula: P1 = P2 * S * 1.3 (... 1.6), while P1 means the power of the cable going to the laying of warm floors, P2 means the heating power per square meter of the room, variable indicators from 1, 3 to 1.6 represent the safety factor. Its role is to ensure that the equipment does not operate at the limit of its own capabilities, but has a reserve of power reserve.

As a rule, for heating one square meter, power is required in the range of 120-180 watts, in the case of glazed loggias and balconies, the indicator increases to 180-250 watts per square meter. The power can vary depending on whether the system was installed with the aim of the main heat source or additional:

  • if the installation is planned as the only heat source, more than 70 percent of the floor surface is covered,
  • if the structure acts as additional heating, cable laying takes place only on a surface where furniture or household appliances are not provided.

Having calculated the cable power for each individual room, its length is calculated by the formula: h (cable laying step) = S (area of ​​the insulated surface) * 100 / L (total cable length). The cable, depending on the power, has a standard length. Trimming it is not recommended - if necessary, the step of laying it during the installation process changes. It is important to remember that such a calculation should also take into account the wire for connecting the entire structure and the regulator from the meter to each element of the system, since the connection of the warm floor does not allow a direct approach to the outlet.

In the case of laying film warm floors, the calculation process is simplified as much as possible - the total number of heating elements should completely cover the entire area of ​​the room.

Distribution of heating elements and control units

Before you install an electric heated floor with your own hands, it is recommended to take care of creating a plan for future work. It is important to note here that the installation of a cable or film is not provided in places where massive interior items or electrical appliances are planned to be placed in the future.

Being in the same plane, the operation of the heating devices occurs evenly. If there is pressure or an obstacle in the form of heavy furniture, then the heating elements overheat, which provokes their failure. There is also a risk of furniture damage due to overheating.

The heating wire is often laid in the wrong shape. Any rearrangement of furniture after completion of work is undesirable - there may be malfunctions during the operation of the system. Therefore, for different rooms, experts advise taking care of creating separate contours of the underfloor heating, supplemented by independent regulators and power. Provided that the installation of a warm electric floor is carried out under the screed, a damper tape is installed between the elements.

To install the underfloor heating controller, a hole for the mounting box is prepared on the wall surface in the selected place. From a recess in the wall to the floor, a groove or a shtrobo is made into which wires are then placed. The place for the future thermostat for an electric underfloor heating should be convenient and inconspicuous, however, the height from the floor should be 30 - 40 cm.

Surface preparation

Before direct installation of the heating cable, a set of preparatory work is carried out: laying of an electric heated floor is allowed exclusively on a flat surface. You will need to perform the following steps:

  • dismantling of the previous finishing material,
  • the base of the floor is cleaned of various debris and dust. The ideal solution would be to use a construction vacuum cleaner, but for lack of this you can resort to an ordinary old vacuum cleaner or broom for help,
  • the cleaned base is inspected for bumps and other defects. For starters, you can try to smooth them mechanically (wipe). If this method is not successful, then the base is covered with a screed. The choice is recommended in favor of quick-drying mixtures, since drying a classic cement-sand mortar can take up to two weeks, depending on the area of ​​the treated surface and air temperature. The height of the screed can vary between 3-7 cm (with a layer thickness of less than 3 cm, the screed can crack)
  • for better adhesion of the self-leveling mixture to the surface, it is recommended to cover the floor with a primer,
  • after the screed has completely dried, you can proceed to the thermal insulation of the base.

Careful alignment of the base is necessary for the reason that any bend or unevenness in the path of the cable can provoke a breakdown. As a result, there will be a breakdown of the heating system, the repair of which will be financially costly. In detail, read how a screed is made for a warm floor, so that everything goes without errors.

Features of base insulation

In order for electric floors to fully heat the room, it is necessary to take care of the thermal insulation of the room. The fact is that during the operation of the system, heat spreads in all directions, which contributes to excess energy consumption. To correct it, previously insulating material is placed under the heating elements (heat will be sent exclusively to the heated room).

The choice of insulating material depends on the characteristics of the room where the warm floor will be laid:

  • if there is a heated room below (applies to apartment buildings), it is enough to use rolled foil material with a thickness of not more than 4 mm. The roll is cut into segments with a suitable length, laid out on a rough floor and fixed with a construction stapler. If desired, the joints are processed with mounting tape,
  • if there is an unheated room below (basement or garage), extruded polystyrene foam, polystyrene or any other similar material supplemented with a foil layer is used as insulating material. In this case, the insulation thickness varies between 5-10 cm.

If it is planned to insulate a room with a high humidity level with a warm floor, the heat-insulating material is additionally treated with waterproofing.

Installation process

At the preparation stage, a thermostat is installed for the electric underfloor heating. In the process of preparing the base, a corresponding recess in the wall under the thermostat has already been created, as well as a strobe for its wire.

The temperature sensor is placed between the heating lines with cables at exactly the same distance. It is important that the heat controller is in the sure zone of heating: a common mistake is its installation behind the first line of heated elements and as a result the sensor is in the area with insufficient heating. Therefore, it is necessary to arrange a corrugated tube with a sensor, at the end of which a plug is mandatory, at least 50 cm from the wall so that the correct temperature readings can be obtained.

Heating cable

When laying the material, you should start from the point where the power wires are connected to the thermostat. A steel mounting tape is mounted on the thermal insulation (dowels or self-tapping screws are used for fixing), and the cable is laid on top of it with a predetermined step. Mounting tape is used for fixing.

After connecting all the structural elements, the underfloor heating is connected to electricity, thereby checking the absence of possible damage and facilitate the management of the underfloor heating.

In the absence of defects, the screed is poured. The use of such a solution, designed for underfloor heating, will allow you to start finishing in 3 days, however, connecting an electric underfloor heating at this stage is still not allowed: a complete scramble and drying of the screed takes up to 30 days.

Heating mats

In order to avoid overheating of the system, preliminary thermal insulation is not carried out. Since the material has the form of a roll, it should be rolled out on the floor, and the desired direction is set using scissors (it is important to prevent damage to the cable).

Such material is supplemented with adhesive tape, which greatly simplifies the installation process. No additional clips are required in this case. When the heating mat will fit snugly to the base, it is covered with tile adhesive. It is important that the cable does not protrude above the floor. The design dries no more than 5 days, after which you can begin to work with finishing materials.

Heating film

The heating film is mounted as electric mats, but there are some differences:

  • I cover the prepared work surface with a heat-insulating substrate, supplemented with a foil film,
  • heating elements are laid out on the floor, but it is allowed to cut the film completely in the places provided. Cut points are isolated, and power wires are connected to the other side of the material. Individual sheets are joined in parallel,
  • after fixing all the constituent elements, the system connects to the network and checks its performance. No additional screed is carried out.

Correctly selected materials, the absence of errors at the installation stage and a well-executed wiring diagram are considered a guarantee of long-term use of a warm electric floor and a comfortable microclimate in your home.

Stage 1 - creating a project and performing calculations

The beginning of work on arranging the system of an electric heated floor begins with the choice of the type of heating element.

Depending on this, these types of systems are distinguished:

  • cable floors. For the supply of heat, a heating cable is laid on a prepared base. Cable installation is carried out using additional fasteners or mesh,
  • heating mats. In this case, the heating cable is placed in a special heat-conducting mat and is located inside in the form of a "snake". The use of mats significantly reduces the time for the design and installation of cables,
  • film floors (infrared). Heating is carried out by installing a special IR film for a warm floor.

Types of electric underfloor heating

Options for laying heating cables

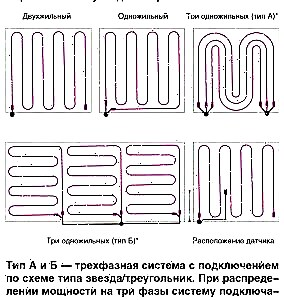
Options for laying heating cables for electric underfloor heating Options for laying heating mats with rotation of 90 and 180 degrees

When developing a project for a warm electric floor, it is necessary to take into account the fact that there are various approaches to the installation of systems that differ in the way of laying the cable:

  • mounted in screed
  • stacked on top of the screed under the tile, laminate,
  • It is laid directly on the screed under the final coating (film (infrared) warm floors).

The developed project contains the following information:

  • calculation of electric floor heating,
  • place of installation of heating controllers and power supply,
  • place of installation of the heating cable in each of the rooms,

Sample project for the bathroom

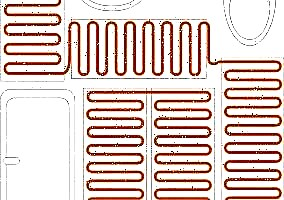
Layout of cable underfloor heating in the bathroom The project of electric underfloor heating in the bathroom

One of the drawbacks of a warm electric floor is the inability to make a rearrangement of heavy furniture, because It is extremely undesirable to put furniture on the cable, this can lead to a violation of its integrity.

Calculation of electric floor heating

Calculation of the system by capacity depends on the heated area and can be performed by the formula:

P - system power, W / sq.m.

P is the power of the heating element, W,

S - area of ​​the room, sq.m.

Note: calculation of underfloor heating is performed for each room separately.

For calculations, you can use the tables developed by manufacturers of cable underfloor heating. These tables take into account the heat loss of the room, the step of laying the cable, the total cable length in the room. In the case of a film floor, the number of sections covering a given area is selected.

Stage 2 - verification of existing wiring

The device underfloor heating is characterized by significant electricity consumption. This makes it necessary to check whether the existing wiring can cope with the load that falls on it.

In the calculation process, the current cross-section of the cable is taken into account.

If the calculation shows that the old wiring can not cope with the new load (the diameter of the cores does not correspond to the load), you should either replace or install additional wiring (directly from the shield), designed exclusively for servicing a warm field.

Power consumption of electric underfloor heating per 1 m2 is shown in the table:

Room purposeOptimum power, W / sq.m
Kitchen100-130
Bedroom
Living room
Hallway
The corridor90-110
Bathroom120-150
BalconyUp to 180

An example of a project indicating the location of furniture, key components of the system and major distances.

Electric Underfloor Heating Project

Stage 3 - selection of equipment and materials

The electric underfloor heating system includes:

  • heating cable
  • connecting wires
  • regulator, temperature sensor,
  • protection system (residual current devices),
  • grounding cable (copper),
  • other material: fasteners, dowel-nail, damping tape, chalk (for marking).

A standard tool is used for work: hammer, chisel, punch, metal scissors, tape measure, screwdrivers.

Types of heating cable for underfloor heating

The choice of a heating cable is of decisive importance, therefore, you should be aware that its types are used for installation:

  • resistive cable. The heating element is a core, characterized by increased resistance. Due to this resistance, the current moving along the cable is converted into thermal energy,
  • self-regulating cable. In this case, heating is due to the polymer matrix. A feature of the self-regulating cable is that overheating is excluded. This type of cable is distinguished by high cost, but also a longer period of operation.

3. Laying insulation

Often, under a warm electric floor, penofol (foamed polyethylene with foil) is mounted. Penofol insulation is a reflective insulation, the peculiarity of the material is its small thickness, the presence of a foil layer (which allows heat to be reflected) and a self-adhesive layer (simplifies the installation process, eliminates the movement of the insulation during cable laying). At the same time, the thermal conductivity coefficient of penofol (at a temperature of 20 ° C is equal to 0.031 W / mK).

Foiled foamed foil is laid up, butt, and the junction of the strips is glued with tape.

In addition to penofol, as insulation can be used: polystyrene foam or polystyrene (with a density above 25) with a layer thickness of 20-50 mm. When installing the system underfloor heating on the balcony, it is recommended to bring the thickness of the insulation layer to 100 mm.

After laying the insulation, the room, around the perimeter, is glued with a damper tape. The purpose of the edge band is to compensate for the expansion of the floor covering during heating.

Since it is recommended to use a solid thermal insulation material, which is characterized by an extremely low hygroscopicity, it is impractical to install a waterproofing mesh.

4. Installation of a temperature regulator

The temperature controller for a warm floor is a control unit, which can be with an external or with an integrated temperature sensor (measures the temperature of the floor). There are temperature controllers with an additional air sensor. The purpose of the thermostat is to provide the ability to regulate the degree of heating of the room and energy consumption.

It is connected to the mains, as well as to the cable of the electric floor through the wires that are laid in the corrugation. Using corrugations will allow performing repair work (if necessary) without violating the integrity of the screed.

5. Mounting the temperature sensor

The temperature sensor for a warm floor is installed directly in the floor, more precisely in the corrugation. At the same time, the masters note the importance of cutting insulation and “warming” the corrugation so that it does not rise much above the heating elements (cable or mat). The bend angle of the corrugation should be smooth to avoid bending the wire and cracking the corrugation. It is recommended that the end of the corrugation extending into the screed be sealed with sealant.

Note: The heat regulator and heat sensor are mounted in each room.

6. Laying the cable underfloor heating

After the service equipment is installed, you can proceed directly to the installation of the cable. Laying an electric floor heating is performed in two ways:

  • by installing heating mats. These are ready-made canvases that are good in that they allow you to perform styling quickly and at the same time eliminate the possibility of cable bending or violation of the optimal distance between adjacent loops. The heating mats are attached to the insulating material with tape. The distance between adjacent mats is 50-100 mm, between the mat and the wall - 150-200 mm,
  • by installing a special tape with fasteners for cable or metal mesh (a plastic clamp is used as a fastening element, which should not be tightened strongly). With this installation method, the cable is placed by a snake, attention is paid to observing the specified distance between the cable loops.

If there is a joint on the floor of two floor slabs, then in this place it is advisable to lay the cable in the corrugation. This compensates for the possible thermal expansion of the panels and reduces the risk of damage to the underfloor heating system.

The view of the electric floor before starting to fill the screed is shown in the photo.

Stage 5 - checking the electric underfloor heating

Before pouring the screed, you need to check the performance of the system electric underfloor heating. The pre-operational check includes measuring the resistance of the wire. If the deviation from the previous ones, the test is negligible, you can begin to fill the screed.

Measurement is carried out using a multimeter or tester, and then a megohmmeter (used to measure high resistances, above 1,000 V). The result should not be lower than 10 megohms.

Stage 6 - pouring screed

Laying an electric floor heating in the screed is done using a cable or heating mats. In the case of film floors, installation is done without screed.

For the installation of an electric floor in a screed is used:

  • concrete screed. The classic mortar for concrete screed consists of 4 parts of sand, 1 part of cement M400, 0.5 parts of water.When using cement M200, the ratio will be 2: 1. To increase the elasticity of the solution, you can add plasticizers (1%). The advantage of a plasticizer in cheapness, the lack of a long period of complete drying,
  • bulk floor. The height of the bulk floor is 3-10 mm. Therefore, it must be applied in several layers. Bulk floor is recommended when an electric heated floor is laid under the laminate,
  • tile adhesive. Tested according to user reviews, an option that is advised to give preference if an electric underfloor heating is installed under the tile.

Regardless of the type used for screed material, the optimal height (thickness) of the screed is 30-50 mm.

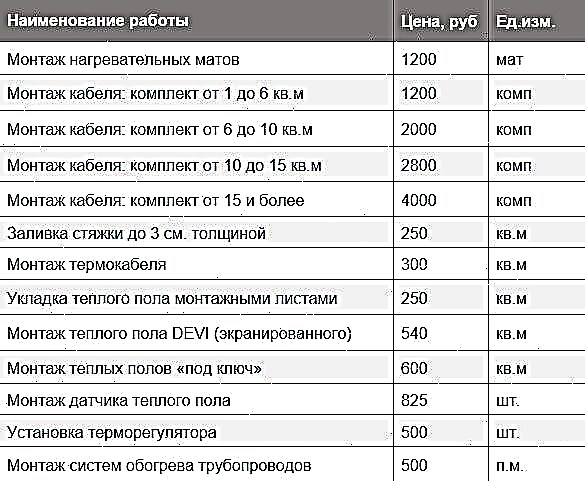
The cost of installing a heated electric floor per 1 m2

As you can see, the installation of an electric floor does not cause great difficulties. The table below shows the cost of installation with the involvement of hired craftsmen. On average, the price per m2 for turnkey installation is 600 rubles / sq.m. excluding the cost of materials.

After analyzing the proposals of different companies, the cost of installing an electric heated floor with materials will vary from 2,000 to 4,700 rubles per square meter (according to the end of 2016). At the same time, the minimum price is valid for orders of 250 sq.m. or if the announcement was given by a private master, and not a construction company.

Thus, doing the installation of an electric heated floor with your own hands is an opportunity to significantly save on work.

Electric floor heating installation - errors

Here are some common mistakes that, as evidenced by the reviews of home masters, are very common:

  • purchase of excess material. The error is due to the fact that in the calculations the user focuses on the total area of ​​the room, and not on the one that will serve as the basis for the heated floor. The calculation does not take into account the area occupied by furniture and heavy household appliances (refrigerator, washing machine),
  • the cable used in the heating mat cannot be cut. You need to choose such a stacking scheme in order to use the mat fully. It’s better to leave part of the floor surface uncovered,
  • Do not turn on the underfloor heating system until the screed is completely dry, as this can lead to uneven drying of the layer and the appearance of cracks and voids.
  • the cable must not be laid on an unprepared surface. It is better to treat the surface of the subfloor with a primer to eliminate dust, which can lead to air pockets around the cable and cause it to overheat,
  • the temperature sensor is placed in the corrugation, so it can be removed and repaired if it fails,
  • resistance measurement is an important step in the pre-operational test of an electric floor; do not ignore it. If there are significant deviations, you need to make a decision to correct the situation on your own or to attract professionals,
  • The cable management scheme is useful when moving furniture and performing repairs or maintenance. The easiest way is to photograph the mounted floor before pouring the screed.

Electric underfloor heating is unpretentious in operation, reliable (when choosing good components and proper installation) and will last a long time.