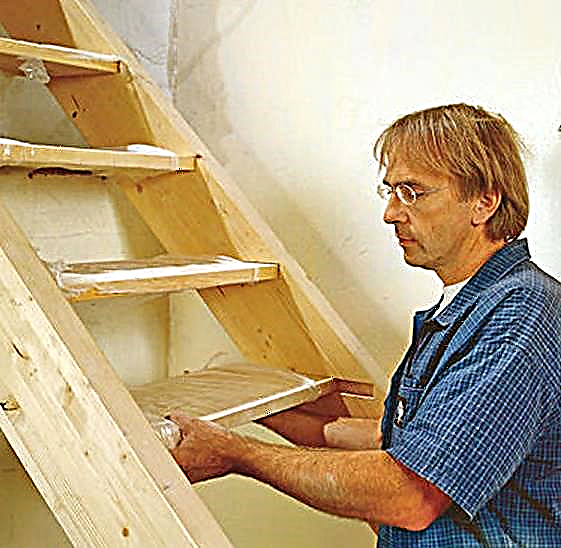
When building a house, many include an attic in the layout. Naturally, one cannot do without a ladder. To make the descent and rise as comfortable as possible for all the inhabitants of the house, we suggest exploring all the nuances of this design and the requirements for its construction. Creating an attic staircase with your own hands is not a difficult task, it is enough to have all the necessary materials, drawings, tools and allocate some free time.
Options for folding stairs to the attic
Built for permanent use. Reliable, safe, convenient, but takes up enough space.

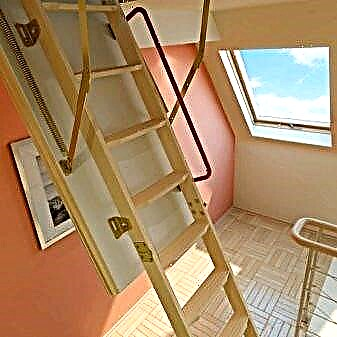
Foldable with sunroof. It is installed at the entrance to the attic hatch. It is compact, but differs in less reliability and safety in relation to the previous one. Depending on the type of construction, it can be hinged, scissor telescopic or lever.
- Scissor - most often completely metal. The folding mechanism resembles an accordion. In the process of caring for the structure, lubrication is necessary, otherwise, over time, squeaking cannot be avoided.

- Telescopic - usually aluminum, fairly light and stiff. When unfolding the sections of the stairs, one of the other is advanced.

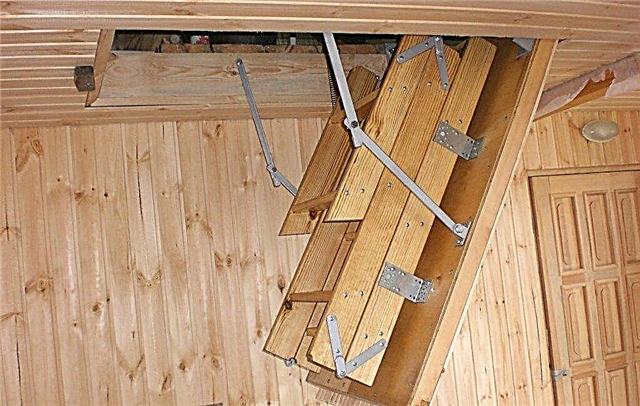
- Folding (lever) - two-, three- or four-section design. The first part is attached to the opening of the hatch and is equal to its size. The remaining sections, connected by hinges and hinges, are laid out in a flight of stairs.

- Hinged - in assembled condition it is fixed on the wall. To attach the steps to the bowstring, card loops are used.

Attached (stepladder). The least safe and extremely inconvenient for daily use.

Attic staircase requirements
- Security. The design must be reliable and durable. This applies to both the material used and the fixtures. In some cases, anti-slip pads for steps are recommended.
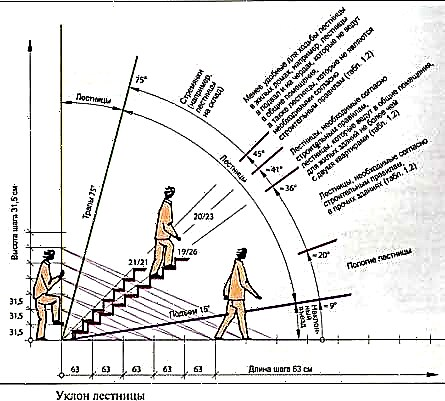
- Parameters of the stairs. For comfortable use, steps with dimensions of 70 cm (width) x 30 cm (depth) x 20 cm (height) are considered optimal. From the point of view of safety and reliability, the total length of the entire structure should not exceed 3 m. The recommended inclination angle is 45 °. Although options are possible from 60 to 70 °. The classic design has 10 - 15 steps with a thickness of about 2 cm. The surface of the steps must be parallel to the floor. The design must be able to withstand a load of at least 150 kg.
- Sizes of the hatch. The most optimal option is 120 x 70 cm. If you make it smaller, it will be inconvenient to use, a larger opening will contribute to a very significant heat loss. If there is no heating in the attic, heat and steam insulation for the hatch can be provided.
The location of the stairs
Stairs to the attic can be external and internal. The latter, of course, is much more convenient, you can climb into the attic without leaving your home. The structures are usually located in the corridor or hall. It should be placed in such a way as not to interfere with the free movement of residents. It is important to remember that the area occupied by it in the unfolded state of space is inversely related to the angle of inclination. The smaller it is, the more space will be required.
Simple two-piece staircase
For individual sizes, we make a simple ladder.
Next, the finished flight of stairs is cut into two unequal parts (1/3 and 2/3). They are fastened together by card loops, and the design becomes folding. A wooden beam is mounted on the wall under the hatch. With the help of hinges, a staircase is fixed to it.

In order not to open, the ladder is fixed on the wall with a hook, a loop to which is located at the point where the sections are connected.
The main disadvantage of such a ladder is that it will not be possible to hide it in the hatch. If it is important for the owners that the design does not spoil the appearance, a three-section staircase can be made.
Three-section staircase
The finished design will look as follows.
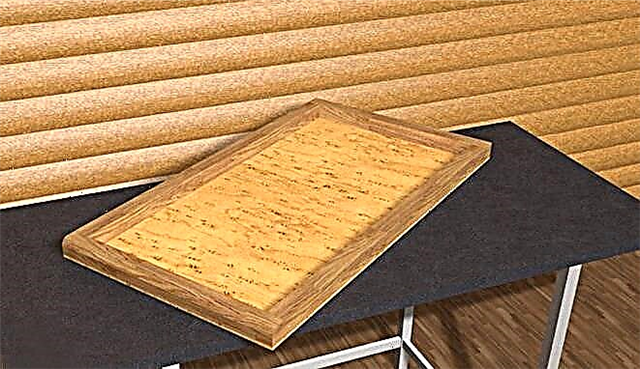
First of all, a manhole cover is made. From a plywood sheet with a thickness of 10 mm, we cut the workpiece. In size, it should be larger than the hatch itself by 8 mm around the entire perimeter. With such an allowance, the lid will be freely closed, while maintaining thermal insulation properties.
For the manufacture of the hatch frame, we need 4 beams, equal in size to the length and width of the cover (section 5 x 5 cm). 2.5 cm deep cuts are made at their ends, they are coated with glue. The bars are fastened with self-tapping screws. To make the diagonals perfectly even, you can use temporary scarves from thin plywood sheets. When the frame is ready, the kerchiefs are removed and the cut blank of the manhole cover is fixed on it with the help of self-tapping screws.
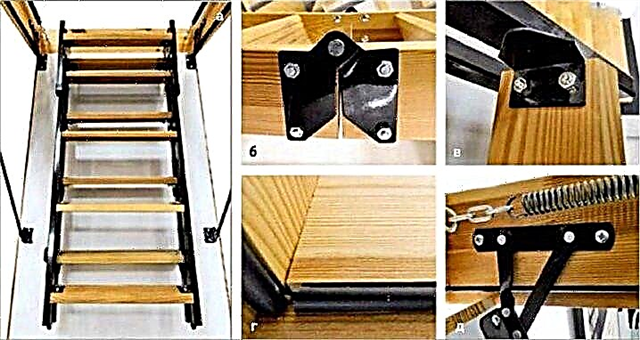
The next stage is the manufacture of the staircase mechanism itself. This is an option on hinges without a spring. The entire set of parts for it can be purchased at the store, but we will tell you how to make it yourself.
First, on the sheets of cardboard, you should recreate the drawing of the planned staircase, taking into account the opening angle of the hatch. We try on the cut out model on the spot. This will help us determine the required joint length.
For the manufacture of one mechanism, we need metal elements: a rectangle, 2 strips of different sizes, a corner. We drill holes for hinges for bolts No. 10. We assemble and tighten the parts. With the help of a small measure the angle at which the hatch will open and open the structure to the desired angle. On the rectangle, select the area overlapped by the obtained angle, and cut it out with a jigsaw.
We cut the excess from the strips of metal and round them at the ends. Now the corner can be locked in the required position.
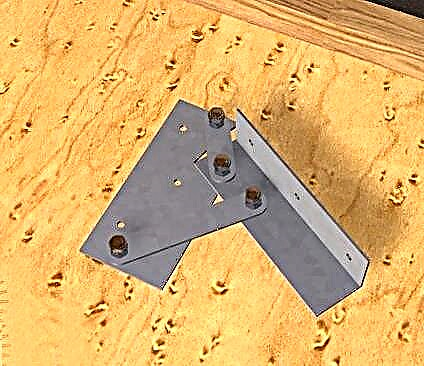
Next, we make a similar element in the mirror version. For this, each pair of parts is fixed on the clamps. A hole is drilled into which a bolt is inserted. Next, a second hole is drilled. The blanks are twisted with two bolts and leveled in length. In this way, all elements are created.

The resulting mechanisms are mounted to the cover. The fabricated structure is hung on the hatch.

Now let's make sections. Their dimensions will be: the first - 90% of the length of the hatch, the second - 90% of the length of the first, the third - the length of the flight of stairs, minus the lengths of the first two.
We need 15 pogs. m. of boards (10 x 3 cm). We mark them according to calculations, the march angle is transferred to the bowstring. The bowstrings are mounted in a mirror way, this must be taken into account when marking and drilling. Holes are made at the connection points of the parts of the stairs - in a mirror image through one.

According to the calculated section sizes, we cut the boards into bowstrings. Using a file we process holes. Cut the steps. All elements are polished, chamfers are rounded off. Next, using the chisel, according to the marks made, we cut out the grooves under the steps.

Each part of the structure is pulled together with self-tapping screws using wood glue.

We make loops from metal strips 2 cm wide. We should get four strips 16 cm long and four strips 12 cm long. Paws are welded to the short ones, in which a hole of 0.8 cm is pre-drilled. The length of the short strips with the paws should be equal to the long ones. Now we have eight elements with equal length, four of them have a step. We twist the mechanisms with bolts.

Now we carry out the general assembly of the flight of stairs on the manufactured hinges.

For fastening the structure to the manhole cover, we do not recommend using self-tapping screws. For this we need bolts - they are more reliable. Having completed the assembly, we carry out the test. If everything worked out and you do not need to adjust the mechanism, remove the stairs to stain. For processing, varnish and spray paint for metal are recommended.
A do-it-yourself folding ladder to the attic is ready. In the future, you can supplement the design with handrails, a lock-lock, springs and additional hinges to eliminate play.

Features
An attic staircase is necessary not only in a house with an attic, it will be needed even if the attic is not used for housing - for access to the roof, repairs, laying of communications. There are many types and designs of it, but the main thing is that it provides a convenient descent ascent and is safe.

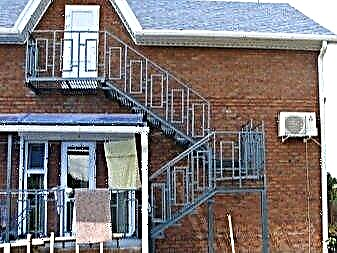
One of the simplest options is an attic staircase located outside the house. It is elementary to make it, but in cold weather it will not be very comfortable to climb into the attic, and the attic opening to the street will let in cold air, which will generally increase heat loss inside the apartment building. Therefore, it is better to immediately choose the design of the stairs to the attic from the inside.

The attic room can be used in different ways. It can serve as a full-fledged living room, be a workshop, a pantry. Depending on its purpose, it is worth choosing the type of attic stairs. If access to the attic is required several times during the season, then you can get by with the simplest folding model made of wood or aluminum, and if there is a bedroom or a nursery on the top, you should definitely make a durable and comfortable design with a hatch and railings.

The task of making a staircase for the attic with your own hands is not too difficult for an experienced master, the main thing is to pre-select its type, shape, location and pre-create drawings with dimensions. The simplest folding options are made in one day, the more complex models with railings and two spans can be built in 2-3 days. Most often, the entrance to the attic is done in the hallway, on the veranda, but it can be built in any other residential building.
All types of attic stairs can be divided into portable and stationary. Portable options are ordinary step ladders that are attached to the attic hatch and used for their intended purpose. Constantly going down and climbing them will not bring much convenience, especially to children or the elderly, and they are also unsafe. Their advantage is that they are easy to manufacture, do not take up much space in the room, if they are not in demand, then they can simply be removed to any free place.


Portable stairs are most often used as temporary (during construction or repair), in the future it is best to build a more reliable and convenient option.
Folding construction is usually made of aluminum, as it is durable and lightweight. Below are the support beams for stability, the width can reach 65 cm. The step pitch is usually 10–20 cm, there can be one or several sections. The longest is a 4-section model, but such a height is usually not required, for a floor height of 2.5–3 m, two sections are enough.
The folding attic ladder according to the mechanism of its dismantling can be:
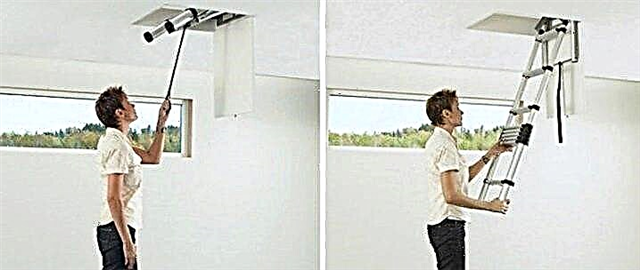
The aluminum sliding attic staircase is good in that it can be easily folded to the desired length and is securely fixed, and when folded it takes up very little space, it can be leaned against the wall or put in the attic. All such designs can be easily found in hardware stores, so you don’t even have to do anything on your own.
Another option is to mount a makeshift staircase with a folding part. It can be mounted on the ceiling door or hatch, then it is easy to recline and unfold. Sections can be 2-3, in the unfolded state it turns out to be rigid and stationary. For the installation of its frame and steps, solid wood is used, and for the fastening and folding mechanism, metal parts. With a competent design and accurate work, such a design can be automatic, very convenient and completely safe.


An interesting option for compact designs that are mounted from the inside to the attic is the scissor ladder. They are most often made entirely of metal, and when you open the flaps in the attic, they are laid out in the likeness of an accordion or a tram current collector. The frame is very light, easily attached to a wooden hatch with bolts. The disadvantage is that after some time of intensive use, the metal parts begin to creak. Therefore, one must not forget to lubricate them periodically.

A type of retractable is a telescopic attic staircase. It consists of many aluminum tubes that fold one into one. When folded, it takes up little space, is easily attached to the attic hatch. In order to decompose it, a special handle is provided. But such models are not very popular.
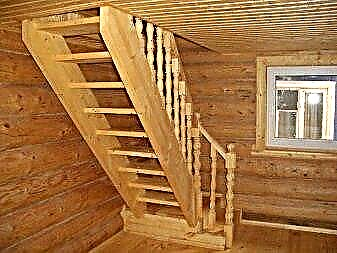
A very common option is monolithic stairs, that is, not folding and not portable. Such lifting structures, although taking up more space, are sturdy, do not need moving parts, and can last for more than a decade. They can be made of high-quality wood, equipped with handrails, and the under-stairs space can be used with maximum benefit.

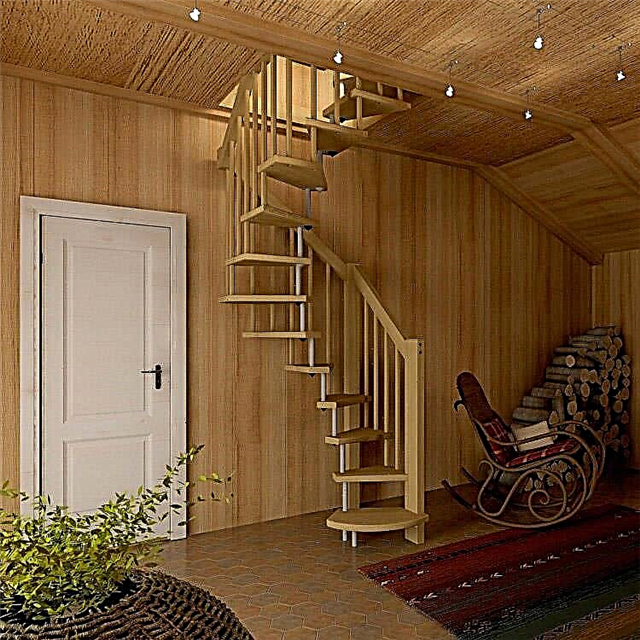
Single span monolithic staircase - the easiest to manufacturebut it may be too steep, which will cause inconvenience with regular use. The most convenient may be a design with two spans located perpendicular or parallel to each other. The only problem is that it will take up maximum space. To save space, many craftsmen erect a spiral staircase in a small room.

Monolithic stairs to the attic or attic with one or two spans are made of wood, but there are also models with a metal frame with wooden steps. Most often they are made in a secluded, most unclaimed place in the room. A good solution is to place them against the wall or in the corner of the room.

Materials
The attic staircase can be metal and wooden. For sliding and folding structures, it is better to use metal, which will wear less with constant friction of parts.
Most often, aluminum is selected, which is lightweight, durable and not subject to corrosion.

Stair fittings include hinges, bolts, springs, which can be made of stainless steel.
A stationary and monolithic staircase to the attic is best made of wood. It is easily processed and fastened. Usually choose hardwood: oak, beech, pine. The material should be well dried, varnished and antiseptic. For the frame and steps, bars of at least 2 cm thick are taken.
Hardware
When mounting a wooden monolithic staircase, only ordinary nails will be needed to fasten the parts. Sliding or reclining ceiling options will require more sophisticated components. To open the attic hatch you will need metal corners and strips, hinges, hinges, bolts or self-tapping screws. The number of parts is selected depending on the length of the stairs and the number of sections.
Mounting
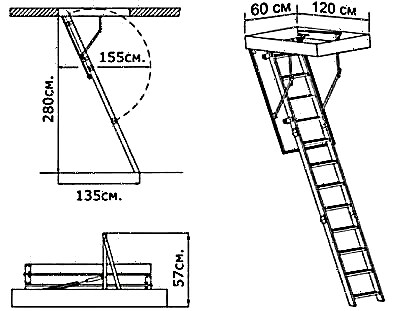
As an example of manufacturing a convenient and safe staircase to the attic, you can consider the device of a folding model of three sections, which leans up on the ceiling hatch. It can be built independently in almost any country house with wooden ceilings with a height of up to 280 cm.
Step by step it is made in several stages.
- First you need to make an attic hatch. The ceiling opening can have any size, for example, 80x70 cm. The hatch itself should be easy to open and withstand the design of the folded staircase. For its manufacture, 5x5 cm bars and plywood 1 cm thick are taken.The bars, cut to the size of the opening, are connected with glue and self-tapping screws, for rigidity, the frame can be strengthened with metal corners. Then plywood is nailed to it with the help of thin nails.
- Next, you need to install the hatch on the ceiling using hinges so that it easily and smoothly opens and closes. At this stage, it is important to correctly select and mount the articulated mechanism. There should be enough space in the attic for the sunroof. If the room under the roof is cold, then it is necessary to additionally insulate the attic hatch, placing some insulation between the plywood layers, sheathe the edges with a rubber seal so that there are no cracks.


- After that, you need to make the staircase itself. For it, a 2x10 cm board is taken, sections of the desired length are cut out. The steps need not be fixed at a right angle, but at an angle according to the angle of the stairs themselves, that is, when unfolded, they should lie horizontally.
- Further, the sections are fastened with metal hinges in such a way that the whole structure can easily be moved apart and folded. The assembled ladder of three sections is mounted on the hatch using metal corners.
- Next, you can attach a convenient handle, latches or locks to the attic door.
Another example of an attic staircase in a wooden house that you can do yourself is a stationary monolithic structure with one span. A place for her should be chosen in the corner of the room, so that on one side the flight of stairs rests on the wall. Since the climb will be quite steep, it is best to equip the stairs with wooden railing. For the frame and steps, 10 cm wide boards are selected.

Steps are sawn 650 cm wide, the step between them should be 10-15 cm, the length will depend on the height of the ceiling. For handrails, you can take polished beams 5x5 cm. Installation takes place on anchors or screws. If necessary, a hatch is mounted on the attic opening, opening with hinges with hinges.
The advantages of this design is that it is easy to assemble and install, has a pleasant appearance, and is easily dismantled during repair.
Tips & Tricks
It is not recommended to mount a wooden staircase with one section longer than 3.5 m, since its rigidity suffers, the structure has the risk of collapse. In a private house with high ceilings, it is better to use a monolithic version with 2-3 spans. If the height of the floor is large and there is not enough space, then there is a good option for a spiral staircase. But such structures are not very convenient, there is a big risk of falling.
The stairs to the attic from the street can also be made stationary, adjacent to the wall of a wooden house. But this option is only good for a warm climate, or if it is used irregularly. Often such projects are used in houses with an attic for additional entrance to the upper room. If the possibilities to build a strong and beautiful internal structure do not allow, and you need to use the attic regularly, then you can create the simplest temporary street option.

For ease of use, steps should have a pitch of not more than 20 cm, but too often they should not be placed. The optimal height is 19.3 cm.
If they are made of wood, their thickness should be 18–22 mm, otherwise the ladder has the risk of collapsing. In a building up to 280 cm high, the number of steps of a single-span staircase will be 14–15.
The optimal angle of inclination of a folding or single-span staircase is 60–75 degrees. If it is less, then the steepness of the rise is too large, it becomes uncomfortable and dangerous to use. If the slope is greater, then the design will take up a lot of space in the room. In general, it is calculated that for a comfortable lift, the total span in this model should be 35 cm greater than the height from floor to ceiling.
The calculation shows that the optimal length of the steps should be at least 65 cm, then you can freely move along it. But if space allows, you can increase this value. A folding or single-span wooden staircase must support a weight of 150 kg. The width of the steps should be at least 20 cm, then it will be convenient to step on them.

There is an opportunity to buy ready-made folding mechanisms for attic stairs. But at the same time, their sizes must be correctly taken into account so that they fit folded into the ceiling opening, are securely attached to the hatch, and when unfolded are just the height of the room.
If it is decided to do such an ascent to the attic independently, then it is worth creating a detailed drawing with dimensions, calculating the possible load, drawing up an estimate that includes building materials for the frame, steps and railings, accessories and fasteners, insulation for the hatch.
Unlike handrails, steps are best not made from smooth polished wood. In this case, the surface will be very slippery and there is a high risk of falling, especially with a large slope or screw version. If the wood is still too smooth, it is best to equip the steps with anti-slip stickers.
Good examples and options
The scissor staircase to the attic is easy to install, relatively cheap. But it is not so comfortable when climbing, and the view is not too attractive.

A folding wooden staircase, attached to the hatch, looks beautiful. As you can see, the mechanism is equipped with a special handle, so no steps and stools are required.

A beautiful version of a monolithic wooden structure with original steps can be made and assembled with your own hands.

A nice looking folding design with a sunroof is a very simple device. Installation is quick and easy.
A monolithic staircase made of wood with a railing is characterized by practicality and convenience. For its installation will require a minimum of materials and fasteners.

Instructions for making stairs to the attic with your own hands in the next video.
Design Features
The design of the wooden stairs is not much different from her metal sisters.
- Screw models do not suit us, there all the elements need to be calculated personally, but for an amateur it is difficult.
- The best option would be direct marching stairs.
 A spiral staircase will have an original look, but it is problematic for an amateur to assemble it
- Marching stairs to the second floor and to the attic differ only in the angle of inclination. In our case, the angle of inclination varies between 45º – 75º.
- The height of the steps is also determined by the angle of inclination, the steeper the design, the more often the steps are mounted, but according to the rules, for comfortable use the riser height should be from 15 to 23 cm.The number of steps is calculated from the same data.
- The size of the tread is 20–40 cm.
- In the calculations, you need to start from the top of the structure, because the height of the lower first stage does not really matter, often it is less than the rest.
Advice! To make it convenient for you to walk, the stairs should have an odd number of steps.
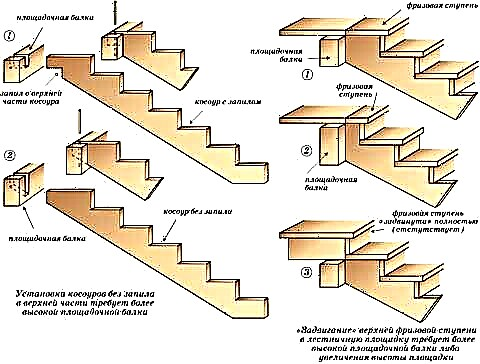
- Straightmarching construction done on kosoura or bowstrings. There is a small difference, in the first case, on the kosour (guides), the step is mounted on top, and in the second case it is inserted between the bowstrings.
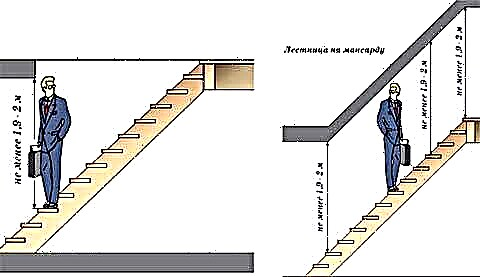
- Ladder heightcounted vertically from the floor of the first floor to the final floor of the attic. It is important that when lifting a person does not cling his head to the edge of the hatch. According to the rules, the minimum distance from the step to the edge of the opening vertically is 190 cm.
 The simplest design of a ladder made of wood on bowstrings
Self-assembly steps
For the attic, the ladder on the bowstring is considered the most suitable. The instructions there are simple, plus a little tool and material.
- To make a wooden structure, we need a planed board 200–250 mm wide and 30–40 mm thick.
- The length of the board depends on the size of the structure, because 2 whole bowstrings will be made of it.
- Theoretically, steps can be made from a 25 mm thick board, but it is more convenient to purchase one board for both a bowstring and steps.
Additional accessories and tools will be discussed during assembly.
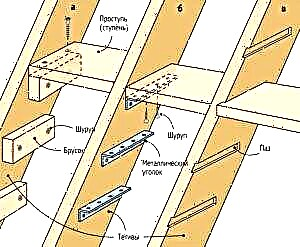
Methods for attaching steps
There are 3 ways to fix the steps:
- Small wooden blocks are screwed to the board from the inside and treads are already placed on them.
- Inside treads are fixed on the board with metal corners.
- In bowstrings, grooves for treads are cut, steps are inserted into them.
 From an aesthetic point of view, the groove option looks better than competitors
Bowstring Installation
The first are marked and cut at the right angle 2 bowstrings. After trimming and fitting, you need to immediately mark on the floor of the first floor and on the box of the attic hatch the fixation points of the structure.
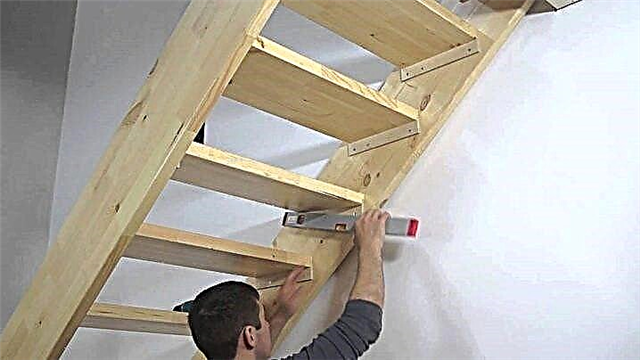
- Step Marking. If you are not sure that you can accurately calculate the angle of inclination, then install (without fixing) the bowstring in its place and, having attached a level to it, mark the horizon for the first step.
- Template. Now you have the angle of the steps relative to the bowstring. To mark the remaining degrees, you can use the small one or make a homemade template from cardboard.
 It is more convenient to cut out the grooves under the steps with a hand circular saw, but for lack of such a regular hacksaw can be used
Important! The depth of the groove under the step should not exceed 1/3 of the thickness of the bowstring.
- After marking up one bowstring, fold the boards together and copy the marking onto the second bowstring.
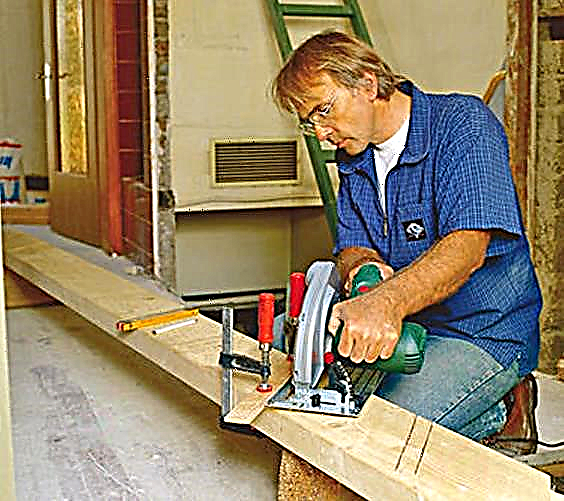 The circular saw is convenient in that it can be set to a fixed cutting depth
 - Grooves. Then take a wide chisel and carefully select the grooves throughout the depth of cut. A blind groove, as in the photo below, is also done with a chisel. First, choose everything that is possible, and then put the chisel vertically and cut the side.
 A blind groove is selected with a wide chisel
- Place both bowstrings on pre-marked points and fasten them with metal corners. Screw the bowstring with screws, and drive the anchor into the floor.
Important! Before final fixation, measure the distance between the bowstrings several times at 3-4 points, everything should be the same.
For more solid support on the floor, from below under the bowstring you can cut and fix a wooden corner from the same board
 Installation of steps
It is advisable to measure and cut the steps after installing the bowstring. The grooves are small and if you make a little mistake, the boards will go loose or burst the bowstring.
- It’s faster to make steps under the steps according to the template so that everything is the same, but it is better for the amateur to cut and adjust each element separately. Without experience, it is impossible to choose a chisel groove with an accuracy of a millimeter.
 Faster doing all steps in one package
- Before you install the plinths, the grooves must be lubricated with any glue on the tree, as an option, you can use PVA.
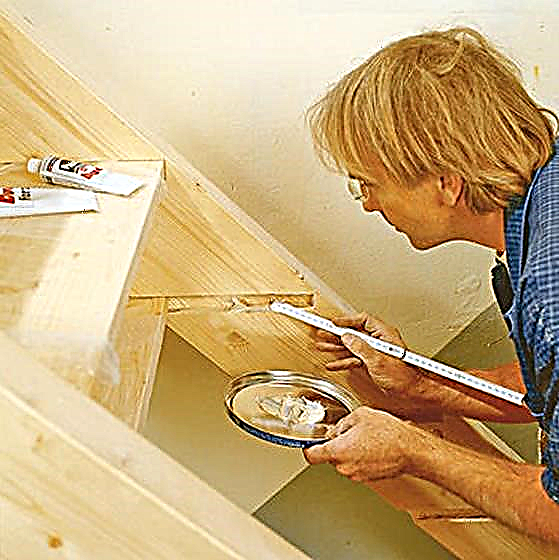 Grooves are necessarily coated with glue.
- When inserting elements into the grooves, you can use a wooden mallet, it is problematic to hammer in pieces with your bare hands.
 Immediately after inserting the element into the groove, it is necessary to remove excess glue
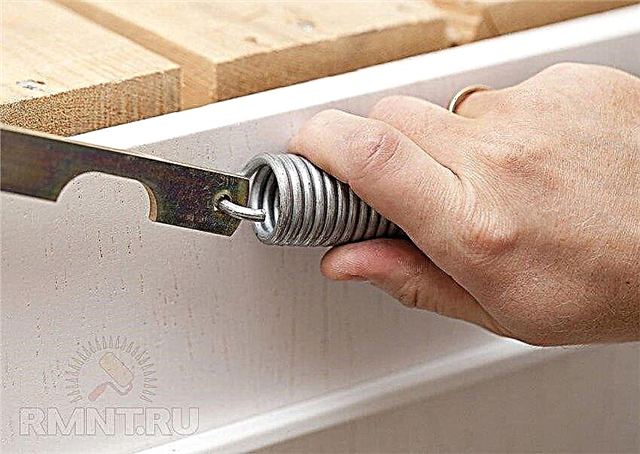
- So that the massive structure does not dry out over time, and the bowstrings do not go apart, under one of the central steps we mount a tightening metal stud.
 The pin is needed to fix the side elements
Railing
There are many options for installing the railing, but we have chosen the easiest one for the amateur. If the hatch is in the corner, then the railing can be mounted only on one side.
- From the fixation point of the bowstring on the floor, to the ceiling, install a stand of wooden timber, the minimum cross-section of the timber is from 50x50 mm.
- Further parallel to the bowstring, 1 or 2 boards are attached to the beam and to the attic lining box.
- The boards can be screwed with screws or drilled holes and fixed with bolts with wide washers.
 The final steps in the assembly of the stairs will be grinding and varnishing
 Technical requirements. Data and formulas for calculation
Attic stairs must meet the following characteristics:
- The width of the opening is from 600 mm. It is important to understand that with large openings, the percentage of heat loss increases, but too narrow will not provide sufficient comfort when climbing to the attic.
- The height of the stairs. Recommended parameter up to 3,000 mm (optimal 2,500 mm). With such dimensions, the rigidity of folding structures is maintained.
- Mechanical impact. The device must support a weight of 150 kg.
- The number of steps is recommended up to 15 pcs.
- The angle of inclination for attic stairs is allowed 60˚-70˚.
 With these parameters, structural stability is ensured. If the angle changes in a smaller direction, the device will occupy more area.
 - The height of the steps should be in the range from 100 to 200 mm. Depth according to standards 180-200 mm. But more often there are designs with parameters from 70 to 140 mm.
- When assembled, the steps of the stairs should be strictly parallel to the floor. Desirable with a non-slip coating.
- For stationary options, it is recommended to install a fence with a height of 900-1200 mm, for other designs, handrails in the upper part. They will make much safer descent and ascent.
 With these parameters, structural stability is ensured. If the angle changes in a smaller direction, the device will occupy more area.
It’s easy to make a staircase to the attic. Begin by calculating the parameters and drawing. To draw up a diagram not by eye, the following data will be required:
- Dimensions of the opening. The parameters of the stairs will depend on it,
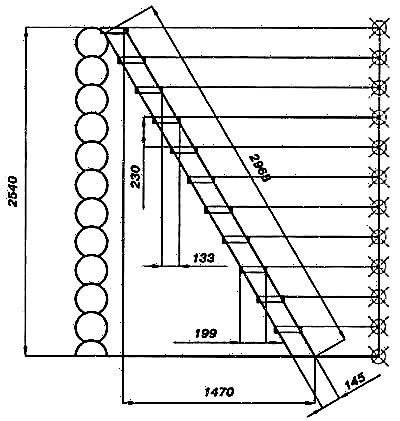
 The drawing and dimensions of the opening of the stairs to the attic
 Scheme with dimensions of stairs to the attic
Drawing number 1
This view is a device of two folding sections.
This option is suitable for attic openings located near the wall.
When developing a drawing, the following points are taken into account:
- To calculate the length of the stairs, the height is taken not to the hatch, but 50 mm below the ceiling.
 Detailed drawing of a folding ladder

This staircase is not particularly aesthetically pleasing, but when assembled it practically does not take up space.
Drawing number 2
This option, like the first, is attached to the wall, but through one string. The requirements for it are slightly different:
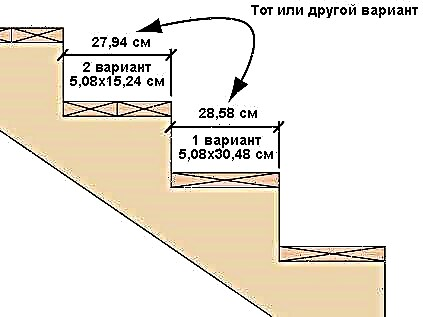
- For a bowstring, boards 28 * 200 mm are used. The length is selected from the calculated data,
- The steps are cut 120 * 500 mm, the height between them is 200 mm, taking into account the thickness of the material,
- The bowstring is mounted at the right angle to the wall on the anchors. The top point is 550 mm below the opening,
- Marks the position of the steps on a fixed bowstring parallel to the floor according to the level. There is a segment along the depth of the tread (120 mm),
- On the bowstring, two parallel lines along the entire length of the canvas are drawn through the start and end points of the resulting segment,
- We return to the segment. A perpendicular 200 mm long is drawn from its farthest point (size taking into account the thickness of the steps). From it, 10 mm is measured to the right (technical gap for folding the tread). This is the starting point of the next segment under the step,
- Marking is done on the second bowstring,
- To attach the steps to the sides, you will need to purchase card loops. Their fixation occurs in such a way that the steps rise upward relative to the fixed bowstring,

 Assembling and attaching stairs to the attic
This staircase is a bit more complicated than the previous version. But the next type of device received great popularity.
Drawing number 3
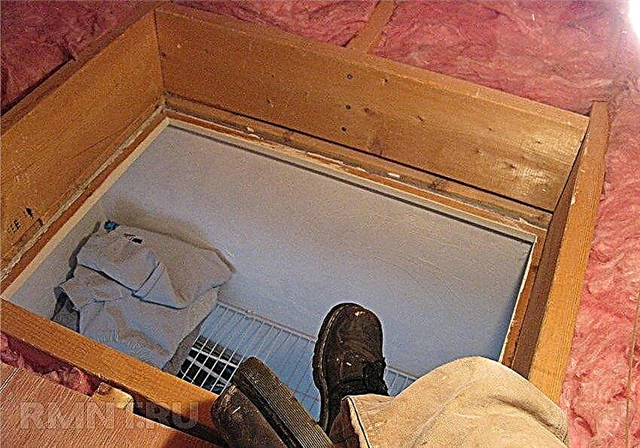
This type of structure when folding and closing the hatch is cleaned in an insulated attic. The most convenient option, as in the residential part of the house does not take up space. If the width for the previous design could be arbitrary, then for this type of staircase this parameter is associated with the dimensions of the opening. The main subtleties in the design and assembly:
- The hatch must provide the ability to freely enter the desired floor, and therefore comply with the following characteristics:
- The width of the opening is equal to the width of the stairs + margin on the sides 50-100 mm. At the minimum standard value, we get 600 + 50 + 50 = 700 mm.
 Having increased the margin by another 50 mm on each side, it will be possible to mount additional handrails and balusters on the sides of the stairs,
 - The opening height is considered optimal up to 2500 mm. The number of folding sections of the stairs is reduced and its backlash during operation is reduced. Measurement is taken from the floor to the hatch, unlike the previous version,
- The length of the opening. The most common size is 1200 mm. Such a parameter will provide more or less convenient movement between floors,
- Tight fit of the hatch to the box - energy saving requirements. Attic rooms are rarely heated,
- Opening mechanism. The hatch must open inside the living room and lock in position. This can be achieved using strong door hinges, and the additional installation of hinge mechanisms with fixation,
- The width of the opening is equal to the width of the stairs + margin on the sides 50-100 mm. At the minimum standard value, we get 600 + 50 + 50 = 700 mm.
- The assembly of the stairs is not difficult, but it requires the accuracy of marking and cutting:
- It is not worth creating monumental structures. Keep in mind that the weight of the stairs and the person will be a significant load on the hinges and hinges of the hatch,
- The thickness of the bowstring (guides for steps) is optimal 120-150 mm,
- The height of the steps is determined individually and must lie in a regulated range,
- The section length calculation is done according to this principle: hatch length minus 200 mm (distance for free folding). Next, the number of folding parts is calculated. The estimated length of the stairs is divided by the length of the section. Take for example the recommended minimum size of the hatch, then the length of one part will be like this: 1200-200 = 1000 mm. And the staircase, let it be estimated, came out 2740 mm. We calculate the number of sections 2 740/1000 = 2.74. It turns out two sections of 1000 mm and the remainder of 740 mm - the lower part. It is recommended that the middle segment be made slightly smaller than the first for ease of folding,
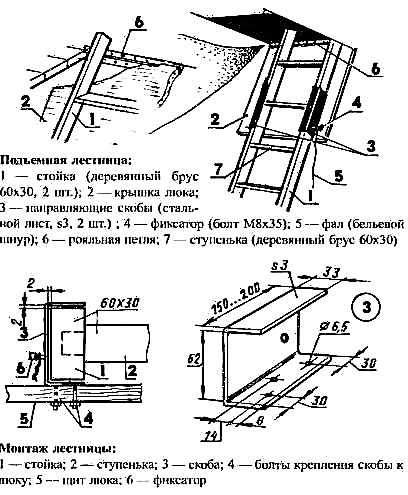
 Scheme and drawing of the section of the stairs to the attic
 - At the final assembly, the hinges on the sections are set so that the ladder folds according to the principle of the letter Z,
- At the last stage, the stairs are attached to the hatch through the corners. On the sides of the structure, handrails can be provided, they will add convenience when climbing and lowering.
 Having increased the margin by another 50 mm on each side, it will be possible to mount additional handrails and balusters on the sides of the stairs,
 Scheme and drawing of the section of the stairs to the attic
A self-made attic staircase, the drawings of which are presented, is made simply. Some craftsmen and hinge mechanisms for the hatch do it yourself.
Schemes of stationary structures
Depending on the technical installation capabilities, choose the appropriate type:
- A project of a wooden staircase in a house with a slope angle of 60-70˚. Make a calculation, draw up your drawing and install the device on it will not be difficult. Yes, and take a little time. This design can organically fit into the interior. For example, arranging a tea party or reading area under a flight of stairs.
 Scheme and drawing of a stationary wooden staircase to the attic
For this, it is not necessary to make closed structures. An ordinary wooden staircase will not create a pressing sensation and visually reduce the space, but at the same time divide the room into zones,
- calculation of the radius of the entire structure,
- the radius drawn through the middle of the step,
- parameters of steps, their number and height between them,
- passage height one turn.

All these data require certain knowledge of mathematics and trigonometry. More often they turn to professionals to create such structures. Given the width of the required opening for this option, it is necessary to provide for heating in the attic. Otherwise, the massiveness of the hatch will cause inconvenience, and its absence will reduce the energy efficiency of the house. The heat from the house will go into the chimney.
With the apparent simplicity of the designs, the attic staircase drawings are made taking into account a number of nuances for each type. With due attention and patience, you can create a reliable and convenient design for moving between floors. Despite the fact that there is a wide range of finished products on sale, the popularity of hand-made products is growing.
Preparing the opening in the ceiling
The main installation rule states that the opening must have dimensions that exactly match those specified in the assembly instructions. This is mainly due to the tightness of the hinged cover to the rest of the ceiling surface and, of course, to the reliability of the mounting block fit inside the ceiling system.

However, the realities of construction projects are far from ideal. If the staircase was not selected well in advance, its dimensions may differ significantly from the step between the beams of the ceiling. Therefore, the actual dimensions of the opening may differ from the recommended ones if a cover box is assembled in it before installation.
The cutout in the decorative finish also does not have to coincide with the dimensions of the clearance in the system of beams and the draft ceiling. The ice and the part of the decorative casing fixed to it can be wider than the opening, while part of the frame system of the ceiling will be visible when the stairs are unfolded. There is another option: if additional finishing is not planned for Lyada (and it almost always has unsightly gaps around the perimeter), the ceiling is released into the opening by 5-10 mm for a closer fit.
Also, when thin stiffening ribs with frequent pitch are used in overlapping, you may need to selectively remove them to increase the width of the opening to convenient values. The aperture must be located along the bed of the main load-bearing beams, and then restore the solidity of the overlap with additional connections. This is done with the help of scarves-wedges from a massive beam: they are first screwed to the existing elements of the frame according to the marking lines. Later, additional boards are fastened to the wedges along the previously made holes.
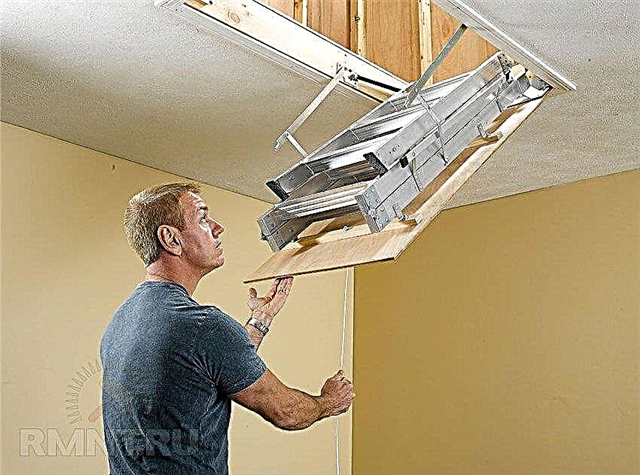
Web assembly, hinges and other components
The folding mechanism of the ladder itself is a completely independent device, which is almost never disassembled during transportation. However, the canvas may not initially be fixed to the load and the hinge, in this case, you need to fix according to the instructions. Usually, the fastening is implemented with clicks with a click system.

Also at this stage, all auxiliary accessories are attached: handrails, closers, gas lifts or springs, decorative plugs and a locking mechanism. After fixing the unit, it remains only to make the adjustment.
Completion of work, adjustment
Initially, the length of the stairs should be slightly greater than the actual height of the premises on the lower floor. When you try to decompose a staircase, its canvas may not straighten in a straight line - bowstrings require trimming at the bottom. Please note that the staircase should be completely cut only after the installation of the floor covering, since even 5 mm the difference will matter. It should also be noted that a staircase that is not completely unfolded is not allowed.
Measuring the cut line is quite simple. The lower segment of the ladder must be folded and allowed to sag freely at the most steep angle, which only allows the hinge lyady. Since the details of the bowstrings are joined at the end, you only need to measure the distance to the floor and cut the board along it at an appropriate angle, taking into account the thickness of the caps on the legs.
There are a number of specific situations that cause installation difficulties:
- If the cut line falls on a step, you will have to unscrew the steel sheet from the fastening of the frets and shift it a few centimeters lower, and then trim.
- If the length of the stairs is not enough, it, by analogy with the first paragraph, is shifted as far down as possible. The remaining space to the walls of the box allows you to build up the bowstrings with overlays from the boards on the sides, here the bolted connection is preferred.
- Scissor ladders do not require a full layout only if the difference in height is less than the length of one scissor segment. Otherwise, a segment with a step can be deleted or, conversely, increased. The final adjustment can be made with an adjustable hinge for attaching the scissor mechanism to the frets.

Decorative finish
The easiest step is to finish the front surface of the fret. Usually it is smooth and has a neutral color, so you can leave it as it is. Otherwise, a rectangular cut-out of drywall is hemmed to the lyad, which exactly corresponds to its size or has small protrusions on the sides.

Please note that the installation of the stairs is best done at the stage when the preparatory coating of the suspension system (GKL, OSB) is already fixed, but the decorative finish has not yet been applied. This will allow you to align the stairs flush with the ceiling and avoid differences in shades of the applied composition or mismatch wallpaper pattern.

The edges of the ceiling and hatch finishes are preferably edged with a plastic decorative profile for slopes. So the staircase will stand out slightly, but at the same time the ends do not fray and will retain an attractive appearance for longer.

To install the stairs when finishing the ceiling with a tension method, the box is simply installed in a pre-prepared lining that protrudes downward exactly to the installation plane of the lock profile. At the same time, no additional finishing is planned on Lyade, and the ends of the lining are covered with an ordinary plastic U-shaped profile.