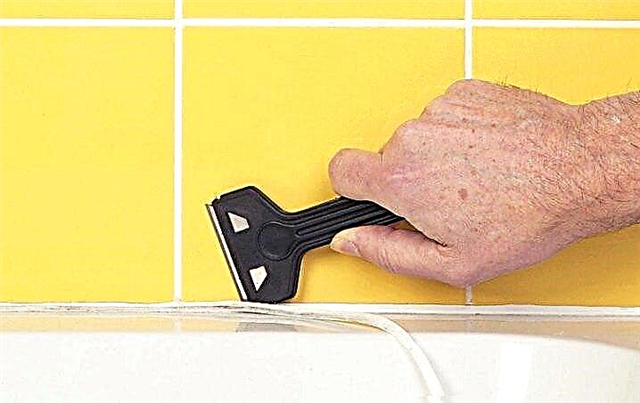
A properly prepared surface is the key to quality repair. Many have a reasonable question: is it necessary to prime the wall before applying putty? This is necessary in the following cases:
- The primer evens the wall, smoothes out microcracks and defects.
- The composition improves adhesion.
- A primed wall requires less putty.
- The composition lays on the treated surface better.
- The primer in the composition contains beneficial substances that protect against moisture, mold and fungi.
Ready and dry mixes are available. The latter must be diluted with water to a thick consistency.
For the best quality of work, it is recommended to prime the wall before puttying.
How to putty yourself
Required to buy the necessary tools:
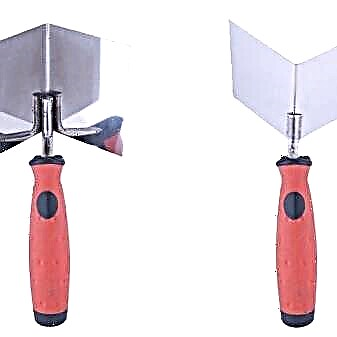
- Corner spatula. It is used in order to align the joints of the walls.
- The rule.
- Building level.
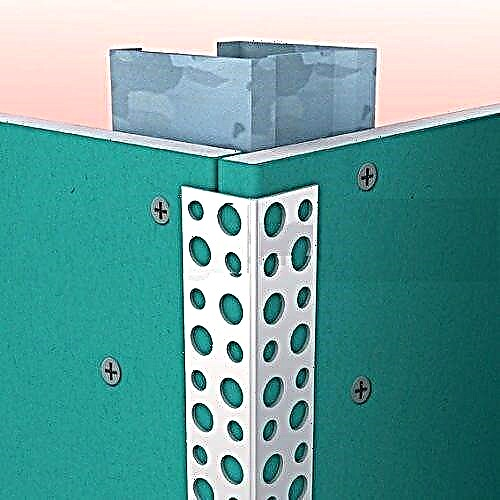
- Perforated metal or plastic corners.
- A set of spatulas made of metal of various sizes.
When you need to putty the corners of the walls
 It is necessary that the corners are even and strong, so that they do not crack and crumble when the building shrinks. Aligning them with putty increases the adhesion of the wall with paint or wallpaper. Also, when planning the subsequent gluing of walls with thin wallpaper, you need to make everything as even as possible, otherwise all defects and flaws will be clearly visible.
Tools
To perform putty work, you need to prepare the following tool and equipment:
- two straight spatulas with a width of 100 and 250 mm,

- special angular spatula from two plates located at right angles,

- a drill with a blade nozzle for mixing the working solution,

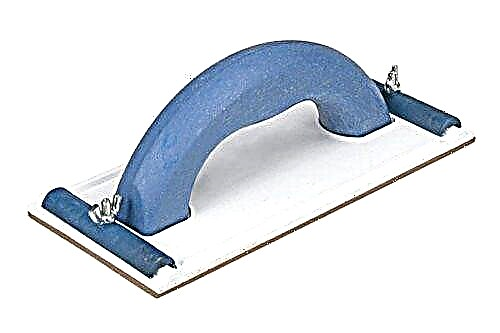
- grinding grater complete with sandpaper P100-P120,
- bubble building level,
- measuring angle
- plaster rule or flat rail 2000 mm long,
- knife and pencil
- stepladder or small table.
To fix the surface of the walls and improve adhesion, it will be necessary to perform priming (we wrote about the need for this stage here), which means that a pump room and a paint brush will be required.
Materials
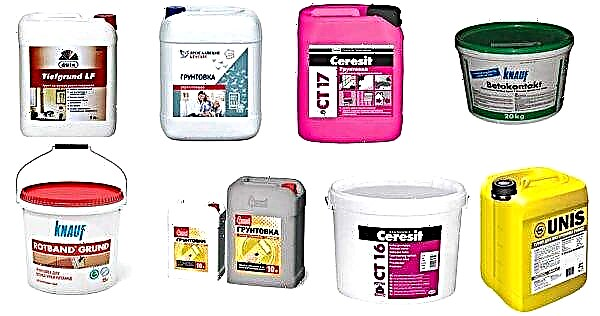
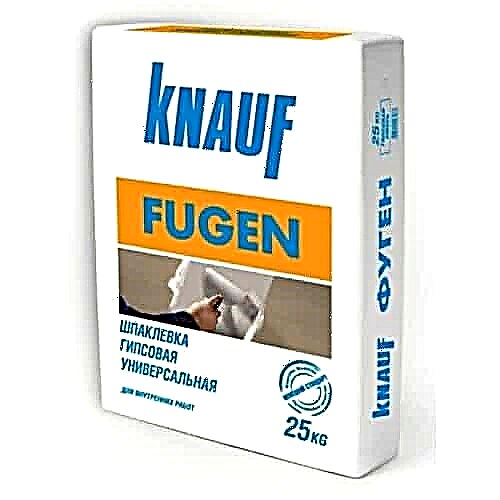
An important point is the correct choice of putty mixture, which is sold in dry or ready-to-use form. Dry formulations are cheaper, but ready-made formulations are more convenient to use, since the manufacturer immediately offers a solution of optimal density.
By the type of binder, all putties are divided into gypsum and cement. Compositions cement based moisture resistant and are used for finishing corners in the bathroom and kitchen. The main disadvantage of such mixtures is the existing probability of the formation of small cracks during drying.
Gypsum plaster putties have a finer grinding, are applied in a thinner layer, but quickly set, which forces the performer to prepare the working solution only in small portions.
According to their purpose, putty mixtures are:
- starting, for primary rough alignment,
- finishing, for fine decorative finishes for painting,
- universal, most suitable for filling corners.
The choice of the type of base material should be based on the initial state of the surface of the corners. Starting compounds allow the application of a thicker layer. If the corners are quite even, then to finish them, it’s enough to buy only the finishing mixture. If you are at a loss with the choice, then buy a universal putty in a ready-to-use form.
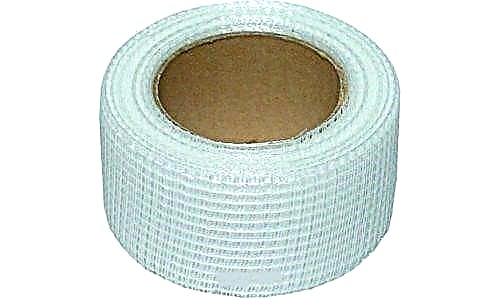
For simple and high-quality putty of wall corners, in addition to mortar, it is recommended to buy perforated corners made of plastic or metal, sickle (polymer plaster mesh 100-150 mm wide) and deep penetration primer. When purchasing a grid, pay attention to its thickness. For plastering the walls, a thicker material is used, for filling the corners - thin.
Preparatory work
At the initial stage, a visual inspection of the surface of the corners is carried out and obvious defects are removed with a spatula, a durable knife, and in some cases with a chisel and hammer. After that, the level and the rule checks the vertical of the surface and its plane. In places of significant deviations, pencil marks should be applied.
Next, apply liquid primer to the wall. Wait until it dries and repeat the operation again. This will strengthen the surface, reduce moisture absorption and increase its adhesion - the degree of adhesion of the putty to the wall. On this preparatory work is completed.
Outdoor
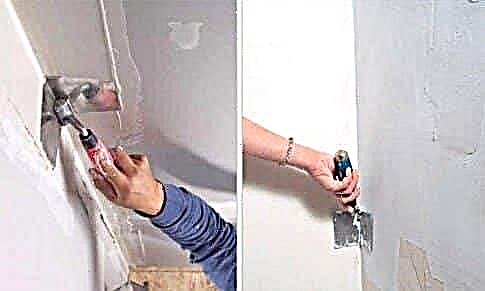
To simplify the process of puttying an external right angle with your own hands, it is convenient to use special corner plates with perforated shelves. They are made of galvanized steel or plastic. Plastic corners are more practical, because not subject to corrosion, traces of which may eventually appear on the surface of the wall in the case of metal.
The order of work is as follows:
- apply a thin layer of putty along the entire height of the corner,
- attach the perforated corner to the surface and press it into the solution,
- Using the building level, check the vertical and overall correct fit.
- in case of deviations, align the position of the corner, greasing the putty under it,
- wait until the mortar has set and then putty mortar on the wall surface on either side of the corner.
After the putty dries, treat the surface with an abrasive mesh and soak it with soil 2 times. Cement mortars can give a slight shrinkage, which can be compensated by applying a thin layer of the mixture and re-grinding.
Inside corners
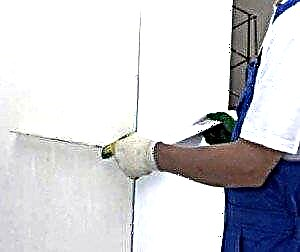
Puttying the inner corners is somewhat more complicated. Especially in cases where their size differs from 90 °. When performing work, it should be remembered that the putty layer should not be more than 2-3 mm. Large differences are leveled only by classical plastering.
Putty is applied from the corner towards the wall plane. Very often the angular vertical is littered to the top or to the bottom. Therefore, during the finish, the surface must be constantly checked for this parameter. In this case, each of the walls is plastered separately.
It is very difficult to get the perfect angle by applying the mortar and leveling with a spatula. The desired result is achieved by finishing polishing each wall individually. Grouting must be done using plaster abrasive mesh No. 100-120.

Curved angles of arches
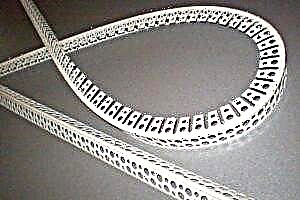
Especially for arched sections, manufacturers of building materials produce flexible plaster corners. They have one of the shelves has cuts along the entire width, and provides the ability to bend a straight line. The rest of the technology for puttying curved surfaces is no different from the finish of the outer corners.

The places of abutment of the walls to the ceiling
The angles between the walls and the ceiling are also internal. The peculiarity of their finish is that the putty is made only after the plastering of the walls is finished and the perforated plaster corners are not used. The solution must be applied to the ceiling with a minimum layer.
The leveling process is mainly aimed at obtaining a smooth wall surface, since floor slabs are usually even. If the plates do not match the height of the installation, then it is best to consider the option of a suspended or suspended ceiling, and in this case, putty is not required.
Nuances of plastering corners of drywall
Drywall corners and joints before puttying need to be pasted over with dense paper or a serpian net. It is recommended to cover the self-tapping hats with a layer of PVA glue, which will protect the metal from corrosion and prevent its manifestation on the wall. After this, apply the primer 2 times and putty the corners of the drywall, similarly to the technologies described above.
Outer
To make the outer corner perfect, the task is not easy. Therefore, it is better to use special corner pads that allow you to work much easier and faster.
Attention! Such products should not be confused with other materials. They are used exclusively for 90 degree angles.
Pads come in several forms:
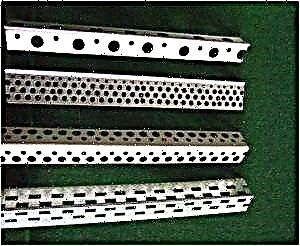
- Metal
For production, an aluminum alloy or thin steel is used. All products are perforated. This reduces weight, and also allows you to "drown" it much deeper into the wall. Unfortunately, corrosion is often observed, which can come to the surface. - Plastic
Almost identical to metal, but not subject to destruction processes. Used only when applying a fairly thick layer, several layers. This is due to their significant thickness of the sides. - Flexible parts
These products are designed to work on curved surfaces. They can align the edges of the arches. They do not form breaks and easily acquire the desired shape.
 Arched corner
Work technology
Working with corner elements requires adherence to a certain technology. It consists in the following:
- Putty is applied to the wall - along the entire height of the corner.
- A corner element is applied and well pressed into the previously applied solution.
- Now you need to use the level. They measure the correct fit, if necessary, align. To do this, add the solution in small portions.
It takes a little while, the solution should set. It is advisable to measure it again by level. Often the solution gives a slight shrinkage, it must be compensated.
The work does not end there:
- Now you need to apply the solution to the pad itself. To do this, one by one, it is carefully coated on both sides. It is easy to do this with any middle putty knife to putty the walls.
- All excess solution is removed. Then you can finally align the walls.
We are waiting for the complete drying of the surfaces. After that, we proceed to thorough grinding. This must be done carefully. Excessive efforts at the installation sites of the corner lead to its emergence, which means that the work will have to be repeated again.
Next, you should soak everything well with a primer. And you can apply a decorative layer. The angles will be even, and making them was not so difficult.
Advice! You can often hear that you need to chamfer from the corner. Yes, this is a justified procedure that will avoid its destruction. But the look is lost. This can be avoided if the final coating is wallpaper. Or reinforce the corner with PVA glue added to the putty.
Interior
Aligning the internal corners is not always as easy as it may seem. Although it is believed that they can be given a little less effort.
- Before you putty the corners, you need to decide how much they are curved. It is almost impossible to meet perfectly even angles. Often they can be sharp or round.
- You need to understand that large differences can be corrected only by applying plaster. Make it exclusively putty, and even the finish layer - will not work.
- Before filling gypsum plasterboard corners, they should be glued with special paper or serpentine net, thus ensuring a reliable connection of two sheets at the junction.
 Puttying the wall should always start from the corner
Leveling technique
Each master has his own leveling technology using putty. Often the following applies:
- Work begins precisely from the corner. The fact is that it is possible to bring out the walls most evenly. If you start from the walls, you will have to make a lot more effort.
- Walls can be littered to the top or bottom. Therefore, the angle is constantly checked.
- The solution is first applied to one wall, then to another. It is better to immediately capture a significant portion of the wall. A small rule comes to the rescue.
- It is required to constantly monitor the process.
It is almost impossible to form an ideal angle; a slight rounding is obtained. It is eliminated by grinding. This is done in several stages:
- Hand grater works well. Sandpaper is attached to it. It is important that it overlaps the edge of the tool.
- Grinding begins with one of the walls. Alternately, you need to move on to the next. Grouting is carried out by that party on which sandpaper is wrapped.
- Making fast and energetic movements, it is possible to achieve an even angle.
 The final stage of puttying the corners is grinding
Tips & Tricks
- Puttying should begin with preliminary preparation. You should pre-purchase the required amount of the mixture.
- Do not forget that along with the corners it is desirable to align all the walls at once.
- If the work was interrupted, then the dried up putty should be moistened with water.
- For the formation, you can use a special angular spatula. To work with him will have to work out a little.
- Putty mortar must be prepared in the right amount. The consistency should be pasty. If there was a significant drying of the mixture, which led to the formation of numerous lumps, then it can no longer work.
Puttying corners is not the most difficult process, but it requires patience and a little knack. It is impossible to level them unless you are prepared in advance for the fact that you will have to apply a significant amount of the solution to the entire wall.
Putty nuances
During repairs in any building, it is necessary to align the internal and external corners of the walls. In this case, you will need to choose the optimal solution for this work, which may vary in the following parameters:
- Degree of manufacture. The solution may be dry, has a fairly low price and ease of use, but you will need to breed it yourself. There are also ready-to-process mixtures that do not require preliminary preparation.
- The number of binders. The composition can be made on the basis of cement or gypsum. Cement mortar has good moisture resistance, which allows it to be used for filling corners in the bathroom or in the kitchen. The disadvantage is the possibility of cracking of the coating when the mixture dries. Gypsum cladding is used only indoors, as it has a low protection against moisture.
- Destination The solutions can be leveling, decorative or universal, therefore, before buying, it is recommended to consult with the seller.
When choosing a composition for aligning angles, you need to pay attention to the size of the grains of the solution. This indicator directly affects the quality of the lining, the smaller it is, the thinner the finish layer will be.
Before aligning the corners, you will need to prepare the following tools:
- Corner spatula. This tool is used to align the exterior and interior corners of a building. Its difference is the mounting of the handle of the trowel on both sides of the corner.
- Building level.
- Perforated corners made of metal or plastic.
- Metal spatulas in different sizes.
Outside corner finish
Puttying is carried out by arranging the joints of the surface at right angles. To putty the outer sections, on the edge of the wall you will need to install special nozzles. They are of the following types:
- Metal. For the production of such products, aluminum or thin galvanized steel is used.In order to reduce the mass of the structure in order to drown it in putty, perforations are made on the sides. The disadvantage of this variety can be considered the possibility of corrosion in places of damage to galvanization.
- Plastic The shape of the product resembles a metal plate, but the material has a longer life. Plastic structures are often used for uneven walls with a large number of protrusions and other defects.
- Flexible. They are used for facing corners in arched openings or, if necessary, plaster curved sections on gypsum plasterboard surfaces.
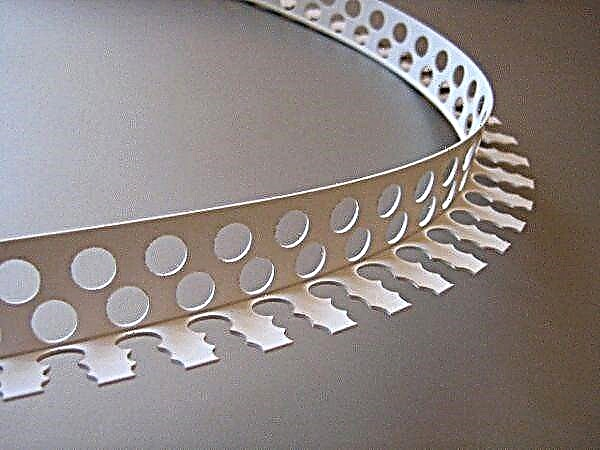
 Types of corrugated metal
The metal perforated corner can be seen in the following photo.
This part is often confused with a corner plaster. Outwardly they are similar, but the putty plate is made with a smaller thickness.
The special design of the corner allows you to bend it at the right angle, without damaging the edges of the material. The pads are used only for processing 90 ° sections; the rest is puttyed without additional structures.
The procedure for filling the outside corners is as follows:
- A small layer of mortar is evenly applied along the entire length of the surface to be treated.
- The installation of a perforated corner, which is then recessed into the mixture.
- The product is installed according to the level, if necessary, the right amount of putty is added.
- After the solution has dried, you can proceed to the finish.
- A small amount of the mixture is applied to the spatula and the surface is treated on one side.
- The procedure is repeated on the other side, and you will need to remove the excess solution under the product.
- With uniform movements, the composition is leveled, but you must not leave furrows.
- The procedure is repeated until the entire area to be lined has been processed.
- After the composition has dried, the area is ground and primed with a penetrating solution. If necessary, finishing putty is carried out.
- Re-grinding is carried out. In this case, you must ensure that the “sandpaper” does not erase the filler layer.
 Correct placement of the corner
In the following diagram, you can see the correct placement of the corner with slight indentation along the edges.
Experts recommend removing the chamfer from the junction of the planes. This will avoid cracking putty, but the angle will look less attractive.
Putty of internal corners
How to putty the inner corners of the walls? The procedure for such a procedure is as follows:
- The curvature of the angle being machined is determined. In some cases, prior plastering is required.
- Flat sections on the wall are aligned, and they will need to be brought almost close to the joint.
- A mixture is applied along the corner; its excess is removed as a rule. The tool is used alternately on all walls.
- To simplify the work, it is recommended to use an angular spatula. Its design allows you to quickly complete the processing without additional procedures.
- Evenness is checked using a level and a square. If abnormalities are found, the procedure is repeated with a decrease in the amount of solution.
You can learn more about all the intricacies of the internal putty from the next video.
Grouting and grinding angle
After the inner lining, small protrusions form. They are removed by grinding as follows:
- An emery cloth is installed on the prepared hand grater so that its edge protrudes 20 mm beyond the edges of the tool.
- This tool processes one side of the corner and then the other. Movement during processing should be sharp and fast.
- Due to its plasticity, emery paper will remove rounding, creating a smooth and sharp surface.
Putty of drywall corners
Often when working with drywall walls, a problem arises: cracks in the corners form at the joints of the sheets. To avoid this, you will need:
- Cut and clean the seams.
- Fill with a special adhesive with a spatula.
- A 60 mm wide grid is mounted in the corner.
- Then processing is carried out according to the usual instructions.
Installation of the grid must be carried out with all accuracy so that it fits well on the site. To prevent the solution from spreading after application, it is necessary to maintain the same temperature in the building until the composition finally hardens.
As you can see from the article, doing the puttying of the corners with your own hands is not too difficult, you just need to follow the instructions. Thanks to the photo used in the article, one can see in practice the implementation of such a procedure.
Where to start puttying
First you need to choose a solution for putty, it can vary:
You can buy a dry mixture, it is cheap, but it should be diluted. Already prepared solutions are also sold.
The solution can be created on the basis of gypsum or cement. And it can be made on the basis of polymers.
The cement mixture has excellent moisture resistance, it is used in the bathroom or in the kitchen, it covers the facade of the building. But the minus of this solution is that it can crack after it dries completely.
 Gypsum mixture is suitable for puttying rooms that do not have high humidity: bedrooms, living rooms, children's rooms.
Polymer putty is made on the basis of acrylic or latex. A latex-based putty is used only for application to walls in rooms.
Mixtures are leveling, decorative or universal. They mainly differ in the size of grains. When choosing a mixture, look at the graininess of the material. The finer the grains, the thinner the layer can be laid.
Leveling, these are starting putties that are applied with the initial layer. Decorative, this is the finish, which is used at the end of the work.
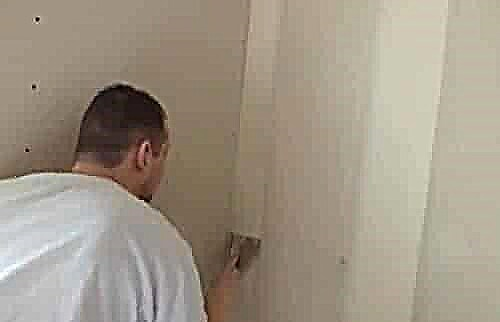
How to apply the mixture on the inside corners
First you need to understand the curvature of the joint. Next, putty is applied along it. Excess composition is removed by the rule. Evenness is checked using a square and a building level. If deviations are found, then the joint is again smeared with plaster, but with a smaller layer.
After such plastering small protrusions may form. They are polished as follows: emery is attached to a hand grater so that its edges are 2 cm wider than the edges of the grater. Then one side of the corner is then ground with this tool, then the other. This is done with sharp and quick movements, gradually rising from the floor level to the ceiling. After that, the surface will become flat.
How to align the angle between a wall and a ceiling
 There are differences in the duration of the work and in the materials used in the work when aligning the angle between the wall and the ceiling under the baseboard and just at a flat angle.
- True, the corner under the baseboard does not have to be very carefully aligned. For such work, it is good to use the starting composition Acrylic Poots or any other mixture based on acrylic. First, the composition is applied with a thin spatula, then wide in 1 layer. Then the surface is primed, this will further increase adhesion with the baseboard. After waiting 10-12 hours for the primer to completely dry.
- An angle without a baseboard is harder to make. This is especially difficult to do in a new building, as the building shrinks. First putty is putty, after it has completely dried, the corners are reinforced with reinforcing materials: serpentine or adhesive tape with metal threads. Serpyanka is quite cheap, but it’s difficult to make an even angle with it, since it is constantly lagging behind.
A metallized adhesive tape is great for creating a right angle, and after that, cracks do not appear. But it has a minus: the adhesive tape can swell and distort from the applied composition. Eliminate this drawback with the help of liquid nails and the application of another layer of putty.
How to putty a corner if it is uneven initially
 If the angle is uneven initially, then it can be aligned in 3 ways:
1. This is the most time-consuming way. It is often used in old rooms, where at the joints of the walls the layer of old plaster is much thicker than on the walls.
And only then you can putty with a wide spatula. The composition must be applied to the very edge of the spatula.
If putty accidentally appeared on the opposite side of the spatula, then you should take it with a small spatula
Then put a wide spatula to the corner so that the mixture hits the corner, and then carefully put the spatula away from the corner. So putty the wall from top to bottom
It is required to align the joints of the walls with plaster. And then primed with a deep penetration primer.
2. First grind the wall with a grinder or emery, and then plaster. But do not do this if the joints of the walls were poorly concreted. In addition, such work should not be done if the walls were plastered with 150-200 grade material.
3. This method consists in aligning the joints of the walls with the help of finishing putty. But it is suitable only if after that it is decided to paint the wall. Since after this method, the walls can still remain uneven. Finishing putty is applied in 3-5 layers.
Principle of operation
Puttying the outer corners. Puttying is carried out using the design of the joints of the surface at right angles. Nozzles must be installed on the edges of the wall so that the putty is properly applied to the outer areas.
Specialized nozzles can be different:
- Metal. In the manufacture of nozzles, galvanized steel material or aluminum metal can be used. To reduce the weight of the structure so that the product can be drowned in putty, perforations are made on the sides. The disadvantages of this type of tool include the possible occurrence of corrosion in galvanized areas.
- Plastic. In shape, such plastic products are very similar to metal nozzles, only plastic material has the highest operational life. This design is often used when processing uneven wall surfaces with significant protrusions or other various defects.
- Flexible. Such nozzles are used for facing corners that are in openings with arched geometry. Flexible nozzles are also used if it is necessary to plaster curved sections on a drywall surface. The special design of the corner will allow you to bend this product at the right angles without damaging the edges. These pads are used only when processing rectangular surfaces, but the filling of the remaining concrete planes is performed without the use of auxiliary structures.


Puttying the outer corners in the room should be done in the following order:
- A small amount of the solution is applied over the entire surface in a uniform layer. The site that needs it is being processed.
- Then carry out the installation of perforated corners to drown them in the mixture itself.
- Products are installed according to the level, putty is added if necessary.
- After complete drying, proceed to the final finishing process.
- A little mixture is applied to the trowel to process the surface on only one side.
- Then this procedure is repeated - the work is done on the other untreated side, along with this you need to remove the excess solution.
- Equalize the composition with uniform movements; furrows cannot be left.
- The procedure is repeated until the entire area to be lined is completely treated.
- The site begins to be ground and primed with a special penetrating solution only after the putty coating has completely dried. If necessary, then carry out the final putty.
- Then re-grinding should be carried out. The procedure should be carried out carefully so as not to erase the first layer of putty.
Putty of an internal corner. Work should be performed in the following order:
- To begin with, determine the curvature of the processed angles. There are times when preliminary laying of the plaster is necessary.
- The flat places of the wall begin to level out - such areas will have to be brought close to the joints.
- Along the whole corner, you need to apply the prepared mixture, and the remaining excess should be removed as a rule. Such a tool must be used alternately on each wall.
- To simplify the difficult work, experts recommend the use of an angular trowel - the design of this spatula will help to complete the processing faster, you do not need to perform any additional procedures.
- On slopes, the resulting coating can be checked for evenness using a square and level. If there are any deviations, then the procedure will have to be repeated, but this time you need to use a reduced amount of solution.


Grouting and polishing corners. Small protrusions may form at the end of the inner lining. These unwanted defects can be removed by grinding. To do this, you must perform the following simple steps:
- On a pre-prepared hand grater, you need to install an emery cloth so that it protrudes 20 mm beyond the edge of the tool.
- Such a device first processes one side of the corner, then the other. During processing, all movements performed must be made quickly and abruptly.
- Due to its plasticity, sandpaper easily removes rounding, thereby creating a smooth surface.

Putty plasterboard corner. Often, difficulties can arise in working with walls covered with drywall: cracks begin to appear at the joints at the corners. To prevent this from happening, you need to follow the following instructions:
- The first step is to cut the seams, create recesses, and then clean them.
- Then you need to process the already cleaned seams with glue - you need to do this with a spatula.
- After that, a 60 mm mesh is installed.
- Then you should do the processing according to the method described in the instructions.


Features and Benefits
Dry putty, in comparison with other finishing materials, has a number of advantages. The first, and perhaps most important, is the low price. Making a solution yourself is not difficult, but it will cost a penny.
The second advantage - it well covers all kinds of cracks and bumps. If the wall is damaged, there are faults on it, then the plaster will help correct the situation. Under the layer of this material, all the flaws will be invisible, and you can safely paint or cover it with wallpaper.
Finally, it is easy to apply. Even if you have absolutely no experience in repair work, you are still able to independently level surfaces of small curvature using high-quality material.


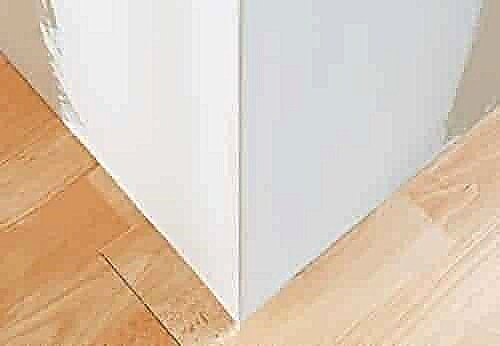
The outer corner of the walls - how to achieve a smooth joint?
For external alignment work, drywall is not used. For exterior corners, only dry mortar is suitable.
- First you need to check the external angles for evenness. All protruding irregularities must be removed with a hammer.
- The next step is the priming of the walls using special deep impregnation compounds.
- To strengthen the outer corner joints, it is necessary to use perforated metal corners, which will strengthen the joint and help to avoid damage. They are pressed into a solution of gypsum and subsequently aligned with putty.
- Excess mixture must be removed with a spatula. Then you need to make sure the exact vertical installation of the metal profile.
- Using plaster beacons on both sides, the angle is leveled and plastered.
Different ways to align external angles are discussed in the video below:
Ways
In order to properly putty the inner corner, you must first draw a construction square from the ceiling to the floor and mark all deviations with a pencil.The protrusions are cut with a planer, and the hollows are primed and putty. After the solution has dried, the surface of the walls forming the corner should be primed, and only then proceed with puttying.
The technology consists in sequentially leveling each of the walls with applying the solution as close to the corner as possible. Excess mortar is also removed alternately - first from one wall, then from another. To facilitate the work of forming an angle, you should use a special angled spatula, with which you can form a perfectly even joint. After applying the mortar and initial setting, it is necessary to carry out a control measurement of the angle using a construction square. Revealed recesses will have to be putty again, and irregularities will be removed during subsequent grinding.


If the joint turned out to be slightly rounded, then the formation of a right angle is achieved by grinding with emery cloth No. 150. Grinding of adjoining walls is also carried out alternately until a sharp and even inner edge can be drawn.
When plastering plasterboard corners with butt walls, a self-adhesive mesh-sickle should be installed. Its width should be 5 cm. The sticker must be done very carefully, avoiding bending and skewing of the material. Further work is carried out according to the technology used for concrete foundations.
Plasterboard corners putty
It is not necessary to putty the corners, it depends on whether you want the corners of your rooms to be symmetrical and you can save on this. well, very rarely). And also, if in the future you use thick vinyl or non-woven wallpaper for decoration, after all, small errors under them will not be so noticeable.
Using paint will emphasize them. Also, if grinding under the paint is done with all the surface, and under the wallpaper - in the places where roughness is detected. To putty on the inner corners, a special spatula with a 90º angle is used. Such corners are much more difficult to align than the outside, because there is little room for maneuver.
In addition, if the angle is drywall it takes a day. When the start dries, you can proceed to the finish layer, again we use the usual spatula. Roll the finish around the perimeter as thin as possible.
When it dries a little, gaining plasticity - we level it with a special angular spatula. The type of putty depends on the purpose of the room that is being finished. For the kitchen and bathroom, a cement one is suitable, which is not damaged by high humidity.
Dries 1-2 hours. Gypsum is used for interior decoration, except for the bathroom, because there it eventually lags behind the wall. Gypsum dries for 2 hours. There is also a mixture of lime and cement for the decoration of the facade, which can withstand any weather conditions.
It also dries 1-2 hours. We take a small spatula, apply the composition to the installation sites of the screws, remove the excess. Putties in this place should be exactly so that the surface is flat. Thus we go through all the screws. They can be repaired in parallel with the seams, but you can - in the first place.
It does not matter. To putty surfaces you will need a large spatula - with a blade of 40 cm or more and narrow - 10 cm
The first layer is applied by starting putty. It is laid with a layer of about 5 mm (the maximum must be seen in the instructions for the particular putty) and hides all the bumps.
Dilute it with water to a state of thick sour cream, stir thoroughly so that there are no lumps.
- Serpyanka.
- Fiberglass tape.
- Perforated paper. Some companies offer paper tape with fiberglass composition, considered the most modern type.
- Not expensive paper tape.
If drywalls are used in the form of panels of PVC, MDF and similar building materials, the base does not need to be putty, it will be enough to treat it with antiseptic solutions or soil, especially in rooms with an increased humidity threshold. To putty the drywall corners without problems, use the following materials that will help in your work: By clearly following the instructions, you will simply achieve the desired results, or rather, strong and even corners that are already ready for further upcoming finishing. First you need to prepare the putty in full accordance with the instructions, if it was purchased in the form of a dry powder. To do this, putty is slowly poured into containers with clean water and mixed for about 10 minutes with a construction mixer. After it, let it stand for another 10 minutes and mix again.
Some craftsmen prefer to make additional fastening of a semicircular corner using a construction stapler, but without applying a preliminary layer of putty.
Additional information on the topic:
- How to fix a door to a drywall wall
- How to make a box of drywall for pipes in the toilet instruction
- Design of multi-level plasterboard ceilings in the living room
- Imitation drywall brick for interior decoration
- Putty not factory joints drywall serpyanka video
Material selection
In the modern market of building and finishing materials, putties are presented in a wide assortment. Their compositions differ from each other in purpose, properties and pot life.
Before you start buying material, you need to familiarize yourself with some characteristics of each type:
- Polymer putty is a finish coating and is applied at the end of the finishing work. The mixture aligns the surface of the wall well and has high moisture resistance,
- Gypsum is allowed for use only indoors. It forms a smooth surface, quickly hardens and dries,
- Cement putty is characterized by high moisture resistant qualities and can be used in the decoration of bathrooms and kitchens. The disadvantage of this type is the likelihood of cracking after drying. To prevent cracking, the surface should be moistened periodically until the inner layer is completely dry.
According to the form of release, the putties are dry, requiring self-preparation, and ready-made. According to the intended purpose, specialized, leveling, finishing, decorative and universal solutions are distinguished. The choice of material is carried out individually and depends on the type of work performed and the degree of exposure to external factors.
You should also purchase a primer. For the formation of both external and internal angles, it is recommended to use deep penetration solutions. This will ensure a good adhesion of the mortar to the wall and prevent peeling and chipping of the plaster.


Three spatulas should be prepared from the tools: two straight lines with a width of 25 and 10 cm, and an angular one. To obtain a homogeneous solution when using dry mixtures, you will need a blade nozzle on a drill or construction mixer. As a surface equalizer, you can use a grinding grater with an emery or mesh attached to it, and when preparing the surface for wallpapering, it is better to use an abrasive with a grain size of P100 - P120.

How to make even corners with plaster, if the curvature is small?
Most often, the owners of houses and apartments are faced with the problem of fairly crumbling, having lost their shape external corners, on the corners of corridors, in niches and alcoves, on vertical beams (reinforced concrete crossbars). To check how large the error is, it’s quite simple, just take a regular metric square and apply it to the converging surfaces of the walls. If there is curvature, either one scale will not touch the wall, or vice versa, both will touch, and there will be a gap between the walls and the measuring tool at the junction of the walls. In other words, the outer corner is sharp or dull, respectively.
If the deviation from the correct geometry is small, up to 2-3 millimeters, for correction it will be enough to use a countertop (perforated corner plate) and a putty mixture. With a very small error (up to 1 mm), one putty is enough. Before you make even angles when plastering the walls, a primer is always used, the same applies to other finishing materials.

After priming, abundantly cover the entire vertical joint of the walls with the mixture and apply the perforated part so that part of the leveling compound appears through the holes. Next, with a regular spatula, we smooth out the emerging finishing material so that the countershirt disappears under it almost completely. From the corner with the same putty, we align the entire wall using the rule.
Finally
Almost all professionals also use non-woven tape in their work for greater system strength. It is applied to the corners only after applying the extreme layer of the initial putty at the points of transition from the perforated corner to the drywall plane.

Application of non-woven tape to strengthen the corners.
It adheres to putty and guarantees the best reinforcement of the corner and mortar. In the provided note, it is carefully described how to make corners from drywall: both external and internal.
By clearly following the instructions, you will simply achieve the desired results, or rather, strong and even angles that are already ready for further upcoming decoration.
All work can be carried out without outside assistance, since this process should not create special difficulties. At the end of this event, you can begin to finish the joints of the GCR.
The video in this article will clearly demonstrate the nuances of work, look! And, easy repair!
When to carry out subsequent work
 If several layers of gypsum or cement putty were applied, then it is worth waiting 5-6 hours until it completely dries and continue to work. The maximum drying time of such putties is 12 hours.
If a putty based on polymers was used, then you should wait a few days.
It is better to plaster very uneven corners of walls, then to ground and then to putty. And the corners between the ceiling and the wall can first be puttied, then strengthened with a metallized tape, and then puttied again.