 Despite the huge choice in the construction market of plaster mixes, a classic cement-sand mortar is often used for rough finishing of walls. Such plaster is considered the most durable, reliable and durable.
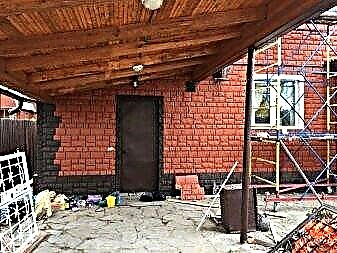
Areas of application of cement plaster
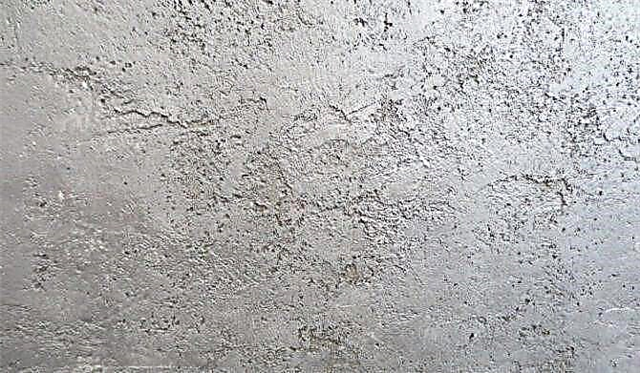
Cement mortar adheres well to bricks and concrete, filling even small potholes. The coating is quite smooth, without cracks and large defects.
Cement-based plaster is used for the following works:
- facade decoration
- plastering and leveling surfaces in rooms that do not have heating (balconies, loggias) or in rooms with high humidity (bathrooms),
- sealing joints and cracks of external and internal walls,
- alignment of surfaces with large defects and large dips,
- preparing walls for tiles.
By the way, in wet rooms on unfinished cement plaster, mold or fungus may appear. In this case, the walls are etched with a neutralizing solution.
For stone and wooden surfaces, it is better to use cement-lime mixtures. Conventional sand-cement will stick to them badly.
Advantages and disadvantages
The main advantages of cement compositions include:
- increased strength of the coating: unlike gypsum, chipping or crumbling such a plaster is not so easy,
- resistance to temperature and humidity fluctuations,
- durability: even when decorating facades most exposed to adverse weather conditions, waterproof cement-sand plaster is able to last up to 15 years and beyond without repair,
- high adhesion to most types of surfaces, including concrete, brick, cinder block, stone,
- ease of manufacturing the solution: it can be prepared even at home, simply by mixing cement with sand and water in the right proportions,
- reasonable price: ready-made DSP plasters are 15-20% cheaper than gypsum plasters, and if you mix with your own hands, the price will be 2-3.5 times lower.
But there are coatings based on cement and a number of disadvantages:
- working with a heavy viscous solution and leveling it is difficult,
- the surface is rough, therefore it requires the application of an additional finishing layer of gypsum, if you plan to paint the wall or wallpaper,
- cement-sand mortar makes the walls heavier, respectively, the load on the foundation will also increase,
- poor adhesion to painted and wood surfaces,
- it is not recommended to apply cement plaster on gypsum - a heavy layer will simply tear it off,
- it shrinks, so when applying too thin a layer may crack, the minimum layer is 5 mm, the maximum is 30 mm. If a thicker leveling coating is required, it is applied with mesh reinforcement, plastering 2-3 times, drying each layer.
The composition of the cement-sand mortar
The composition of a conventional cement-sand mortar includes water, sand and a binder - cement, mixed in a certain proportion. The strength of such a coating directly depends on the brand of cement used. Cement M150-200 is used only for internal work, and the more durable brand M300 and higher - plastering facades.
Respect for proportions is very important. With a lack of sand, the mixture will turn out to be quick-drying and less durable after drying. It is possible to use cement without sand only for filling small cracks, for leveling coatings such a composition is not suitable.
Using too fine sand is also undesirable, because such a plaster can crack. The presence in the sand of a large amount of impurities, for example, clay and soil fragments, can lead to a weakening of the finish and its cracking.
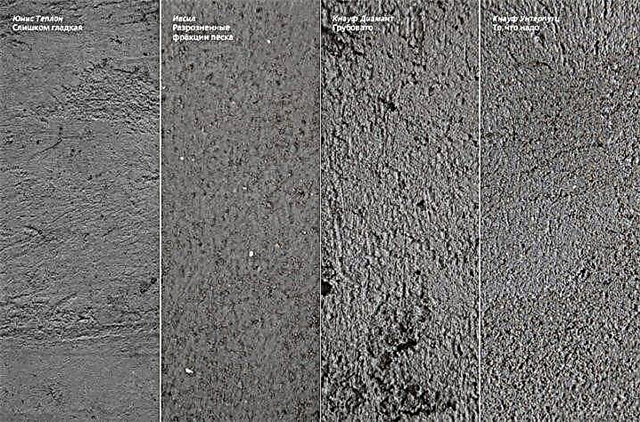
 Surface quality also depends on the type of sand used. The ideal option is river or washed quarry sand with a fraction size of 0.5-2 mm. The presence of large grains of sand will make the surface too rough. Sand with a grain of 2.5 mm is used only for brickwork, and a larger one, up to 5 mm, when installing reinforced concrete structures.
In addition to the usual DSP, there is light cement plaster, which contains lime and mineral fillers. Due to the porous structure, it has lower thermal conductivity.
To give the solution plasticity and increase adhesion to the surface, various plasticizers are added to it. Typically, their proportion in the solution does not exceed 1%. Lime dough also improves the properties of cement.
Specifications
Density. Strength and thermal conductivity of the stucco mixture directly depend on its density. Cement-sand mortar in its pure form, without additives, is classified as heavy and has a density in the hardened state of 1600-1800 kg / m3. This is a fairly durable coating, which is used not only for facade or interior decoration, but also as a screed for the floor.
Thermal conductivity. Due to the high density, the thermal conductivity of the cement-sand screed is high. Unlike more porous gypsum, which stores heat well and has a thermal conductivity of 0.3 W (m * K), the thermal conductivity of cement and sand based plasters is 0.9 W (m * K).
Vapor permeability. To avoid condensation in the room, the walls must be sure to absorb excess moisture and bring it out. Therefore, when choosing a material for wall decoration, such an indicator as vapor permeability is also taken into account. In gypsum and cement mortar, it is approximately the same and is equal in the first case to 0.11-0.14, and in the second 0.09 mg / mchPa.
Drying time. At a temperature of + 15-25 ° C, a layer 2 cm thick will dry for 12-14 hours. With an increase in its thickness, the drying time naturally increases, so for the sake of fidelity it is better not to touch the plastered surface for a day.
This article provides a comparative overview of cement-sand and gypsum plaster. It also talks about a mixture of cement and gypsum.
For clarity, we summarize all the characteristics in one table.
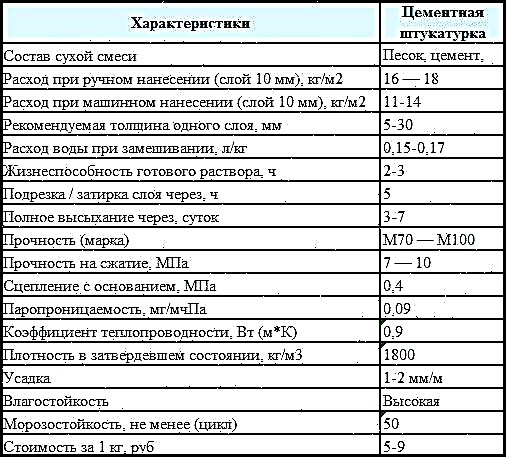
Consumption of cement plaster per 1 m2
When calculating the cost of repairs should pay attention to the consumption of plaster. Despite the fact that dry cement-sand mixtures are cheaper than gypsum, their consumption is 1 m2 more and is 17 kg / m2 with a thickness of 10 mm. For example, gypsum per square meter with a thickness of 1 cm needs only 8-9 kg, that is, two times less. The manufacturer must provide information on how much material will be needed to create a layer of a certain thickness per 1 m2.
We will calculate how much cement, sand and water are needed for plastering 1 sq.m. The consumption rate of the solution is 17 kg / m2 (with a thickness of 10 mm). The amount of mixing water per 1 kg of dry mix is 0.15 - 0.17 liters. If for plaster we take the ratio of cement and sand 1: 4, then the mass of the necessary components will be equal to:
- Cement - 2.9 kg
- Sand - 11.7 kg
- Water - 2.4 kg
Wall preparation
 To avoid peeling of the heavy cement mixture from the walls, it is necessary to prepare the surface first. There are several ways:
Apply a small layer of tile adhesive to the wall. It is used as an intermediate layer between cement plaster and the wall. Thanks to additives in its composition, the adhesive has good strength and adhesion. On top of it lay a plaster grid, completely covering it. The edges of the mesh should overlap 10 cm. Next, use a toothed spatula to smooth the mesh and recess it into a layer of tile glue. After that, horizontal grooves are left with a spatula. When the adhesive mortar dries, it will become a solid base for smoothing cement-sand plaster.
Metal plaster mesh reinforcementrigidly fixed to the wall with self-tapping screws. This is done when it is necessary to plaster unstable surfaces with a thick layer, as well as wooden and clay walls.
On concrete walls, do notches over the entire surface. To do this, they usually use a puncher or an ax. After this, an adhesive primer is applied, for example, Concrete Contact.
Wire crate - Another option to strengthen the wall. Self-tapping screws are screwed into the wall at the same distance or nails are driven in, which are tied with wire. It looks like a metal mesh, which is then plastered. This is an inexpensive but time-consuming method that is more suitable for repairs in small areas.
Before plastering, the old plaster is tapped, the exfoliated pieces are removed, and the pits are brushed
 The walls of their aerated concrete and other cellular concrete blocks are usually flat, and do not require special preparation. They are treated with a deep penetration primer to reduce the absorption of water from the plaster. Dehydration of cement plaster will lead to its accelerated setting, and this will reduce the strength of the hardened layer.
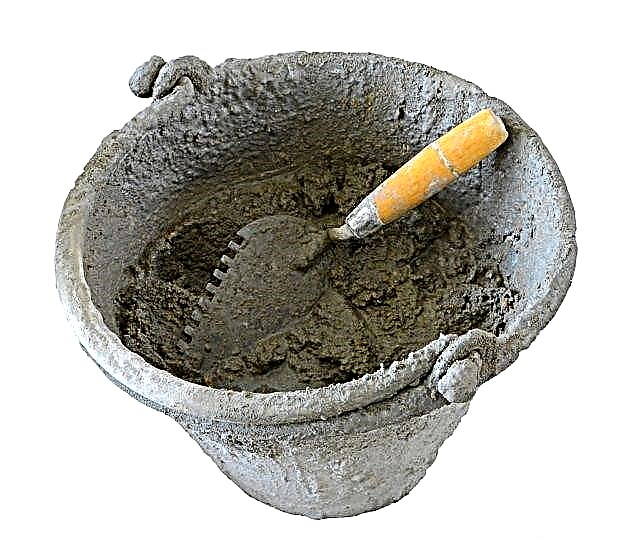
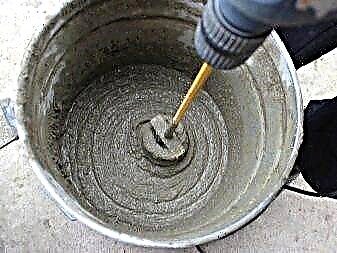
Solution preparation
For finishing small surfaces it is much easier to buy a ready-made dry cement-sand mixture. With a larger amount of work, it is more profitable to cook it yourself. The most important thing is to keep proportions exactly.
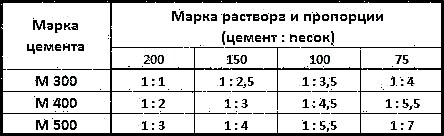
Initially, sand and cement are thoroughly mixed without adding water. Mixing proportions will depend on the brand of cement. The resulting cement plaster according to GOST is divided into several brands:
Even the cleanest sand needs to be sieved through a sieve to remove fine inclusions. Too long stored and caked cement is undesirable. If necessary, it can be sieved by removing hardened lumps, and reduce the amount of sand in the solution by 1/4.
The liquid is added after mixing the dry components. It is added in small portions, each time thoroughly mixing the solution.
To increase its ductility and mobility, plasticizers are introduced into it. We have already mentioned this above. The finished solution should be collected with a slide and not spread, while being well distributed over the surface.
More details about the preparation of sand-cement mortar for plaster are written here.
Wall plaster technology
 Now consider the basic rules for leveling walls with cement mortar:
The walls are pre-treated with a primer. to improve grip and dry thoroughly,
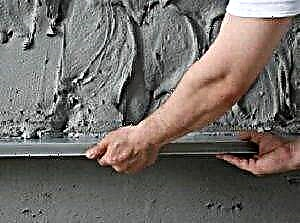
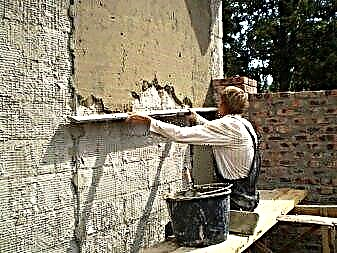
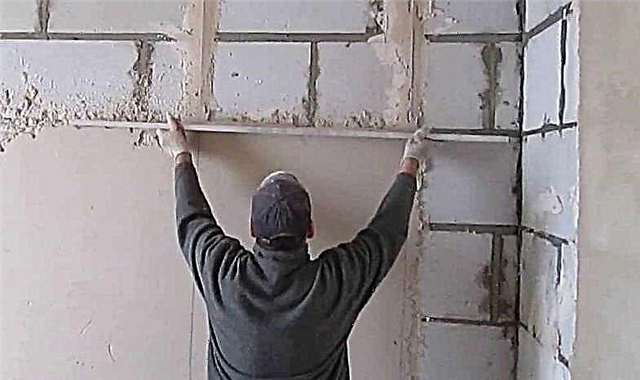
To create a plane on the walllighthouses - guides. In small areas, they can be replaced with slaps of mortar, the height of which is set according to the level.
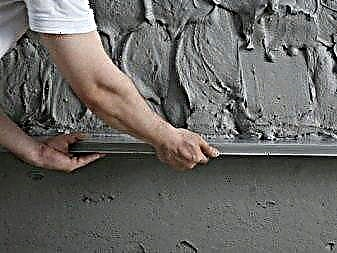
As beacons, you can use a special metal profile. It is attached to the wall with putty. You can also make beacons from wooden slats or bars, they are mounted on self-tapping screws. The main thing to remember is that the distance between the beacons should be 10-20 cm less than the width of the rule by which the plaster will be leveled.
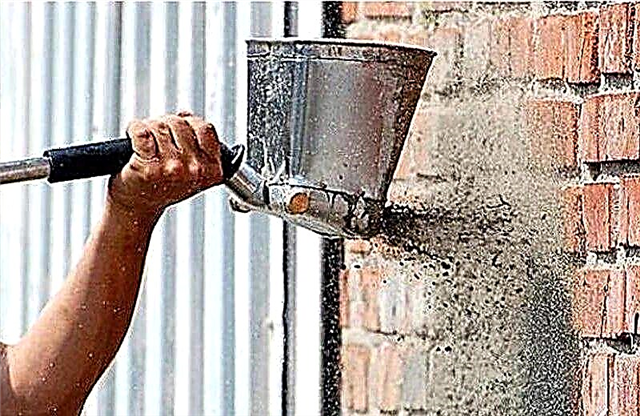
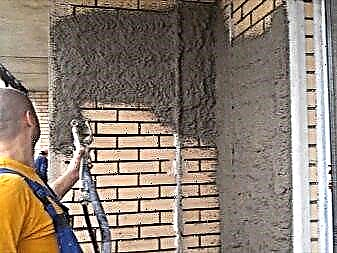
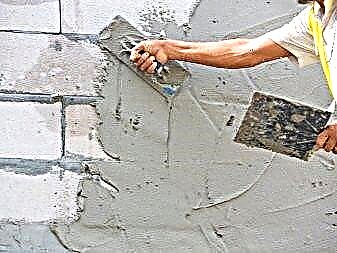
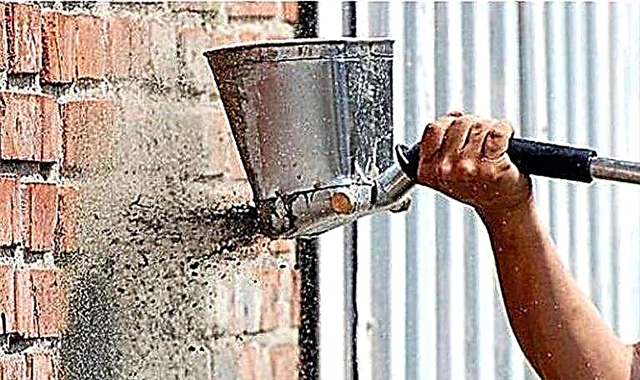
Stucco is thrown on the walls trowel, to create a layer of greater thickness, you can use the bucket. This first layer is called spray - the basis for subsequent layers.
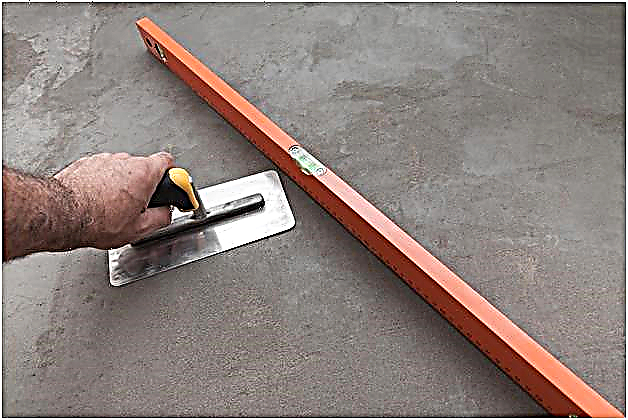
The second coat should be applied a couple of hours after setting the first. It is laid in the direction from the bottom up, completely covering the previous one. It is more convenient to plaster in small sections of 1-1.5 meters. Then the plaster begins to stretch and level the rule. It is pressed tightly to the lighthouses and lifted up, while the rule is slightly moved from side to side. Excess solution from the rule is removed with a trowel.
Thus plaster the entire area between the two beacons and move on.
To align small defects, beacons can not be used. In this case, plastering is carried out using a different technology. After spraying, the solution is distributed with a large spatula from the bottom up.
 A smoother surface can be obtained by additional coating with a liquid mixture (second layer). The proportion of the solution in this case will be 1: 1 or 1: 3 (cement, sand).
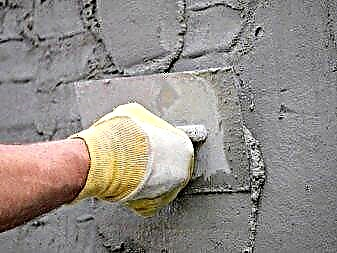
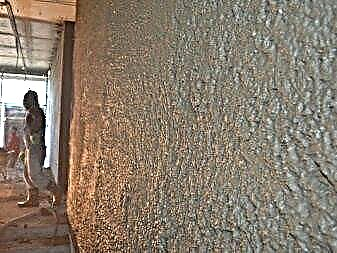
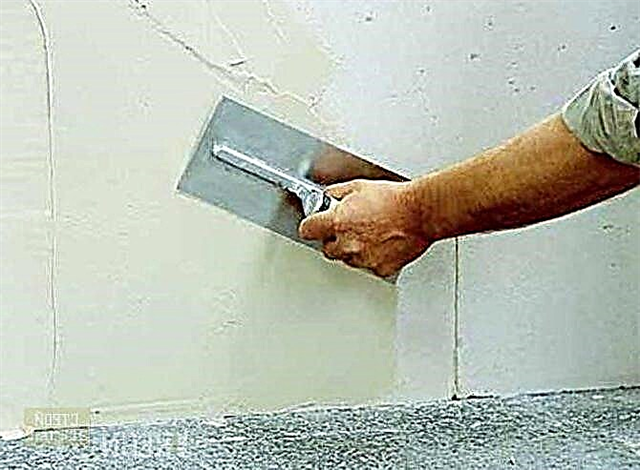
After setting, while the cement-sand plaster has not yet strengthened, it is wiped. In a circular motion, the grater removes small bumps, grooves and protrusions.
The wall so leveled, after drying, will be ready for finishing. Cement plaster dries from 4 to 7 days at normal humidity in the room. In front works, this time can increase up to two weeks.
Some tips before starting work
After familiarizing yourself with the general technology of plastering internal and external walls, we will move on to the nuances of the work:
- Stucco on lighthouses is a good way to level surfaces, however, working with the rule under the ceiling is not very convenient. But if you leave 10-15 cm uncovered, then aligning them the next day after the solution dries will be easier. A new portion can be leveled not horizontally, but vertically by a rule, which is stretched along the dried plaster,
- In order to prevent cracks on the surface during quick hardening and not to peel off, the plaster is periodically sprayed with water from the spray gun or protect the surface with a film. The room should not be drafts and high temperature. If small cracks still appear, re-grout is performed.
- In corners, niches, or pipe passages, working with the rule is very inconvenient. It can be replaced with a DIY template of the required shape. Lighthouses in this case are a little closer.
- Alignment of corners is made by a special metal corner, which you can also do yourself.
- Cement-sand mortar should not be applied over gypsum or lime plaster: heavy plaster will simply tear off the weaker base.
- The proportions during kneading must be observed precisely: if there is an excess of cement (such a solution is called greasy), the coating will be very hard, but will shrink when shrunk. A thin solution with an excess of sand gives a weak, loose plaster, which crumbles easily.
- To determine the quality of the kneading, it is necessary to turn the trowel: the greasy mixture sticks too much, and the lean one drains quickly.
- With different thicknesses of the coating, due to uneven drying outwardly, it will look inhomogeneous. This is especially evident after painting. This defect also appears when applying plaster with a very thin layer.
We hope that this article was useful to you, leave your comments and questions in the comments below.
A mixture of cement and sand: technology
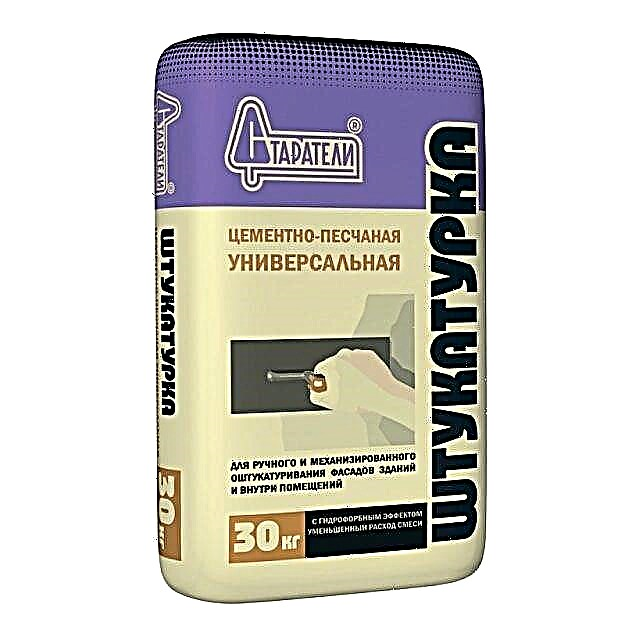
DSP is available in several forms, they differ in the number of additives. For simple work, a pure composition without impurities is suitable, for other purposes it is better to purchase universal compounds.
Universal cement-sand plaster is used for:
- front works and creation of interiors in any rooms,
- leveling screeds or blind areas,
- Improving moisture protection of the substrate.
 Any wall plastering always makes sense.
The work algorithm is always the same; it is performed in 3 stages:
- Draft layer.
- Ground coating.
- Finishing Stage
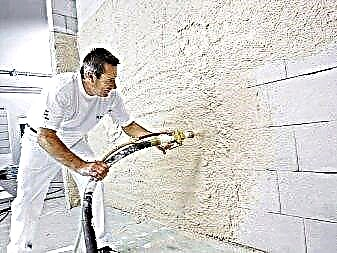
There is a special high-tech application technique, but it will require special tools. The technology is used in a professional environment, since it is quite difficult to apply and is more commonly used where there is high humidity. Cement-sand mixture for plastering using devices is applicable for facades or large volumes of work, but it is expensive. The mechanical method requires expensive equipment, it is cheaper to rent the installation.
Features and composition of cement-sand mixtures - what you need to know?
The key features of DSP are increased wear resistance and coating durability.The composition is used for decorating walls from the inside and outside, especially in places with high humidity (bathrooms, rooms without heating, swimming pools, etc.).
In the case of alignment of the walls with internal defects, the DSP layer improves noise and heat insulation, and also slightly protects against water absorption. The most important advantage is the low cost due to the use of common materials.
 Cement-sand plaster is a mixture of different types
The composition of the cement-sand plaster:
- cement. The basis can be used various brands of substances from M100 to M500. According to the recommendations of specialists, M250-M500 is optimally suitable for external walls, and internal work is carried out with the composition M100-M200,
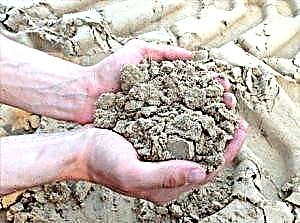
- sand. It acts as the main binder, is a filler and a link for cement. The quality of sand directly affects the result: strength, color, reliability, wear resistance. Sand is of two types: river and quarry. At the heart of the CPS is any variant of the middle fraction. Professionals prefer river sand.
Traditionally, a proportion of 3 parts of sand to 1 part of cement is used to prepare the mixture. Features of the plaster may vary depending on the manufacturer, since mainly additives are added to the composition: plasticizers, redispersible components, copolymers. These substances improve the strength of the coating, prevent wear, simplify the work with the composition, give the mixture elasticity and flexibility. When working in sub-zero temperatures, in addition to the cement-sand mixture, it is necessary to add aggregators to protect against freezing, ready-made compositions are presented in stores.
What sand is needed for plastering walls: the main recommendations
Sand-cement plaster includes various sand: sea, river or quarry, but there is no unequivocal opinion between builders which one is better. Many believe that the use of cement with sea sand leads to a better effect, since it has a more uniform structure. Another argument in favor of the marine type of material is the absence of any impurities that could damage adhesion.
Facade cement-sand plaster with quarry or river sand is somewhat cheaper and has the same performance characteristics.
The ratio of sand and cement
The proportion of mixing ingredients depends on the goal. Before you dilute cement with sand, you should clarify the purpose of the solution, the presence of filler and brand of cement.
More often sandy plaster mixes in the ratio:
- standard mixture: 1 part cement to 3 parts sand,
- the use of cement grade M400 or M500 - 1 to 4 or 5, respectively.
The proportions of cement and sand for floor screed are approximately standard. If slag or gravel is planned, the ratio of cement, sand and filler is 1 to 2 to 4-5.
It is important to consider the marking of building materials and recommended brands of final compositions. For masonry, a mortar M100-M150 is used, the consumption of cement mixtures is 0.062 m3 / m2. For the laying of the facing brick M350, M115 solution is used. Plasticizers are added to increase viscosity. Similar compositions are used in the process of plastering for better adhesion.
Varieties of plaster compositions - not so simple
A simple mixture is used in rooms located inside a heated building for:
- rough alignment before installing a reinforcing mesh, which must be applied to create a decorative variety of material,
- sealing various defects: cracks, gaps, grooves and irregularities. It acts as a preliminary layer for decoration,
- creating an antibacterial surface, but special additives are added to protect against fungus.
A simple composition of sand-cement plaster is used for arrangement according to a two-stage system: preliminary spraying of the surface and a primer layer.
The composition of the plaster changes if necessary to perform work in difficult conditions: high humidity, exposure to ultraviolet radiation, temperature changes. In these conditions, a universal DSP is used. The characteristics of cement-sand plaster with additives is different due to the increased resistance to negative influences. A universal variety of means is used to improve waterproofing, including for reinforced concrete rings, septic tanks, etc.
The universal mixture with which the plastering of the walls takes place is applied in 3 stages (discussed earlier), but 4 steps can be applied to improve the quality (a primer layer is applied 2 times).
 A simple composition is used where finish quality is not critical.
If plastering walls with high humidity, it is recommended to use high-quality compounds that require certain skills and tools. For high-quality mortar for plaster it is necessary to install beacons, in relation to other plasters they are optional. It is recommended to iron the coating layer for waterproofing and increase the strength of the surface.
DIY plastering
If a mortar will be used for plastering large surfaces, it is recommended to knead the composition on a flat surface with sufficient rigidity, ordinary asphalt is suitable.
The procedure for mixing the composition:
- 3 buckets of clean sand are poured onto the asphalt: without weeds, dirt, stones, dust, shells, etc. Preliminarily, it is better to sift the composition, rinse if necessary.
- Level the sand layer and create a circle.
- 1 bucket of cement is scattered throughout the area.
- After this, it is necessary to mix the composition thoroughly, as a result, light areas should not appear.
- Align the material in the form of a circle, inside most of the DSP is extracted to form a “volcano crater”.
- A little water pours into the recess, gradually adding cement and mixing the composition.
- After the crater has dried, water is added again until the entire mixture is prepared.
- At the end, the DSP is thoroughly mixed to create the same consistency.
In the case of preparation for 25 kg of cement, 75 kg of sand and approximately 2 buckets of water are added.
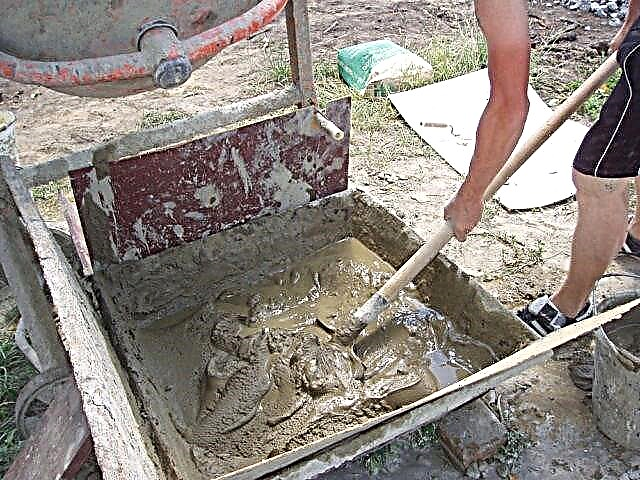 The cement-sand mixture is mixed on a flat and hard surface.
The result of the preparation of the solution should be similar in texture to sour cream, but:
- to lay the tiles on the wall, the mixture is prepared dryish,
- if it is planned to use mechanized plaster, the solution is made liquid,
- when plastering on beacons, the DSP should not drain and be too dry. Slaked lime is added to improve elasticity.
Useful tips at the stage of preparation of the composition:
- It is important to thoroughly mix the DSP with water to prevent the formation of large particles or areas without cement. Due to the appearance of such violations of technology, air pockets or areas with low strength are formed,
- for mixing, it is better to use a construction mixer, it is inexpensive, but simplifies the mixing process, and also improves the quality of the mixture,
- mixing can be carried out with a drill or perforator when installing a special nozzle.
The technology of using solutions based on sand and cement
The first application step is spraying. Some tips for doing the job:
- The procedure can be done manually using a bucket or trowel. It’s more convenient for some beginner builders to spray with their hands,
- An old vacuum cleaner is suitable for application if it is able to blow air. A vacuum cleaner will replace a spray gun,
- the thickness of the layer depends on the complexity of the bumps. In general, a layer of 6-7 mm is applied to brickwork, 4-5 mm to reinforced concrete substrates, and 1 mm to wood.
The second step is to apply a primer. Now it is important to follow the basic recommendations:
 To cement-sand plaster was more viscous, special plasticizers are used
- the solution is prepared a little thicker than in the process of spraying,
- applying a primer DSC is best performed in 2 stages,
- the first step of the coating is designed to level the substrate, before applying the second layer, wait 30 minutes or more,
- at the second stage, it is important to fill in all visible defects and completely level the surface
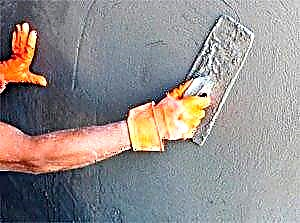
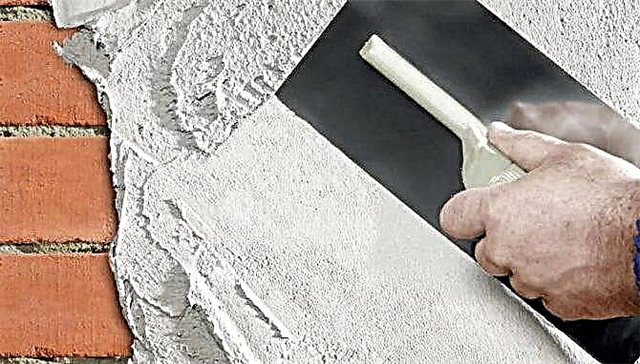
At the end, a coating layer is applied with a thickness of up to 4 mm with a liquid solution. If the preliminary steps were performed correctly, the coating will not lead to difficulty. To eliminate irregularities, the wall is treated with grout or a half. During mashing, circular movements are carried out, otherwise noticeable scuffs will appear.
Decorative plaster "Sand whirlwinds"
Today, the trend is a new type of plaster - “sandstorm”. To create a special effect, sand is added to the finishing material. The composition is simply applied to the surface, and the result is a durable, flexible material with protection against air penetration. An additional advantage is the absence of solvents and uncharacteristic odors.
The color of the plaster is the most diverse, depending on the design idea. The most popular today are purple shades.
Stucco walls with cement-sand mortar: 3 important tips
Experts note the importance of 3 tips in which beginners can get confused:
- For the preparation of DPS at home, the role of plasticizer is replaced by PVA glue. For 1 liter of solution, 7 to 10 ml is added.
- If you plan to spray a smooth surface, the mortar may fall off and stick poorly to the wall. Tile glue will help improve adhesion. If you want to process wood and other surfaces with poor adhesion to cement, it is useful to know what concrete contact is.
- All substances are slightly different, it is recommended to study the manufacturer's instructions before mixing. Differences may occur depending on the type of work, recommendations for a particular type are given on the packaging.
Paint for cement mortar will help to improve the appearance of the plaster, the colors will help to create an interesting design even without a finishing layer.
Cement plaster - areas of application
The applied solution forms excellent adhesion to the wall, filling even tiny pits with itself. The surface after smoothing the cement plaster comes out smooth, eliminating obvious dips and imperfections. Preparing a solution of cement plaster is quite simple: the basis is a sand component, cement filler, modifier, plasticizer - dilute in water and ready. The use of such a solution is most often used:
- Alignment of walls in rooms without heating. The use of cement plaster at construction sites where the moisture level is suspended is especially relevant,
- Correction of shallow or noticeable flaws of the walls inside and outside the room,
- Facade decoration,
- Preparatory alignment of walls for the installation of wall ceramic tiles.
If cement plaster is not treated in rooms with a high level of humidity, fungus and mold will certainly appear on the walls. You will have to periodically treat the walls with a special liquid. For walls made of wood or stone, it is better to use a mixture of cement and lime. Others will not be able to provide good grip.
What it is?
Cement-sand plaster, as the name implies, is a two-component mixture. The first component is sand, the size and purity of which greatly affect the leveling results. The grains of sand should not be too small, the presence of impurities in the plaster mixture in the form of clay and other elements, leading to cracking of the composition after it dries, is also unacceptable.
The sand component is of several types:
- river: grains of sand have a size of 0.05 cm,
- career: sometimes fractions reach 2 mm,
- sand for masonry: granule size - 2.5 mm,
- sand for work with reinforced concrete structures: grain size reaches 5 mm.
The cement component may have different strengths. Some compounds are used for outdoor use, and some are used only for indoor use. You can also highlight a special type of cement in the composition of the plaster mixture - cement with mineral filler. Such a mixture has a lighter structure and has lower thermal conductivity.
Another component in the composition of the cement-sand mortar is water, due to which the bond between the sand and cement molecules is carried out.
In the process of repair special plasticizing elements are often added to the compositionwhich contribute to improving the adhesion of the plaster to the surface.
Like any building material, cement-sand plaster has its own technical characteristics:
- Thermal conductivity. Compared with other compositions, the cement-sand plaster mixture has a high thermal conductivity. Usually this indicator is 0.9 W (m * K).
- Drying period. This indicator is largely determined by such factors as the thickness of the applied layer and the temperature at which the surface is leveled. The most versatile is a two-centimeter layer deposited at a temperature of 15 to 20 degrees Celsius. In this case, the coating will finally dry after 12-14 hours. If you make a thicker layer, then, accordingly, the drying time of the solution increases. Sometimes it can reach a day.
- Density - a very important indicator. It is the density coefficient that determines the strength of the composition. Plaster mortars are considered quite heavy. The density of the cement-sand mixture in a frozen state can be from 1600 to 1800 kg / m³.
- To prevent condensation from appearing on the surface of the walls, it is necessary to choose a leveling compound with good vapor permeability. For cement mortar with sand, the optimal indicator is 0.09 mg / mchPa.
Taking into account all the characteristics helps to thoroughly calculate the required amount of materials and provide for the influence of the conditions in which the process of leveling the surface with plaster will be carried out.
Features and Benefits
Technical features explain a number of features inherent in cement-sand plaster:
- It is recommended to use such a plaster mixture only in a certain temperature range: from 5 to 30 degrees. Going beyond this will result in poor-quality alignment and cracking material. If the plastering process is carried out at sub-zero temperatures, you can purchase special additives that make the mixture resistant to frost.
- To strengthen the cement-sand layer, it is necessary to use a fiberglass mesh.
- Among the products for plastering with the addition of sand there are options with different strengths. Strength index directly depends on the grade that defines the binder component. Remember that the strength becomes final after four weeks from the moment of applying the composition.
- It is important to know that after the preparation of a cement-sand plaster mortar, the time of its use is limited: such a solution can withstand no more than half an hour. In this regard, it is recommended to breed it in small portions.
- It is important to clearly follow the instructions when diluting the composition, since deviations can significantly affect the functionality of the leveling coating.
The main advantages of the material include the following qualities:
- load resistance
- wear resistance
- good adhesion to the surface to be treated,
- weather resistance,
- elasticity,
- ease of manufacture.
But, like any building material, cement-sand plaster is not without drawbacks:
- In order for the composition to acquire the necessary quality in specific conditions, it may be necessary to buy additional additives.
- When repairs are done thoroughly, buying a cement-sand leveling mixture can be quite expensive, especially if you prefer the most famous companies.
- A large layer of such plaster on the walls creates an additional load on the foundation.
- The need to quickly use the solution explains the additional consumption of material. For reasons of various circumstances, it is not always possible to apply the coating in half an hour, so the surplus manages to become unusable. Because of this nuance for repair, the plaster is bought with a margin for such cases. When the solution dries, you can dilute it with water, but you will need to apply such a mixture even faster, since the process of re-hardening is accelerated.
- For many users, a negative quality is the drying time of the mixture.
Knowing all the advantages and disadvantages of the material, you can most effectively carry out the process of leveling the surface.

The introduction of new technologies in the creation of building and finishing materials allows us to subdivide cement-sand plaster into several types:
- Simple compositioncreated for interior wall decoration. The walls are coated with a solution in two stages: spray and soil. Most often, the composition is used in order to repair unevenness and cracks in the walls, sometimes it is used for hygienic processing of surfaces. When applying simple plaster, there is no need to put building beacons on the walls.
- Superior composition Suitable for both indoor and outdoor use. In addition to spraying and soil, as in the previous version, a coating step is included in the work with this mixture.
- High quality composition It is a universal mixture used for leveling the surfaces of external facades and walls indoors with irregularities of almost any complexity. Such a mixture is applied in several layers, the minimum number of which is 5. For a successful result, more work steps need to be carried out: several layers of soil should be applied, and after the coating is applied, it is recommended to iron it using cement.
Depending on the complexity and quality of the composition, the time required to level the walls also changes. But remember that the result always justifies the hours spent.
Areas of use
Cement-sand plaster mix is used in many areas related to repair and decoration.
The most popular are the following:
- with the help of such compounds, facade decoration is carried out,
- cement-sand mortar is used to patch potholes, bumps and other errors of various surfaces,
- the mixture is popular for finishing rooms in which there is no heating or there is an increased level of humidity,
- due to the presence of sand and cement, this type of plaster is suitable for smoothing large defects,
- sometimes a similar solution is used in the preparation of walls for laying tiles.
Manufacturers
It is important to determine in advance the plaster manufacturer. The construction market presents the products of many companies.
Consider the unconditional leaders who have successfully established themselves among consumers.
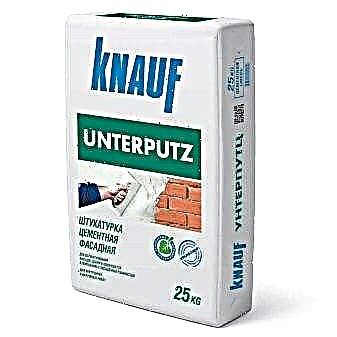
- Cement-sand Knauf mix differs in long service life and resistance to various influences. Most often, the products of this brand are used for decoration of external facades. But the company took care of various users and created a rich assortment of plaster mixes for any type of work.
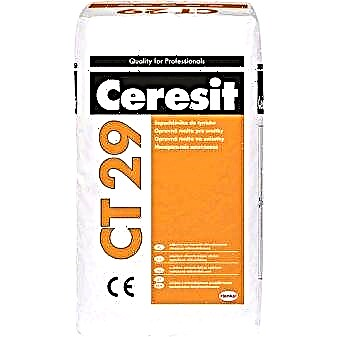
- Ceresit Products stands out for its resistance to mechanical stress and excellent vapor permeability. This mixture tolerates temperature extremes. In addition to the main purpose - leveling, the plaster of this company is also used to create a decorative coating. But in terms of price, such a mixture is one of the most expensive.
- Brand Vetonit ideal for those who carry out the process of plastering walls at low temperatures.
- Among domestic manufacturers in demand products of the "Prospectors" trademark. The company produces various options for formulations designed for both manual and machine type application. The dry mixture includes components that improve its basic functions, for example, it can be a light filler or special additives of high quality.
- For those users who need increased strength of the plaster coating, it is suitable Volma products. Its feature is the presence of reinforcing fibers.
If you take into account all the nuances of the use and purchase of cement-sand plaster, this will help you effectively carry out repair work and prepare the surface of the walls for further decoration.
See how to plaster walls in the next video.
Properties and characteristics of cement plaster
The name of the mixture was due to the main component - cement. Translated from Latin, cement is a broken stone. After all, it is made of clinker and fine gypsum. It is an astringent artificial inorganic substance, which, when interacting with a liquid, is converted into a viscous, plastic mass. In humid conditions, cement gains strength, unlike gypsum or lime.
The composition of the mixture depends on its purpose. Cement plaster consists of cement, as a binder, water, sand as a filler. Instead of sand, lime can be used. Cement plaster has the following technical characteristics:
- The maximum permissible layer thickness in 1 pass is 4 cm.
- The material has a compressive strength of 6 to 12 MPa.
- Cement-sand plaster for interior use has a cement grade from M100 to M300.
- Grip on separation from 0.3 to 0.4 MPa.
- The ability to retain moisture from 90 to 95%.
- The flow rate is from 150 to 400 ml / to the mixture.
- After mixing, the cement plaster can stand for 30 to 360 minutes without loss of properties.
- The rate of consumption of dry suspended matter when applied to the wall layer of 1 cm is from 12 to 20 kg / m 2.
- Optimum temperature conditions for application: from +5 to +30 degrees.
- Frost resistance (property to freeze and thaw without destruction) 50 cycles.
- Tile can be glued after 72 hours.
- The drying time of cement plaster is from 2 to 4 days, it all depends on the type of base. Complete hardening of the layer occurs after 10-30 days.
- The vapor permeability of cement-sand plaster is 0.08 mg / mchPa. Walls will be able to breathe and condensation will not form in them.
To increase the mobility of the cement mixture, and it filled all the voids, a plasticizer can be added to it. Then voids will not form on the surface.
Disadvantages and advantages
Cement plaster is not in vain so popular - it has a lot of positive qualities. This mix is appreciated by users for:
- Budget cost: finished cement-sand mixtures cost almost a quarter less than the same gypsum,
- High layer strength. Crushing it or chopping it off the wall will be harder than it sounds
- Long service life. Even after finishing the external walls, cement plaster is able to withstand the “attacks” of the weather and withstand without repair for about fifteen years,
- The ease of preparation of the solution. Just add the right amount of water to the mixture and mix well,
- Providing excellent adhesion to most of the various surfaces, including cinder block and stone,
- Resistance to changes in humidity and temperature.
But each barrel of honey has its own fly in the ointment. Cement plaster has its drawbacks, which are also useful to learn about:
- It’s physically difficult to work with a thick viscous solution,
- If you make the layer too thin, it may crack. Minimum - 0.5 cm
- Do not apply the solution on top of the gypsum - neither the solution nor the gypsum can hold on the wall,
- The surface does not come out completely smooth, therefore it is advisable to apply an auxiliary layer of gypsum,
- Almost does not stick to wood or paint,
- The mortar makes the walls heavier, which increases the pressure on the foundation.
The composition of the cement-sand plaster
The composition of the mixture and, in fact, the finished solution is extremely simple - it is water, sand and cement. It is the latter in this case - an astringent. The strength level of cement plaster is dependent, first of all, on the brand of this component. For instance:
- M200 and lower - used exclusively for interior decoration,
- M300 and higher - for the external.
It is really important to keep proportions. If there is not enough sand, the solution will dry very quickly, but it will turn out not so strong. Sand can be dispensed with only if minor defects need to be putty. To align the walls, the option is not the best.
Do not use fine sand. Then the cement plaster may crack. If the sand is dirty (for example, mixed with clay or earth), this can lead not only to cracks, but also to weaken the layer.
The quality of the finished layer depends on the type of sand used. The best choice would be river sand, or peeled quarry. Dimensions of grains of sand should not exceed two millimeters. Too large will give the finished surface roughness. Sand with larger granules is taken for processing brick or reinforced concrete.
In addition to the standard cement-sand mixture, there is also light cement plaster. It includes lime and mineral additives. Due to the porous structure, its thermal conductivity is much lower.
Add plasticity to the solution and increase the level of adhesion to the surface, by adding a plasticizer. As usual, the solution does not contain more than one percent of this additive. A good option for such a plasticizer will be lime dough or ordinary washing powder.
The main characteristics of cement plaster
Drying time. At a temperature of no higher than 25 degrees, a two-centimeter layer of cement plaster will dry up to fourteen hours. If the layer is increased, then the time, respectively, will increase too. So it is better not to touch the plastered surface for about a day.
Density. Parameters such as thermal conductivity and strength of cement plaster directly depend on the level of its density. Pure cement-sand mixture without any external impurities is heavy. In the solid state, its density varies from 1.6 thousand to 1.8 thousand kg per cubic meter. This coating is quite durable. The mixture can be used not only for wall decoration inside and outside, but also for the floor.
Heat conductivity. Due to its high density, cement plaster has the same high thermal conductivity. If you compare it with gypsum, which has a more porous structure and retains heat well enough, the thermal conductivity of cement plaster is three times higher.
Skip moisture and steam. In order not to allow condensation to form in the room, it is important that the walls are able to absorb excess moisture and get rid of it. So, when choosing a finishing material, the degree of vapor permeability plays a really important role. If we again compare cement plaster with gypsum, then the vapor permeability index in the first case is somewhat lower.
Surface preparation for plaster
To prevent peeling of heavy cement plaster, you need to prepare the wall in advance. And there are several options for how to do this:
Apply a thin layer of tile adhesive to the wall. He will play the role of an intermediate layer. Due to the impurities in the composition, this glue boasts strength and strong adhesion. Put a plaster grid on it. Smooth it with a spatula, drown in adhesive. Make horizontal grooves and wait for the glue to dry. Thus, you can create a solid foundation for leveling cement plaster.
If it is necessary to apply a thicker layer of plaster, but the surface is unstable or it has poor adhesion, strengthening with a plaster grid is suitable. Previously, the reinforcing mesh will have to be fixed on the surface with screws.
Make notches on the concrete with a hammer drill. After applying a coat of primer and you can plaster.
Aerated concrete surfaces, as usual, do not require preparation. But it is advisable to process from a deeply penetrating primer to reduce the absorption of moisture from the plaster. Dehydration will weaken the dried layer.
How to prepare a cement plaster solution
If there is not much finishing work to be done, you can buy a ready-made mixture for a solution of cement plaster. If the scope of work is large-scale, it is much more profitable to make the mixture for the solution yourself. An important condition is to monitor the proportions.
At the very beginning, sand and cement should be mixed well, without adding water. The amount of ingredients depends on the brand of cement.
Even though the selected sand is very clean, for reinsurance it is necessary to sift it again so that all unnecessary small details work out. In addition, you should not use cement, which has been stored for a very long time and has had time to cure.
Water needs to be added after the dry ingredients are mixed. The liquid is added a little, and each time the solution is thoroughly mixed.
To increase the ductility of cement plaster, you can use a plasticizer as an additive. This has already been discussed a little earlier. High-quality ready-made solution is well distributed on the surface, but at the same time it should not spread.
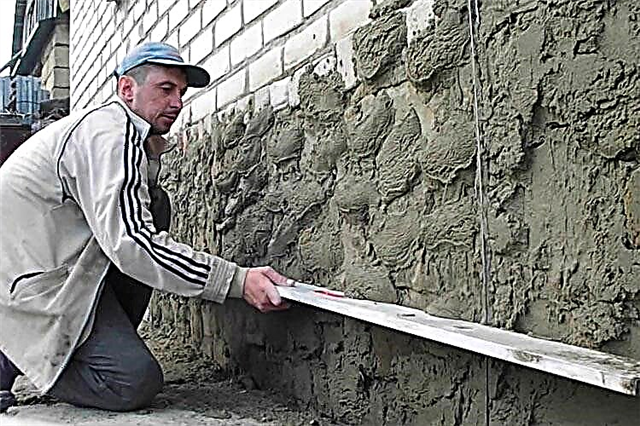
How to plaster walls
Next, the basic rules for applying cement plaster on the surface will be considered:
In advance, the surface must be treated with a primer in order to improve adhesion and wait for drying.
To create a specific area on the wall, you can place beacons. If the working area is small, droplets of cement plaster can play the role of such beacons.
If large-scale works are planned, it is advisable to stock up with a metal profile, exhibiting them in terms of level, they will serve as excellent beacons. Profiles are fixed on the wall by putty. Alternatively, beacons made of wood or just self-tapping screws are suitable. It is important to remember that the distance between the beacons should be 10-20 centimeters less than the width of the rule for leveling.
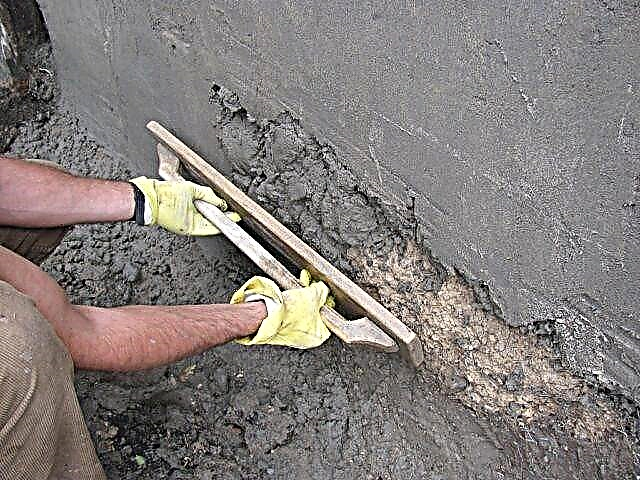
The plaster is poured with a trowel. If you need a layer thicker, you can take a bucket. The first layer on the "language" of the repairmen is called spray - this is the basis for further surface treatment.
The next coat is applied two hours after the first has set. It stacks from bottom to top and completely covers the previous one. After the cement plaster must be stretched and leveled through the rule. The tool must be pressed tightly to the beacons and raised up, while slightly moving along the sides. Excess plaster from the rule can be removed with a trowel. This is how the entire area between two marks is coated with plaster. After it's time to move on.
When the cement plaster has already set, but has not yet hardened, it needs to be wiped. This is done with a special grater. It is convenient to remove all defects of the resulting surface in a circular motion with a slight pressure.
After processing with a grater, the finally leveled surface is completely ready for the final finish. The plaster dries in about a week. A minimum of four days. If optimal humidity conditions are observed. If the work is carried out on the street, then the drying time may stretch to a couple of weeks.
To summarize
Cement plaster is a very useful material for residential and non-residential stock. There are two main application methods. Manual and mechanized when the cement mixture is supplied directly to the walls using a machine. Handwork is optimal in small apartments.The mechanical method is more effective in large building areas. By changing the water-cement ratio, you can get a cement-sand mixture - the main link in the brickwork.
Cement-sand based plaster
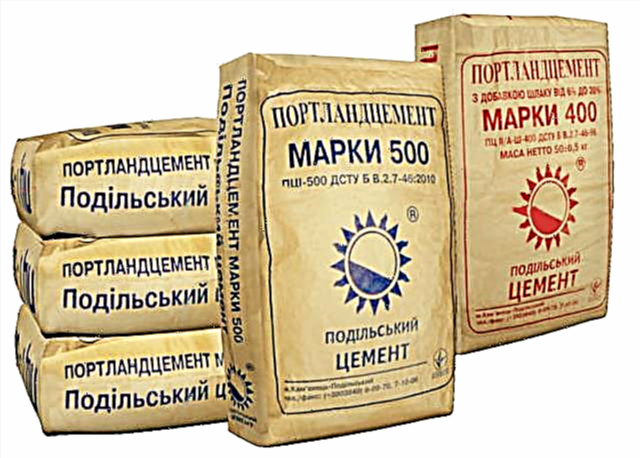
The composition of such cement-sand plaster is simple and clear from the name. As a binder, choose Portland cement, the brand of which begins with M-150 and ends with M-500.
With the increase in the brand of Portland cement, the cost of production increases. Therefore, to save money, for dry rooms choose the brand M-150 – M-300. But for finishing the structure from the outside, it is better to take the brand from M-350 to M-500.
To create a plaster based on cement and sand, resort to proportions of 1 to 3, where 1 is cement, 3 is sand. As for the ratio of cement and sand for plaster used in adverse conditions (street, wet buildings), the proportion of sand increases to 4 parts (1: 4), and cement is selected brand M-400.
The proportions of cement and sand for wall plastering are different for each of the created layer: basic, basic, decorative. Their characteristics:
- Spray It is the initial, applied to the wall by spraying. Thin layer up to 5 mm. Purpose: to penetrate into all cracks and voids, improve adhesion with the subsequent plaster layer. The solution is creamy and will continue to bear the weight of the remaining layers. The optimal proportion is 1 to 2.5–3.
- Priming. Since the solution is basic, it mixes thicker. Try to achieve a consistency test. Purpose: to smooth the surface, characterized by a large thickness. It can be applied in 2-3 layers. In order to avoid sliding of the layer, it is formed with a maximum thickness of 20 mm. The optimal proportion is 1 to 2-3.
- Nakryvka. Finishing coat. A minimum layer of cement plaster is applied, up to 4 mm. The consistency is creamy. The goal is to create a thin, smooth layer, which is then easy to wipe. The optimal ratio of components is 1 to 1–1.5.
To make the created solution more stable and improve its properties, the following components are added:
- To create a stable mixture to an acidic environment, quartz sand and diabase flour are added to it.
- Barite and serpentite sand will help protect the mixture from x-rays. Moreover, their fraction of 1.25 mm is not less.
- To increase strength and toughness, metal dust or chips are added to the plaster.
- To give the composition decorative properties, coarse sand up to 4 mm and marble flour are added to it.
And by designation, all cement-based plasters are divided into other subspecies.
- Simple. They perform two processes: spraying and priming on the surface without the use of beacons. The scope is technical buildings to which beauty is unimportant. This includes a basement basement, warehouse, garage, barn. The goal is to create a layer on bare surfaces.
- Superior. Intend for spraying, soil and nakryvki on which grout is done. The scope is residential buildings inside and facades. The goal is to form the base layer and align the surface in a plane. The most commonly used option.
- High quality. Intend for work with plaster mix on beacons. Application is carried out in 3-4 layers. The coating is formed by the technology of iron cementation, so that the layer becomes even more protected from moisture.
Description of how to make a sand-cement mortar for plaster:
- Prepare the sand. Wet sand is sieved by a sieve with holes up to 5 mm, dry sand - up to 3 mm.
- In the container where the batch will be carried out, pour water.
- Slowly apply cement and mix well. So you can avoid the appearance of lumps.
- Taking into account the proportions, add sand to the composition. At this stage, the selected components are added (metal chips, perlite, etc.). Additionally, a plasticizer for plastering with cement mortar is introduced.
- It remains to mix the raw materials to get a homogeneous mass.
Special plasticizers are on sale to make cement mortar more plastic. It can be replaced with detergent, 30–50 mm is sufficient.
 Advantages of cement-sand mixture:
- Very durable.
- Not afraid of temperature changes.
- Affordable.
- Durable
- Protected against moisture.
- It has good frost resistance.
- It perfectly adheres to the surface of concrete, brick, stone, cinder block.
- Easy to cook on your own.
- Applying cement plaster is physically difficult.
- The finished layer is rough. It is impossible to glue wallpaper on cement plaster, especially if they are thin.
- It adheres poorly to a wood surface.
- Cement plaster grout is laborious.
- It shrinks, you need to do at least two layers.
There are several ways to apply plaster: rune and machine. What kind of cement plaster for machine application is indicated can be found on the bag with instructions from the manufacturer.
Cement-limestone plaster
As part of Portland cement, sand of medium or fine fraction, lime (slaked necessarily). At the same time, the cement grade M-300 is no less. Adding lime to the plaster gives the mixture greater ductility, improves vapor permeability, and makes the solution antibacterial.
The composition can also be done with your own hands, however, it is important to adhere to the rules. For example, lump lime is required to withstand at least 2 weeks so that the finish in the future does not swell and exfoliate. The process itself cannot be carried out in plastic containers, since a lot of heat is released during the extinguishing process.
Advantages of cement-limestone mixtures:
- Adhesion to concrete, brick, foam block, wood.
- Fungus and mold will not form on the surface, etching is not required. *
- The mixture is plastic throughout the work with it.
- Walls can breathe, which is important for wooden structures.
- Durability before mechanical abrasion.
- Low tensile, compressive, and tensile strength.
- Long drying time.
- With self-preparation, lime must be repaid, which takes about 15 days, ideally a month.
- Increased cost when compared with simple single-component solutions.
* Etching cement plaster with a neutralizing solution - what is it? The sandy surface is affected by biological microorganisms. To prevent this from happening, etching is carried out with a special neutralizing solution. They are sold in stores. The solution is applied as a primer: it is required to clean the surface and apply it to the wall with a roller or spray, without missing sections.
Since cement-lime plaster has antibacterial qualities, such a procedure is not required. This saves money and time.
Which mixture to choose
This is not to say which cement plaster is better. After all, each of the varieties has its pros and cons, and it is suitable for a certain type of work. For example, for processing inside it is better to choose materials on a limestone basis, for example, cement plaster Cerezit ST25. It is plastic, light.
When working with facades, plastering is required to protect it and serving as a decorative layer. For this purpose, cement-sand products are used. For outdoor work, craftsmen recommend using cement plaster Knauf Grünband. A store consultant can help with the selection of specific manufacturers.
Application Features
The work cannot be called easy. The whole process is divided into successive stages. Ideally, before you try and apply the mortar yourself, it is recommended to watch a video on how to plaster walls with cement-sand mortar. Then, based on what you saw and fixing everything with the instructions below, you can do the job correctly.
Necessary tools
Cement plastering is carried out with a standard set of tools. Scroll:
- Trowel or plaster bucket.
- Metal brush to clean the surface.
- Spatulas of different sizes.
- Plumb and level.
- The rule by which you can control the roughness on the walls.
- Grater and one and a half to give the surface smoothness and removing furrows.
- Capacity for the preparation of plaster.
- Bucket for water.
- Paint roller and brush.
As for materials, a primer for cement plaster is required to increase adhesion and reduce the ability of walls to absorb moisture.
Preparation of the base before plastering
The quality and durability of the created layer will depend on this stage. Work sequence:
- Remove all unnecessary from the premises.
- Clean the walls to the bottom if the old layer falls off.
- If the wall is made of brick, then to improve adhesion they need to be deepened by 1.5 cm.
- When working with a concrete surface, it is required to remove its smoothness. To do this, notches or grooves are made on the wall, depth 3 mm, length 15 mm. On 1 m 2 you need 250 such notches. Furrows are made with buchard or cog. It remains to clean the wall with a brush and wet it with water.
- If the wall is made of wood, then to improve traction and reinforcement, shingles or metal mesh are packed. The shingles are made of 15x4 mm strips, fixed so that diamond-shaped cells form. The metal mesh is stuffed onto a clean wall.
After that, you can prepare the material and get to work.
Proportions of the mixture per 1 m2
If you buy finished products, then the cement consumption per 1 m2 of plaster is not required to know. It is enough to follow all the instructions from the manufacturer indicated on the container. However, doing cooking with your own hands, such information is required. So you can save money on the purchase.
The rate of cement consumption per 1 m 2 of plaster can be indicated on the packaging from the cement manufacturer, taking into account a layer thickness of 10 mm. Each brand has a different one. To find out the proportions, you need to determine the thickness of the layer and increase the performance on the package. Take the average plaster consumption of 8.5 kg / m 2. The table below shows what cement consumption for plaster is required for different layer thicknesses:
| Layer thickness (cm) | Mixture Consumption (kg) | The consumption of the mixture in a bag weighing 25 kg,% |
| 2 | 8.5x2 = 17 | 17: 25 = 0.68, 68% of the bag |
| 3 | 8.5x3 = 25.5 | 25.5: 25 = 1.02 = 102% of the bag, for such a layer you need a little more than the bag |
| 4 | 8.5x4 = 34 | 34: 25 = 1.13 = 136% of the bag, you need to buy two, half the second will remain |
A cement mortar for wall plaster, the proportions of which have already been discussed above, is created immediately before the start of work, since its life time is from 30 minutes to 360 minutes.
Material Drying Time
It depends on when you can start the subsequent work, for example, putty, wallpaper, painting. Complete hardening occurs in 30 days. Then cement finally gains its strength. But how much cement plaster on the walls dries, the question is different. As practice shows, it takes a day to dry a 1 mm layer. If the layer is 2 mm, then two days, etc.
Plastering
The easiest way to use the machine method. But for beginners, it is not suitable. Work is carried out in 3 layers: spray, soil, nakryvka. The walls can be covered with soil and wait for drying. The best way to make the walls smooth is to install beacons.
The lighthouse is an even guide that sets the plane. It is mounted on the wall using putty. Several beacons are fixed, at a distance slightly shorter than the length of the leveling tool - the rules (from 60 to 100 cm). Cement plaster for interior use should be applied to the space between the created beacons. First spray is applied with a trowel or bucket. The second layer (soil) pours after the spray dries. Moving from the bottom up, the mixture pounces on the wall. As a rule, moving from top to bottom along the lighthouses, the surface is leveled, becoming perfectly flat. Excesses are removed with a trowel.
At the end, a coating is made to give the surface a smooth finish. When the layer sets, but has not yet dried, it is rubbed with a grater. The room is freed so that the finish can dry. Now everything is ready for applying the finish layer.
Top manufacturers and price
The final result also depends on the manufacturer. Little-known companies may produce low-quality raw materials that crack and peel. Therefore, it is better not to save and choose a good brand.
List of audited companies:
- Cement plaster Knauf (Germany). The company has established itself as one of the best among the creators of building mixtures. Reviews are only positive. Cement plaster Knauf Grünband 25 kg is especially praised. Price - 240 rubles. per bag.
- Prospectors cement plaster (Russia). Each of the options complies with GOST standards. The company has been operating since 1992. Prices - 200-220 rubles. per bag 25 kg.
- Plaster cement Seresit (Germany). Excellent value for money and quality. From 400 to 500 rubles.
Worthy of mention are the Polish company Atlas, Russian Bolars, Osnovit, Volma, German Kaparol and Austrian Baumit.
Cement mix is a universal option for finishing the room. It is affordable, practical, durable, moisture resistant and effective. Knowing all the intricacies of working with the material, as well as variations, you can finish quickly and efficiently.