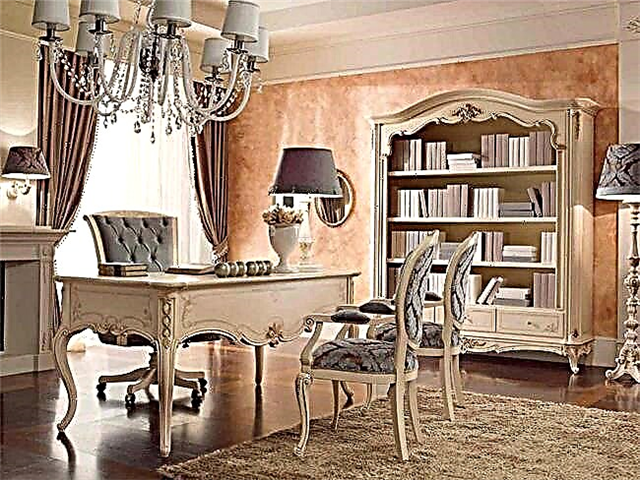
An apartment with a balcony has always been considered the best. For example, many on the balcony can equip themselves with both a study and a relaxation area. These additional square meters make it possible to equip them at your discretion.

If the balcony is not glazed, you can always go out and get some fresh air, so to speak, "without leaving the apartment."

If you want to update the balcony, we recommend watching a video of decorating the balcony with your own hands in order to get ideas and be inspired by this wonderful thing.

Balcony Options
There are two types of balconies - on the foundation and remote (cantilever). The extension, which is most often used to expand the living space of an apartment, is a balcony on the foundation. Such structures are located exclusively on the ground floors of buildings.

Remote can be done on any floor of the building. An important nuance - remember that only professional builders should make such balconies after permission is received from local authorities for building.
We make a balcony on our own
So, the first step is to take the necessary building permit. The second stage - we are making a project for our construction. Well, then already - the purchase of everything necessary for the construction of our balcony.

There is a little trick to saving a little - rent some tools. All the same, they are unlikely to be needed in the future (unless of course you plan to engage in construction).
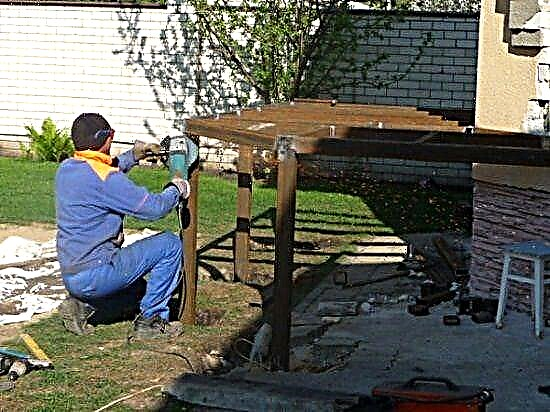
We install a balcony metal frame. To do this, it is necessary to use reinforcing bars that will help keep our structure. To give greater reliability and strength, it is recommended to fix the frame from below with metal supports (similar to triangles with right angles).

The reinforcing belt should be laid out inside the frame of the balcony. Try to leave the reinforcement slightly outside the metal frame. Later, a balcony rail will be welded to the protruding ends.
Now you can proceed to the formwork, which is done based on the size of the balcony. This is necessary for the subsequent installation of the concrete slab. The formwork should be supported on the bars.

Take a look here!


Now you can install mortgages and fill the base of the balcony with concrete. After the concrete slab has completely dried out and grasped well, the formwork can be removed.
Construction options
There are 2 main options for building a balcony, namely:
- on the foundation. This option is exclusively suitable for owners of apartments located on the ground floor. Also, such a balcony can be attached to a private house,
- on a suspended frame. The structure is carried forward from the wall of the building and is equipped on a frame made of metal elements or on brackets.
 Free-standing balconies on supports
If the structure is attached to the second and upper floors, it must have additional supports. It is forbidden to fix the building exclusively to the wall - it will not stand.
The function of the supports is most often performed by columns. They fit well into the environment and complement the architecture of the house.
Before you begin, make up or order a project of a balcony with a detailed diagram in a specialized organization.
Foundation
If the balcony is attached to the first floor, a simple tape base will be enough. In the case of arranging an extension on the higher floors, build a strip-column foundation.
In general, the arrangement of concrete foundations remains almost the same. The following is an instruction for the construction of a strip-column foundation. Having removed the recommendations for installing poles from the manual, you will receive ready-made instructions for installing the tape base.
 Foundation
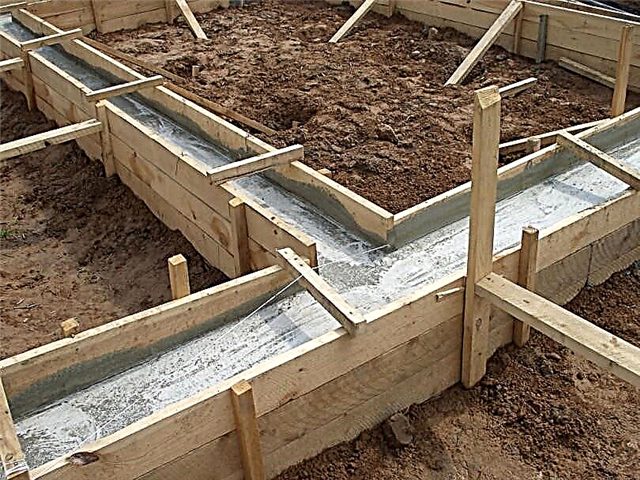
First step. Lay out the future foundation on the ground. Use pegs and a cord for marking.
Markup
Second step. Get rid of the topsoil. Dig a trench of the required depth (determined according to the peculiarities of the soil on the ground) and pits for poles.
Third step. Drive (screw in) the support piles. Supports can also be made independently from pipes, concrete pillars, or other suitable materials. To provide additional installation strength before installing the posts, the bottom of the pits can be filled with a 20-30-cm layer of concrete. The empty space between the walls of the pits and the posts after their installation is also filled with mortar.
Fourth step. Tamp the bottom of the trench, cover it with a 10-centimeter layer of gravel and a 15–20-centimeter layer of sand. Carefully compact each layer of backfill.
Fifth step. Assemble formwork from sturdy boards.
Sixth step. Lay the reinforcement cage. Use fittings with a diameter of 10-14 mm. As a result, you should get a reinforcing mesh with a mesh size of not more than 150x150 mm.
Seventh step. Pour concrete and give it a month to gain strength. It is recommended to dismantle the formwork after the concrete has solidified completely.
The eighth step. Cover the frozen foundation with waterproofing material (bitumen, roofing material).
The ninth step. Fill all the voids with earth.
The tenth step. Tie the posts along the upper edges with a channel. The height of the foundations of the balcony and the house should match.
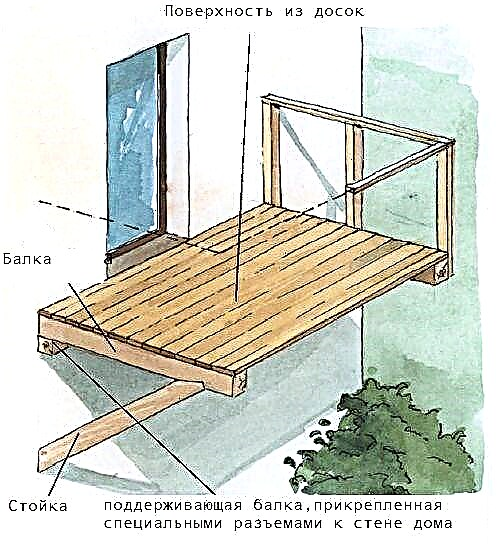
 The formation of the frame of the balcony
Balcony construction
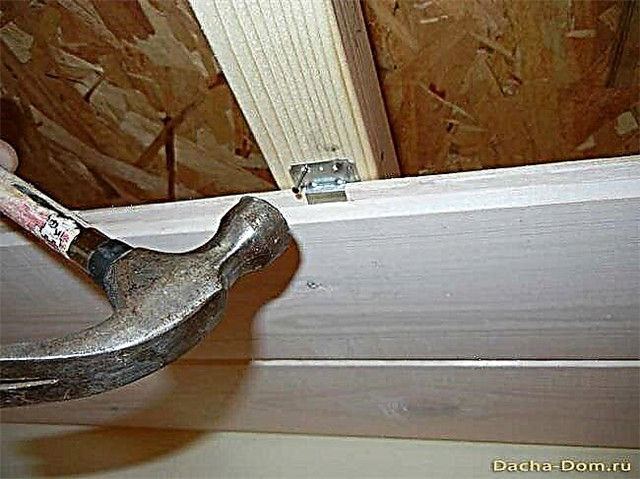
First step. Lay wooden logs or reinforced concrete slab on the finished base.
 Do-it-yourself installation of an extension of the extension
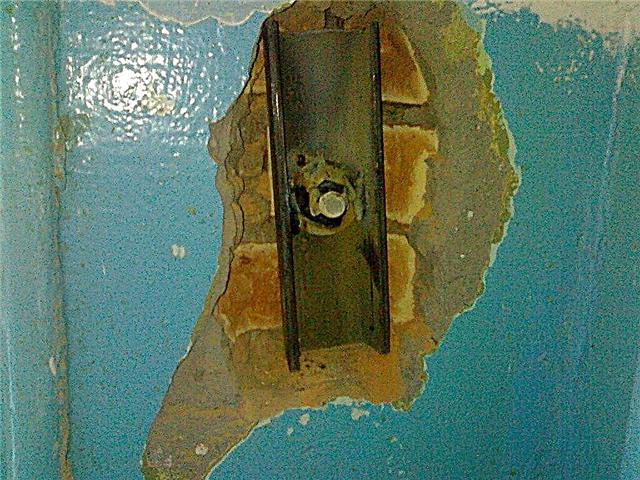
Second step. Using a punch, create an opening in the wall for mounting the balcony block.
Third step. Install the balcony block. After installation, level the slopes with cement mortar and seal the existing slots with mounting foam.
 Balcony block
Fourth step. Build the walls. For this, it is most convenient to use building blocks, for example, of foam concrete. They have a relatively light weight and will exert a significantly lower load on the foundation, compared with the same brick.
 Foam parapet
The thickness of the walls should be at least 25-30 cm. Bring the walls to the upper ceiling.
During the construction of walls, reinforce every 3 rows.
In conclusion, it will remain to equip the roof. The roofing structure should be made with a certain bias in the direction from the house.
To equip the roof, it is enough to lay wooden logs or mount a metal frame, and then lay the finishing roofing material.
 Roof
Roof
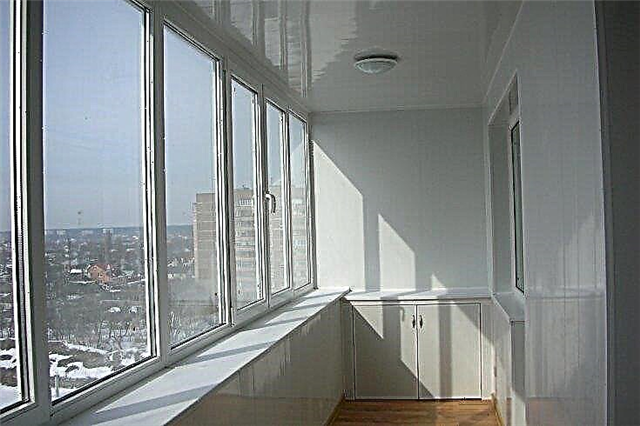
Glaze the balcony. After that, you will need to insulate and finish the finished structure. Recommendations for these activities will be presented below.
 Glazed balcony
  The diagram shows the installation of balcony frames with removal
Second step
Install on the previously fixed beam the main supporting structure. Fix it so that after installing the floor, its total height is 50-100 mm below the door threshold. This will eliminate the risk of atmospheric moisture entering the room.
 Basic structure
  Basic structure
Third step
On the opposite side, mount the longitudinal support element and install the cross beams on it. The supporting element is located on the columns. At the same time, the level of its installation should be performed with a slight slope (2-3 degrees will be enough) to ensure effective removal of precipitation from the house.
 Balcony frame
  Balcony frame
  Frame
Frame
Struts
Perform additional reinforcement of the frame using struts. In such a situation, the function of the struts will be taken over by inclined elements abutting with their lower edge against the support column or the supporting wall, and with the upper part against the transverse beams.
Thanks to the struts, the stiffness indicator of the balcony will be significantly increased.
In some situations, it is more convenient to use wooden triangles with a right angle, made of thick and strong boards, as struts. At this point, be guided by the situation.
 Installation of the balcony block
Support columns
The main pillar of the structure under consideration is the tape-column foundation. Recommendations for its arrangement were given earlier.
The functions of the support columns will be perfectly handled by a wooden square beam. Select the parameters of the beam individually. Most often, supports with a side of 100 mm are enough. Instead of timber, you can use other suitable material at your discretion.
The columns must be installed strictly vertically, otherwise there will be no talk of the reliability of the balcony structure. To ensure verticality, support the columns with temporary braces for the drying time of the foundation.
 Building a balcony
Lay a 4 cm thick planed board on the floor. Pre-treat the material with an antiseptic and a flame retardant.
Lay boards across the support beams. Leave a 2-3 mm gap between the boards to remove precipitation.
To fix the boards, use self-tapping screws. The fastener heads must be slightly recessed into the material.
 Floor on the balcony
  Floor on the balcony
Balcony insulation
Foam boards are well suited for floor insulation. The material is characterized by high thermal insulation properties and normally tolerates all sorts of loads.
Align the base and stick foam boards to it using a specially designed binder. Provide additional fixation of the plates with plastic dowels.
On top of the insulation, lay the mounting grid on the glue, and then fill the entire structure with a self-leveling mixture.
Instead, you can make a wooden crate on the base, fill its voids with thermal insulation, and fill plywood or boards from above.
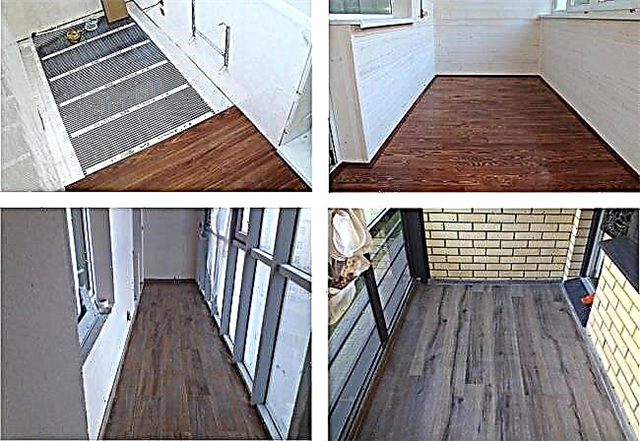
As a finishing floor covering for a balcony linoleum is well suited. You can also use waterproof laminate and other materials with similar properties.
Walls
Attach the frame of wooden battens to the walls. The mounting step of the rails is determined by the width of the insulation.
Cover the frame with waterproofing film. Use a construction stapler to fasten the film. Be sure to glue the joints of the waterproofing material with tape.
Fill the lathing cells with the selected insulation. Lay a vapor barrier on top of the insulation. Fasten the material also using a construction stapler.
On top of the finished insulating pie, fill the second crate, perpendicular to the first, for mounting the finishing material.
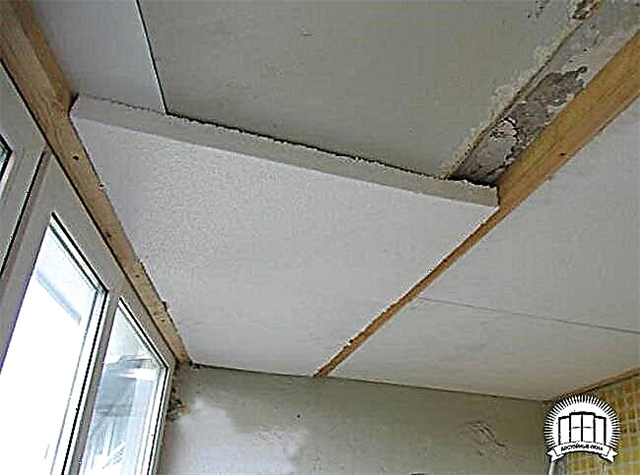
Ceiling
The ceiling can be insulated with mineral wool.
Nail a crate of boards with a thickness of 10 mm to the ceiling. Boards fix edge down.
Fill the gaps between the boards with insulation.
Cover the insulation with waterproofing material and nail additional transverse rails to the boards. They will retain heat and moisture insulation, as well as provide the necessary ventilation gap between the insulation cake and the finishing material.
Finish finish
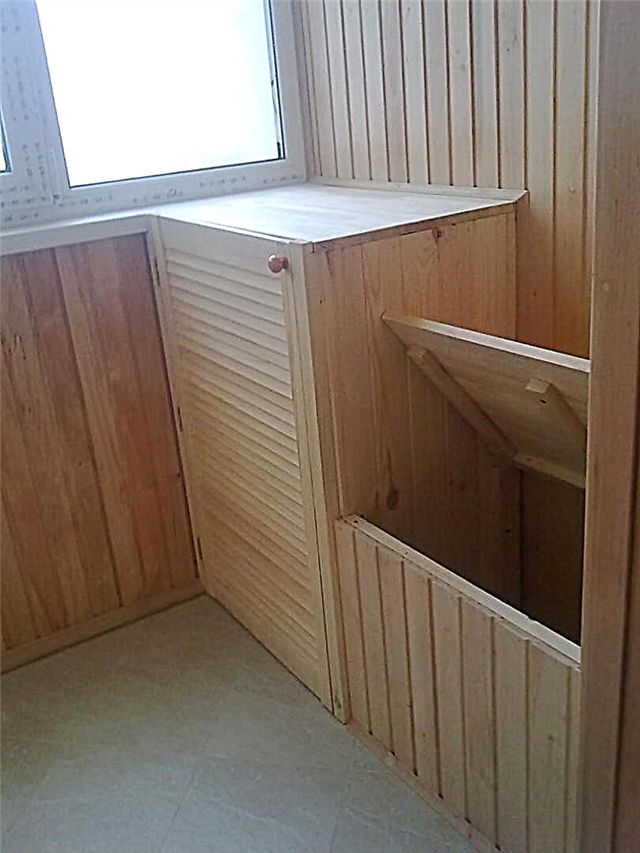
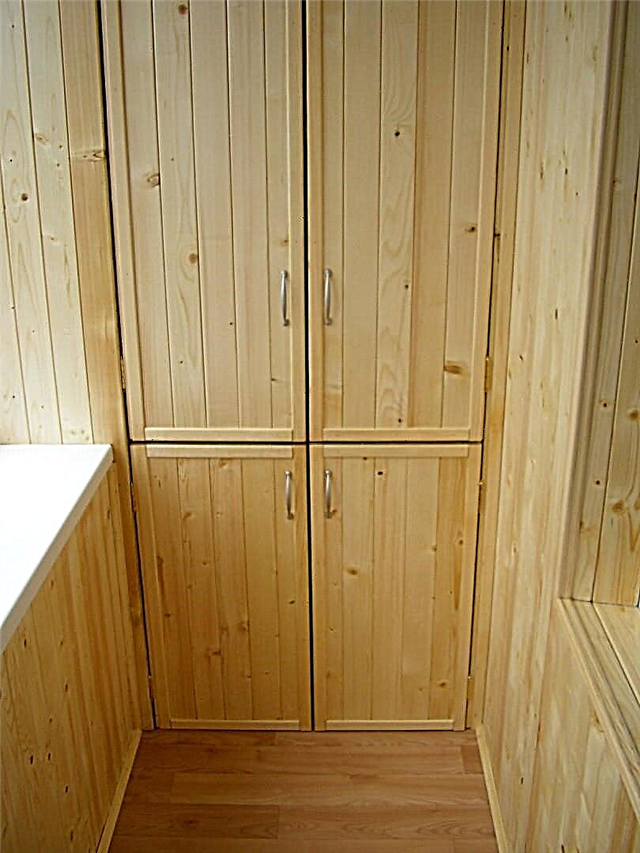
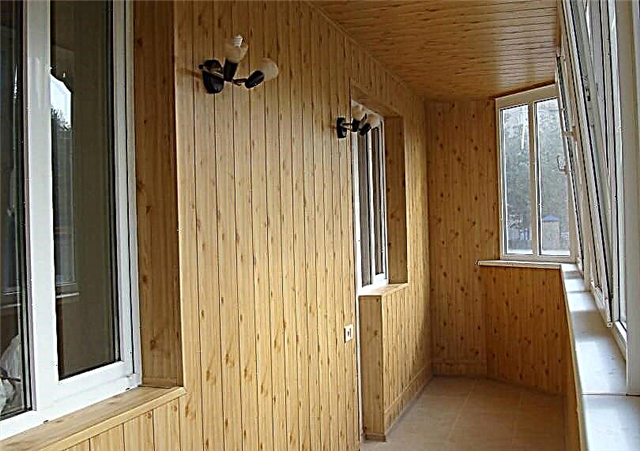
Lining is well suited for the interior decoration of the balcony. The material has excellent properties and is attached to the crate with the help of clamps without unnecessary effort.
Exterior finish of the structure is most often performed using siding. This material is characterized by high reliability and excellent performance, has an attractive appearance and is easily mounted without the involvement of third-party installers.
In general, when choosing a finish, focus on your personal preferences and an affordable budget.
 DIY balcony
DIY repair of a balcony (loggia): detailed instructions
It is necessary to start work with a clear understanding of their stages, and the plan corresponding to them.
Actions are best carried out in this order:
- select and purchase building materials,
- decide on the interior,
- prepare surfaces for construction work,
- to make an external decoration of the space,
- to glaze the loggia,
- to carry out lighting in the room,
- insulate surfaces
- to finish inside the balcony,
- install a heating system.
It is necessary to proceed directly to the repair of the loggia only after the formation of the plan, otherwise there is a risk of getting confused in the tasks and “stretching” the budget to not so necessary things.
DIY repair of a balcony (loggia): preparation
At the start of work, the preparation of the premises is carried out. The bases are being prepared for repair according to the algorithm:
- dismantling old coatings from each surface and window frames,
- bases for construction are tapped with a hammer in order to identify and eliminate weak parts,
- all metal fragments are cleaned from rust and covered with a solution of corrosion.
When the reinforcement in the floor is very rusty, it is necessary to lay new building material on its top. Fixing a mesh with mesh parameters of 15-17 cm, woven from reinforcement of category A-III and 3 mm in diameter, will help.
Stage 1: “Warm floor”
One way to supply heat. Such floors are in demand as space heating due to the simple installation process. There are water and electric underfloor heating. The first, contribute to saving the usable area of the loggia and electricity. However, there is a complex temperature adjustment and installation features.
The second ones - provide an even supply of heat throughout the system, are easy to control the temperature indicators of heating, have a low price.
Of the minuses: high electricity consumption and electromagnetic field.
Laying an electric "warm floor" with cable heating is performed in the following order of work:
- organization of thermal insulation: a layer of penofol, mineral wool or expanded polystyrene is sneaking in,
- laying reinforcing mesh of metal,
- fixing the cable for heating to the grid,
- installation of a temperature controller,
- concreting the floor,
- linoleum flooring or tiles.
Stage 2: balcony repair glazing and lighting
When it comes to repairing a balcony, the theme inevitably arises of glazing. Works of this class can be made from materials:
- Metalloplastik. This is the best way to glaze the loggia yourself. Advantages of building materials - long service life, reasonable price. Also, it retains heat for a long time.
- Aluminum. This material is used only when, in the plans there is no insulation of the loggia.
- Tree. The main advantage of building materials is environmental friendliness. Of the minuses note: high cost, fragility, the need for restoration, poor moisture resistance.
After determining the glazing method, it is possible to proceed with the installation of profiles.
The process of installing windows for a balcony consists of:
- On a parapet laid out of a foam block or brick, a frame is placed. Its position should be only perpendicular - check with a build-level. Fix the straightened frame with anchor bolts or self-tapping screws.
- Inside the loggia, under the window frame, a window sill is placed, and outside the tide system.
- Installation of a double-glazed window in a frame.
- They pass with mounting foam along all the cracks. This is protection against the cold and enhanced sound insulation at the same time.
When the seams dry out, the excess foam is removed with a clerical knife and covered with decorative nozzles. Movie on the topic:
The light system on the loggia is best done when this area is reserved for rest. Why are the electric wires drawn, switches and sockets are installed. To prevent cables from spoiling the interior, it is better to cover them with special boxes.
Simultaneously with the installation of the crate, they lay an electric cable and other communications, are determined with the location of the socket and switch. The number of fixtures is calculated in advance. The power supply system will depend on the amount of power consumed.
Sources of voltage can be:
- junction box,
- switchboard
- a socket close to the balcony.
The easiest way: pull the power cable from a nearby outlet. In order to avoid undesirable incidents, electrical wires are insulated in special metal sleeves.
Stage 3: surface finishing
Sheathing with decorative materials is carried out in accordance with the wishes of the owners of the house. The options here are endless. When choosing wall coverings, it is worth considering:
- panels are often placed vertically on the walls, the profile behind them horizontally,
- the lining can be fixed as you want, even, obliquely,
- siding, block house are mounted horizontally on vertically arranged racks, so the visual perception of the casing does not collapse, and this is required by the technology,
- a flexible stone is made in the form of wallpaper, and laid out on the walls, according to the drawing of its “face”.
For the floor, a timber is an economical way to collect lag, and adjustable floors are an expensive option. It is not advised to take chipboard sheets for flooring. In almost 100% of cases, they swell and break, - "not indifferent" to moisture.
How to make repairs on the balcony with your own hands
Having chosen building materials and the design of a new balcony, it is necessary to carry out actions correctly, according to the installation technology.
Balcony repair with roof installation, parapet finishing and window installation
The required number of metal frame stiffeners from a metal corner is ordered, which are securely fixed with anchors to the facade. For example, three welded triangles are enough for a loggia in 3m to form a powerful frame.
During the construction, it is necessary to choose the right angle of the roof. Good parameters are a slope of 35-45 degrees. So, it will be good to snow. He will not “lie” for a long time and, in the future, fall down an ice block, causing danger to passers-by. And also, such a roof is self-supporting.
The foam block is often used to strengthen and additionally insulate the balcony in high-rise buildings. It is good at reinforcing the parapet, and has high strength and noise isolation. For installation, it is necessary to determine the desired height of the parapet and lay the foam blocks.
A complete analysis of the external glazing process here:
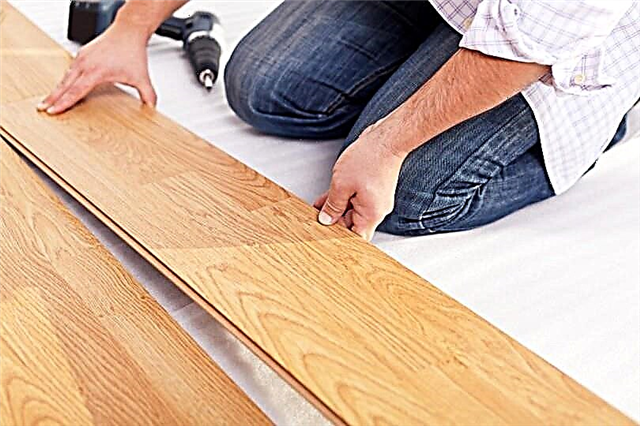
For a wood floor, the algorithm of action is as follows:
- the waterproofing film is laid on top of the plate,
- logs are put down,
- insulation is laid in the air
- an additional layer of waterproofing film is laid,
- a layer of floorboards spreads over everything, fastening to the logs with self-tapping screws.
At the end, it is recommended to cover the floor with varnish or paint.
A similar roof can be done when repairing a balcony (width 3 meters), only without installing glazing. Then it is better to leave the floor in its original form or using a concrete screed in 4 steps:
- rough screed and smoothing the floor,
- tight laying of polystyrene sheets with clogging of all cracks,
- the addition of hydro-film and reinforcing network,
- affixing beacons and pouring 5-7 mm of finishing screed, with the same rule.
The second hydro-layer should not be neglected. It will protect building materials from moisture below during periodic cleaning of the floor and keep the heat indoors.
Repair of the balcony with the installation of "French" glazing
By definition, a French balcony is a panoramic window made from the floor to the ceiling. The windowsill is not installed. There is no need for finishing expenses.
Important: it is not recommended to do this type of glazing yourself! There is a risk of making a mistake in the calculations, which endangers life. Also, these works are carried out at their best, and it is better for inexperienced craftsmen to turn to professionals.
The general plan of action is as follows:
- Before installing a French balcony, determine with doors. Often they choose sliding balcony doors, however, adherents of the classics - they may well install a swing door option.
- Carrying out some preliminary work. An old balcony is being prepared for construction operations: old railings and fences are dismantled, the loggia is strengthened with power supports.
- Actually, the installation.
The detailed installation process of the "French" glazing is shown in the video clip, which can be found here:
Repair on the balcony with pvc wall decoration with lining and infrared heated floor
PVC plates are a popular building material with a number of advantages: environmental friendliness, low cost, durability, easy to install and care. It is mounted according to the same rules as the lining.
Lining is an environmentally friendly product, therefore its use does not have a negative impact on health. The building material is mounted on a wooden frame, with the participation of self-tapping screws. Then the material is often coated with a varnish solution.
When a lining or pvc panel is selected, the decor of the ceiling is as follows: the surface is putty or lined with lining.
Instead of the popular cable heating, the floor can be made with an infrared heating system that does not require filling the screed. Film heaters are involved in it.
It is possible to cover the floor with infrared heating with a laminate or linoleum.
Tips for those who want to make repairs on the balcony themselves
If you have never had to deal with any glazing, it is better to abandon the idea of installing glass yourself.
When the budget is limited, you can use low-cost methods. The technology of economy repair of a balcony with the installation of aluminum glazing is shown here:
Capital
This set of measures gives significant loads on the base plates. Before starting, consultation with specialists is required on what is permissible. Activities include:
- change of enclosing elements,
- restoration of the base of the balcony,
- increasing the space of the loggia,
- installation of windows
- warming.
This option of reconstruction requires the consent of the administration. The following describes how to repair the balcony with your own hands.
Repair of a balcony with an extension on the base or window sill
You can take it yourself only for light operations that do not imply special permission. An increase in the windowsill with minimal knowledge and dexterity is within the capabilities of everyone.
In old buildings, even for small changes, you must have permission from: BTI, firefighters, Gorekspertiza, design organization, Ministry of Emergency Situations and others. In the "Khrushchev", under the law, it is allowed to expand balconies to +50 cm on each side. Without tolerance, it is possible to carry out an increase of 15-30 cm on the plate.
Sex increase
This is a rather complicated procedure, which often requires the participation of professional masters in the implementation.
- Dismantling the concrete base (if authorized).
- The parapet or old fence is removed. A reliable metal structure is created above or around it, which is fixed to the surfaces of the house and walls with anchors. For reliability, a metal tube is added.
- After fixing the frame, finishing operations are carried out and windows are installed.
When dismantling is not required, and a new part of the floor is added to the slab, not more than 50 cm, it is possible to act without permits.
Window sill increase
The operation is carried out during the period of cladding and glazing, as a type of decor and personal convenience. Features and nuances:
- it is possible to put panoramic windows, then more light will penetrate into the space, and visually the room will seem larger,
- the base under the windowsill is formed exclusively by level,
- when the fence is made of metal, the object is equal to it, and the fence made of concrete is attached to the structure by anchors.
- sheathing and decoration of the object with the desired building materials and glazing is carried out.
This set of measures does not change the size of the floor, so permission is taken when the house is old.
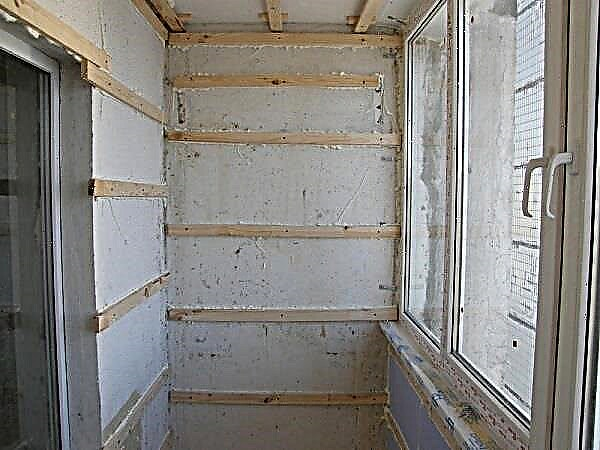
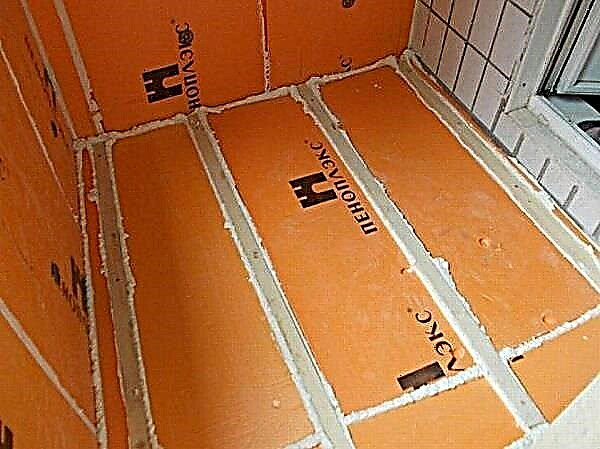
Independent insulation of a balcony or loggia
Penoplex and min-vata are building materials that are common for insulation. They are attached to the building-bases and their surface serves as the basis for external decoration. Let's analyze this process step by step.
Instructions for wall and ceiling insulation:
- Measurements are taken from the walls of the room. The parts of the insulation are cut out on them with a special system knife.
- When the material is cut in sufficient quantities, installation begins on the walls. A mounting foam is applied along the edge of the foam parts, and they are applied to the surface of the walls. Special adhesive solution is not required. Reliability can provide dowels.
- Before installing the crate and penofol, it is necessary to fasten the insulation with dowels with hats. Then all the work will become much more reliable. You will need to take a punch and drill through the foam holes in the walls. They are installed dowels, which are twisted with a screwdriver.
- To install each subsequent insulation plate, apply mounting foam to the edge in the connecting places.
- After fixing all the material, it remains to process the seams with the same foam.
- Covering the ceiling with stomaterial is more difficult. The principle is the same: we drill penoplex and walls and insert dowels from plastic.
- Then, all joints are sealed with construction foam. It is extremely important to choose it correctly, namely, the composition should not give a chemical reaction when in contact with insulation plates.
- Now you can proceed to the next stage - thermal insulation of the loggia using penofol. This material is attached by any construction stapler, and its sheets overlap and without gaps.
- After installing penofol, a crate is laid on top of it. And already on it is finishing and decorative building material.
- The lathing is performed by bars with a 3 * 3 cm cross-section. The material used is wood.
Types of construction
First of all, you need to determine the functionality of the building. And already proceeding from this, the necessary parameters of the future balcony will be selected.

If the apartment is located on the ground floor, the construction is greatly simplified, since there is no need to worry about its future basis. In addition, a number of bonuses appear: you can additionally build a cellar or a separate entrance to the apartment.
When planning a hinged balcony, you need to prepare the foundation with separate fastenings or supports from below, since without this there may be a threat of damage to the entire facade of the building.

In this case, the fastenings can be both horizontal and angular.
Legal documents for construction
Before starting construction, you must obtain permission from the city construction committee with a balcony plan.

To do this, you need a package of documents:
- Plan and project of the apartment,
- New construction project,
- Permission from neighbors for construction certified by a lawyer,
- Confirmation from a lawyer about the legality of the structure.

After the documents are collected, you must contact your local BTI, and then proceed with construction work.
Design
First, we specify the parameters of the balcony and its functional purpose.

Then we draft all the desired sizes in draft form, finalize them with lawyers and present them to BTI.
In the construction project, take into account everything: stability, weight, materials and structural fastenings.

The more detailed the construction scheme will be worked out, the easier it is to realize the idea, you can use various photos of the balcony with your own hands to create interesting projects.

Foundation balcony
As mentioned above, it is being built on the ground floor. Despite the large structure, its layout is simple.

The base has a tape type, consisting of reinforced concrete structures in a closed loop. It is being built under the supporting walls and the foundation of the building.

After laying the foundation, the frame with the necessary marking is strengthened, the screed is laid, the walls are erected, glazing and finishing work are carried out.
Hinged balcony
The design is taken out of the room and has nothing to do with it, except for the central load-bearing wall. And the logical question arises, how do you make the floor on the hinged balcony with your own hands?

Much attention is paid to the strength of the mounts that support the building.

A concrete slab is also laid on the floor, which is supported by the reinforcement. For greater reliability, the screed is built along the entire length.
Balcony in a private house
The design of such a structure is based on general requirements, but concrete columns can be used for fastening. And the railing can be replaced with forged or cast rods.

If you plan to make a wooden balcony with your own hands, then you can mount the base on vertical or corner beams.
Electrification
Lighting can be carried out from the apartment shield, using an adjustable box or from the nearest outlet. In this case, it is better to fix the wiring in an open way on the walls. Closed wiring will require additional wall chipping.

Repair Preparation
At the preparatory stage, a project for the implementation of construction and repair work is drawn up and its budget is calculated. The sequence of work, the need for heating the balcony and the choice of heat source, the calculation of the required amount of materials for insulation and exterior decoration of the balcony are determined.
The preparatory part of the repair work is carried out in several stages:
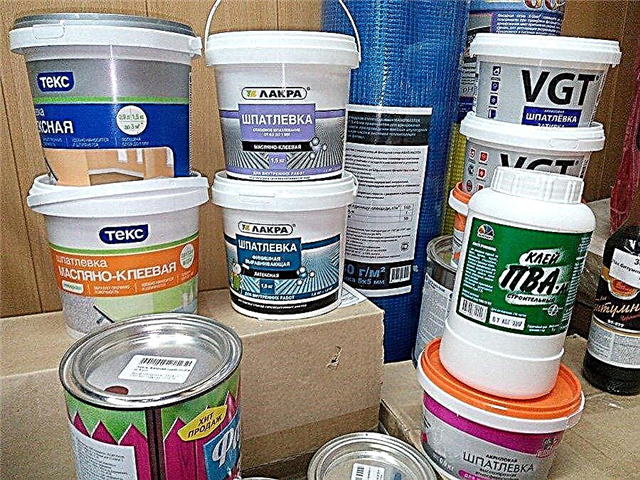
- surface cleaning from dirt and dismantling of old coatings - paint, lining,
 It is necessary to get rid of mold without fail!
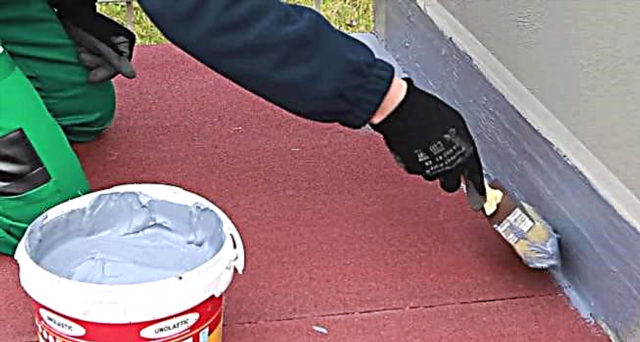
 Irregularities, sinks and cracks must be repaired with a cement-sand mortar,
The choice of quality glazing
Repair of a balcony or loggia begins with the selection and installation of glazing. Glazing is “cold” and “warm”:
- cold glazing - These are aluminum or polyvinyl chloride structures with single glass filling. This design will protect the balcony from wind, dust and precipitation, but will not be able to retain heat, and will freeze in the cold season,

- warm glazing - These are structures made of PVC profile, warm aluminum (systems with a thermal bridge) or wood, filled with double-glazed windows. Warm glazing will make comfortable operation of the balcony at any time of the year. If the repair of the balcony is carried out with the aim of combining it with the living room, then for glazing, constructions with an installation width of at least 70 mm and filling with energy-saving two-chamber double-glazed windows with a thickness of 40 mm are required.
 Such enclosing structures have a high coefficient of resistance to heat transfer and are used for glazing residential premises.

 Such enclosing structures have a high coefficient of resistance to heat transfer and are used for glazing residential premises.
If it is assumed that the balcony is insulated and part of the balcony frame falls under suturing, then special additional profiles are used that increase the opaque part of the structure. Choose the type of glazing based on the functional purpose of the balcony after repair work.
Lag laying
The floor on the balcony is characterized by a large number of bumps, potholes and cracks. In addition, it has a bias towards the street to remove precipitation.If there are large irregularities, leveling the floor with a cement screed means significantly increasing the weight of the balcony. In addition, you will have to wait until the screed has completely dried to continue the repair. Alternatively, you can consider lining the application of light and natural wood for leveling.

For this you need planed wooden blocks with a cross section of 50x50 mm, anchor dowels, and remote plastic wedges.
In order to minimize the ingress of moisture on the tree, waterproofing the floor surface is carried out before laying. For these purposes, use a waterproofing film.

There are other proven methods. Bitumen-based mastic or roofing material are excellent moisture insulators. Mastic is sold ready-made or diluted with a solvent.
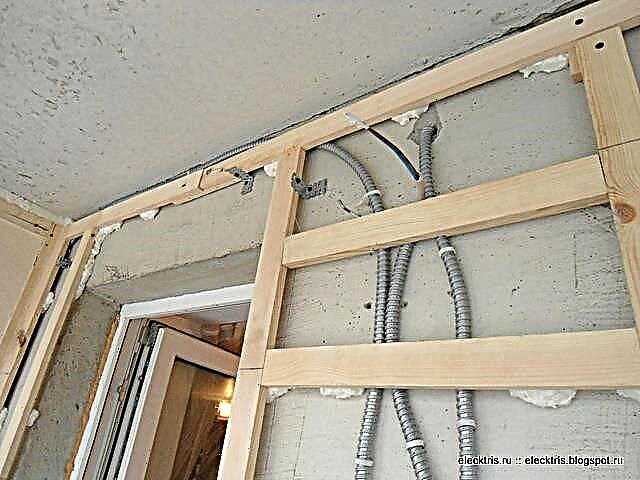
Lathing of walls and ceiling under the panel
The lath serves as a frame on which the elements of the interior decoration are attached. For its manufacture using dry high-quality timber. The thickness of the beam for the lathing depends on the parameters of the insulation.
 Planed pine bars 20 to 40
The beam and all other wooden materials used for decoration are covered with an antiseptic. Begin work on the device of the crate with marking. The beam is cut into identical elements and fixed to the walls with dowels in accordance with the marking.
Lightening and sockets

If it is planned to bring electricity to the balcony, then simultaneously with the installation of the crate, an electric cable and other communications are laid, places for installing sockets and switches are selected. It is necessary to determine in advance the number of lighting fixtures. The power supply system will depend on the amount of power consumed. Possible options for voltage sources:
- switchboard
- junction box,
- the outlet closest to the loggia.
 The easiest option: output the power cable from the nearest outlet
To prevent unwanted consequences, electrical wires must be insulated in a special metal hose.
Wall, ceiling and floor insulation
After the installation of the crate, you can proceed directly to the insulation of the walls and ceiling. The wall adjacent to the apartment does not require insulation, and the ceiling, in case the neighbors have a floor insulated from above. The following materials are used to warm balconies:
- mineral wool has high heat-insulating properties, but is hygroscopic and requires the use of waterproofing,
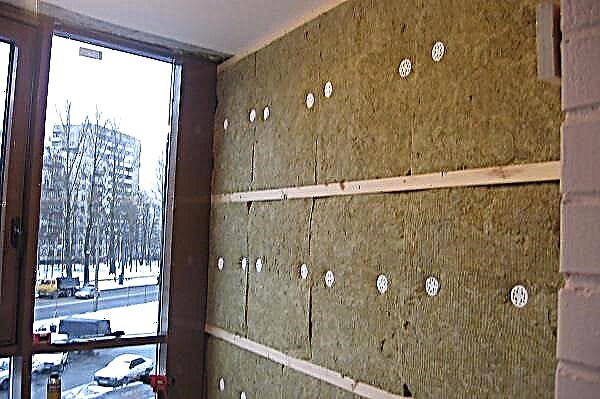
- Styrofoam It has good heat-insulating properties, light weight. This is the cheapest insulation option,
- penoplex - moisture resistant and durable material, is the best solution for warming balconies and loggias.


For walls and floors, foam is usually chosen, and the ceiling is conveniently insulated with lightweight foam. Material for insulation is attached to the cells of the lathing with glue or polyurethane foam. If mineral wool is chosen as a heater, then it is used in conjunction with a vapor barrier film, since the accumulated moisture affects the thermal insulation properties of the material.
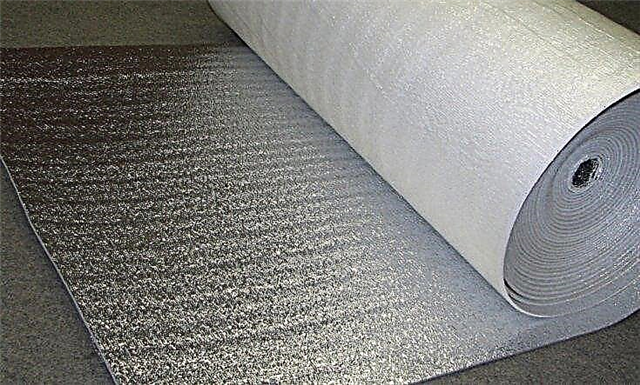
 Penofol - reflective vapor and thermal insulation
Recently, new foil materials that combine the functions of insulation and moisture insulation are gaining popularity.
Warm floor
If you plan to heat the balcony, then a “warm floor” is one of the options for a heat source. "Warm floors" are divided into:
- water. The use of a water floor can save energy and usable area of the balcony. The disadvantages include - the difficulty of installation and the difficulty in adjusting the heating temperature,
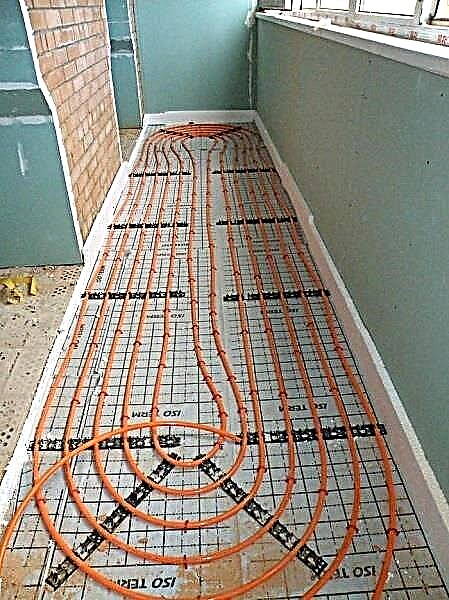
- electric. They allow you to easily adjust the temperature, have uniform heating throughout the area and an affordable price. The disadvantages of such a system are a large payment for the consumption of electricity, the presence of an electromagnetic field in the heating zone.

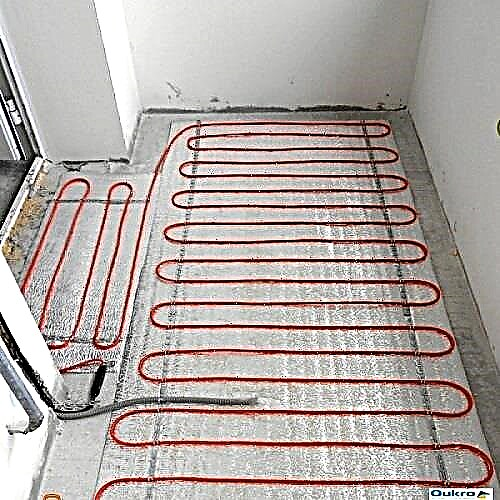 Electric underfloor heating cable system
Installation of an electric "warm floor" with cable heating is carried out in the following sequence:
- a layer of thermal insulation is laid on the screed - mineral wool, penofol or expanded polystyrene,
- installation of a metal reinforcing mesh to which the cable will be attached,
- fastening the heating cable to the grid,
- installation of a temperature controller,
- concreting the area with a cement composition,
- laying tiles or linoleum.

Instead of cable heating, an infrared “warm floor” system can be used that does not require filling the screed. The system uses film heaters.

The floor with infrared heating can be covered with linoleum or laminate. Warm floors are particularly popular for heating balconies for easy installation in tight spaces.
Algorithm for warming floors
The insulation of the floor of the loggia should be distinguished as a separate stage, and it consists of separate stages:
- The process starts with laying a wooden crate with 5 * 5 cm beams. The wood spreads with the formation of an air layer crosswise. The bars are connected together by self-tapping screws, and are still fixed with dowels. It is recommended to pre-impregnate the tree with solutions to extend the life and fire resistance.
- the next step is cutting the insulation into appropriate sized elements. Then, they are laid between the longitudinal beams of the crate. The flooring is made so that all the seams are with the smallest possible distance between the building materials. This will allow you to retain heat and not let cold air in.
- It remains to carefully process the joints with foam.
- Work is completed by laying plywood layers, on which the selected material for decoration is then laid.
Watch the video how to repair a loggia or balcony:
- Repair of a loggia of 6 m with decorative wall decoration and installation of a stretch ceiling is shown in the video:
- Repair on the loggia 3.2 meters, with the decoration of the walls with a wooden lining - the interior with a wooden lining looks more natural and comfortable. In addition to the beautiful appearance, the lining brings a pleasant aroma of natural wood to the room. When choosing a lining, it is worth remembering that wood is a living material, and requires care. If used improperly, it may warp or dry out.
- Repair of a loggia of 6 meters, with decorative decoration of the walls with a plastic lining (wood) is a budget option. Its technological process of lining will show the video shot by the masters:
Balcony (loggia) heating
To improve the indoor climate during the cold season, it is better to arrange a heater on the loggia. Arrangement of water radiators from central heating can be problematic, therefore it is recommended to use electrical appliances.
They are switched on when necessary, and this ensures a minimum consumption of electricity. For example, when the space is visited for evening tea drinking, the heating system is preheated in half an hour. This amount of time is enough to warm up.
The choice of material for wall, floor and ceiling
Various materials are used for wall decoration: PVC or MDF panels, drywall, OSB with further coloring or wallpapering, and a wooden lining. Decorating the walls with wooden lining is the most optimal option, which has practically no disadvantages.
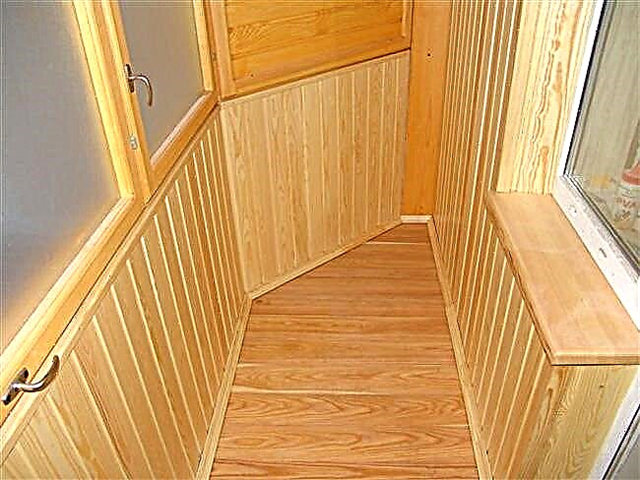
Natural material has a beautiful appearance, durable and environmentally friendly, easy to install. The installation of the lining begins from any corner of the balcony, and the first board is attached strictly to the level.

Installation is simple - each subsequent panel is inserted into the groove of the previous one. Lining to the crate is fastened with carnations, self-tapping screws or on the clamps.
The floor finishing options are also quite diverse: ceramic tiles, floorboards, linoleum or laminate. It all depends on personal preference and financial component.
For the decoration of the ceiling, wooden lining, PVC panels, tension or suspension systems and classic whitewashing are used.
Ceiling finish with PVC panels is budget, practical, durable and easy to install. Panels for the ceiling can be just white, colored or imitate the natural material: wood, stone, marble. The panels vary in width from 10 cm to 500 cm. Knowing the area of the balcony, it is not difficult to choose the right amount of material.

When starting to install the ceiling, make sure that it does not interfere with tearing off the window sash. Each part is inserted with its protrusion into the groove on the previous panel and fits tightly with it. Fasten the cladding elements to the lathing frame using screws, nails or staples.
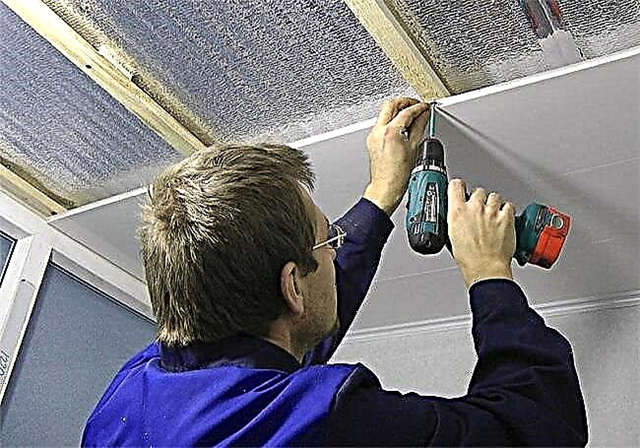 Installation of PVC panels on self-tapping screws
The adjacent parts must be joined together fairly tightly to avoid cracks.
Slope Finishing
To finish the slopes, plastering, drywall sheets and plastic panels are used:
- plaster - a traditional way of decoration. But with the advent of new finishing materials, the method loses its popularity. The plastering process is very laborious, requires additional painting of the slopes, does not provide the necessary heat and sound insulation. The advantages include the low price of the finish and the possibility of repainting, to give a fresh look,

- drywall - A popular type of finish, due to the ease of installation, low cost of the material and the ability to finish in a short time. The disadvantages include insufficient moisture resistance and the need for additional finishing - putty and painting,

- pvc panels - The ideal finish if the window and balcony door are also made of polyvinyl chloride. The homogeneous surface of translucent structures and slopes looks aesthetically pleasing.
 In addition, the installation of PVC panels is quick and easy. This type of finish does not require additional processing, and makes it possible to choose different colors. PVC panels are durable, UV resistant and easy to maintain. If you trim the entire balcony with PVC panels, then the surfaces of the slopes and walls will look like a single unit.


 In addition, the installation of PVC panels is quick and easy. This type of finish does not require additional processing, and makes it possible to choose different colors. PVC panels are durable, UV resistant and easy to maintain. If you trim the entire balcony with PVC panels, then the surfaces of the slopes and walls will look like a single unit.
Installation of finishing decorative corners and baseboards
After warming and finishing the slopes, decorative elements are installed: corners and baseboards. As a rule, the installation of these components is simple and does not take much time.
 Glue corners on liquid nails
Lamp installation
To illuminate the balcony, you can use classic chandeliers, sconces, floor lamps, spotlights and LED strip.
 An interesting solution: - lighting with LED strip under the windowsill
If the balcony is large, then the lighting can be complex, it is possible to create local lighting zones.

When choosing a luminaire, special attention should be paid to the direction of light flow. Direct light fixtures are suitable for balconies with low ceilings, for lighting a specific object, for lighting reading zones. Sources of ambient light will make the dark balcony more comfortable for visual perception.

Luminaires with reflectivity will save electricity costs and create special comfort.
A self-renovated balcony is not only an additional comfort and aesthetically attractive appearance, it is a matter of pride and incentive for further improvement of the home.
Do not forget to also watch a useful video from our experts: