- 1 Advantages and disadvantages of this design
- 2 types of construction
- 3 Features calculation gate
- 3.1 Height and width data
- 3.2 Calculation of the counterweight
- 3.3 Weight calculation
- 3.4 calculation of the strength of the fittings
- 3.5 Additional calculations
- 4 Sliding gate device
- 5 Casement selection
- 6 Component selection
- 7 Installation work
- 7.1 Foundation
- 7.2 Installation
- 8 Automation selection
- 9 Coloring
- 10 Essential Tools for the Job
- 11 Common Mistakes
- 12 Video: gate manufacturing
- 13 photos: options for ready-made sliding gates
- 14 Schemes
An integral part of the enclosing structure of a summer cottage is the gate. Today there are many of their varieties. Let's take a look at the process of manufacturing and installing sliding gates with your own hands.
Advantages and disadvantages of this design
 Advantages and disadvantages
- This design of the gate does not interfere with the exit / entry of the vehicle in a small area. Cantilever gates can significantly save space.
- The presence of the lower mounting console system allows you to equip the gate in any climatic conditions.
- Finishing can be made of different materials, for example, a vertical lathing, a professional flooring, forging and not only.
- The ability to choose a design option, for example, from a sandwich panel or profiled sheet.
- In comparison with other types of gates (for example, swing gates) there is no such thing as sagging hinges. The existing automation and the mechanism of closing / opening the gate provides for a long operational period.
- There is an opportunity to choose various automatic equipment for gate.
- Unlike other types of gates, for example, swing gates, the arrangement of sliding gates requires more financial costs, approximately 10–20%.
- For mounting the console part and the drive, it is necessary to produce an additional foundation.
- Along the fence will need to allocate sufficient space.
Types of construction

The design of the gate is divided into several types, each of which differs from each other:
- Outboard. Since Soviet times, this heavy, but at the same time reliable design has gained immense popularity. In it, the canvas on roller trolleys is fixed to the beam, which is located above the passage, up to 5 m high. As a result, this height is a restriction at the entrance of tall cars.
- Cantilever. This type of gate is ideal for the climatic features of Russia. This design is not equipped with a beam over the passage. Such gates will not be able to disable snow drifts, wind, dust and the like. So, the canvas is fixed to the beam using roller trolleys. In this case, the entire structure is mounted on a powerful foundation, which is poured on the side of the opening.
- On screw piles. To a depth of 1500 mm, metal piles are twisted into the ground, which will be the carriers of the entire structure. Their manufacture and installation will take up to 3 days.
- Mechanical. Such gates open / close manually. Mechanical is much cheaper in cost and easier to install. They are suitable for those cases where a summer house or a country house is rarely used.
- Automatic. Such gates are the exact opposite of mechanical ones. They are equipped with electric drive and remote control. For regular use, the best option.
Regardless of the type of construction, sliding gates require free space along the fence on one side. Moreover, it should be equal in size to the opening. As for console systems, the place should be more than 120-200%.
Features of calculating the gate
 Features of self-calculation
Design calculation is one of the most important and priority stages. It is not worth ignoring this stage, since the construction of retractable ones is much more complicated than the swing ones.
The calculation process includes the following steps:
- Determining the height and width of the opening. As a result, it will be possible to choose the necessary type of gate for free movement.
- Counterweight calculation.
- Estimation of the weight of the structure under construction.
- Making a sketch or drawing.
The calculation of the width and height of the structure should be based on the assortment of the market. So, if a profile or pipe can be easily welded, then cutting sheets of corrugated board, with the aim of adding it, is very difficult. Plus, the result will be unaesthetic.
 Sliding gate calculations
Moreover, understanding the weight of the structure in the long run, appropriate mechanisms and moving parts are selected that can cope with the load.
If the canvas is supposed to be large, then be sure to consider the wind load. To the existing wind prevailing in your area, add a small margin.
Although the easiest option for obtaining calculations is to contact a specialized company that will provide a folder with drawings and calculations, you can do this yourself. It is worth noting immediately that all the above calculations relate to sliding gates of the console type. They are more difficult from all other types, so we will consider them in more detail.
Counterweight Calculation

When moving, the sashes must be balanced. This indicator is achieved by calculating the counterweight. Due to this, the specific gravity of the structure will be evenly distributed over the carriages. Accordingly, to keep the load as low as possible, the counterweight must be large.
But what if there is not enough space for the movement of the sash? In this case, it must be understood that the length of the counterweight should not be less than 40% of the leaf width. An ideal indicator is 50%. As a consequence, the width L in its design has a counterbalance.
With such calculations, you can determine how much space is needed to roll back the gate along the fence.
Weight calculation

This value is determined based on the weight of the material used:
equal to 4 kg / m 2. 2 mm thick steel
A gate with a 4 × 2 m frame will weigh 200 kg on average. Having such data, it is possible to determine the performance of the guide beam. In this case, you can build on the established standard.
For a gate weighing 300 kg, a beam of 9 × 5 cm with a thickness of at least 3.5 mm is sufficient. However, a safety margin of up to 40% is required. It will greatly simplify the operation of the door and increase its service life.
Calculation of the strength of the fittings

Gates will require casters, catchers and a support rail. Modern products of this plan allow you to choose the necessary design. As a basis, we take the simplest estimate of the wind load, which is equal to 12 m / s to 90 kg / m 2 and is evenly distributed over the supporting zones of the canvas.
How to make sure that your design, even with a strong wind, will work without interruption? To do this, it is necessary to ensure that the strength of the fittings is greater than the estimated mass of the gate. The lateral moment of 100 kg / m, multiplied by 8 kg / m, which equals 800 kg / m, is also taken into account. In principle, this is a little
for each supporting element, 150–180 kg / m.
When buying a roller mechanism, make sure that it has a margin of up to 30% by the ratio of the weight of the gate. But this indicator does not affect the life of the product. This is directly affected by the increase in the distance between the centers of the carriages.
Additional calculations

In addition to all of the above, it is worth paying attention to other aspects. Pay attention to the rail for the gate, supports for roller carriages and the number of anchors. It is also important to correctly calculate the mortgages on the pillars. In this case, it is necessary to build on 60% of the total mass of the gate, divided by the number of mortgages.
As for the calculation of the foundation, there are no special secrets here. But despite this, you should not lose sight of this component, because often the cost of the foundation reaches 40% of the total project cost.
Sliding gate device
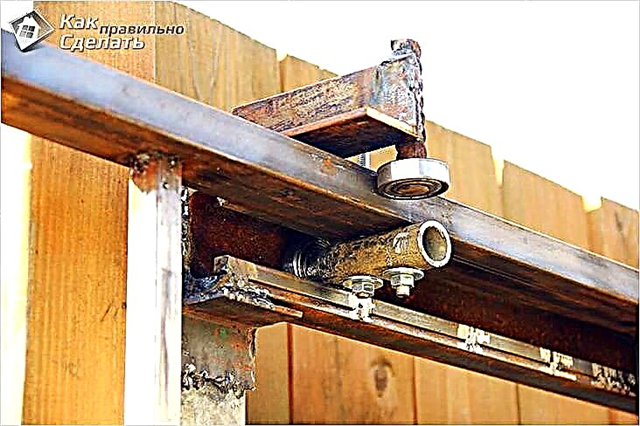
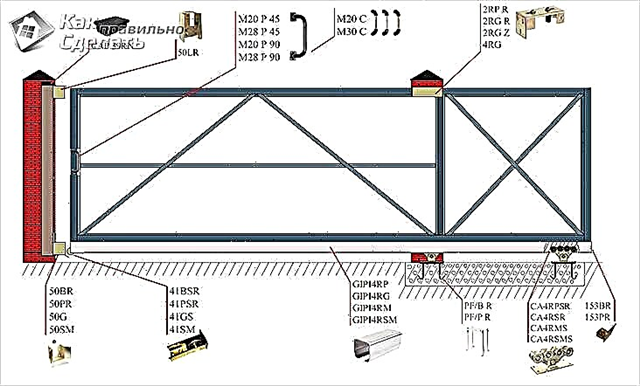
This type of gate has the following structural elements:
- Guide beam. Takes all their weight.
- Cart or roller support. They need 2 pcs.
- Removable end roller. When closed, it serves as a support.
- Catcher top / bottom. The lower one with closed gates perceives the load, and the upper one reduces windage.
- Bracket. It is important to keep the leaf from swinging laterally.
- Stand. The support is mounted on it, which organizes the movement of the sash.
Roller bearings are installed on the foundation, which absorb the load of the guide beam. The rollers are placed inside the carrier console.
Casement selection
 Sliding gate wing
The flap also has high demands. Its design should be sufficiently rigid and stable. It is important that when a strong gust of wind or sleet the sash functions well. Moreover, it must be equipped with additional stiffeners so that it does not sag under its own weight. All this should be considered when creating drawings.
Component selection
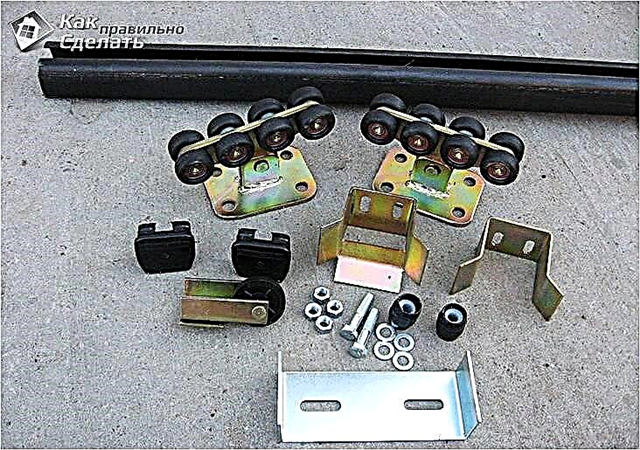
The presence of certain components directly depends on the height and width of the sash, as well as its weight. So, today in the market you can find a number of companies that provide high-quality equipment, namely:
- Combi Arialdo and Flatelli Comunello from Italy.
- Roltek and Doorhan from Russia.
- Alutech from Belarus.
For an example, we will make some calculations. In the basic configuration, a load-bearing rail with a length of 6 m is necessarily installed. And in order to correctly select components for it, it is necessary to take into account the sash length and plus 40%. Also, the selection is carried out along the length of the guide beam and possible loads. So, if the width of the opening is 3.8 m, then the length of the alignment is 3.8 m + 40% = 5.32 m. In this case, you can purchase a ready-made kit with a beam of 6 m.
If the width of the opening significantly exceeds 4 m, then the purchase of components should be oriented taking into account the load of 500 kg. In them, the guide beam has a wall thickness of 3.5 m, and a section of 71 × 65 mm. If the width is more than 6 m, then it is necessary to take into account the load of up to 600 kg.
Installation work
 Installation of sliding gates
The movement of the canvas should be carried out from the inside of the site, namely along the fence. Based on this, it is necessary to prepare a place for the gate so that absolutely nothing interferes with this process.
The installation process includes 4 steps:
- Making the foundation.
- Wiring electricians.
- Installation of a reciprocal column.
- Installation of automation.
Foundation making
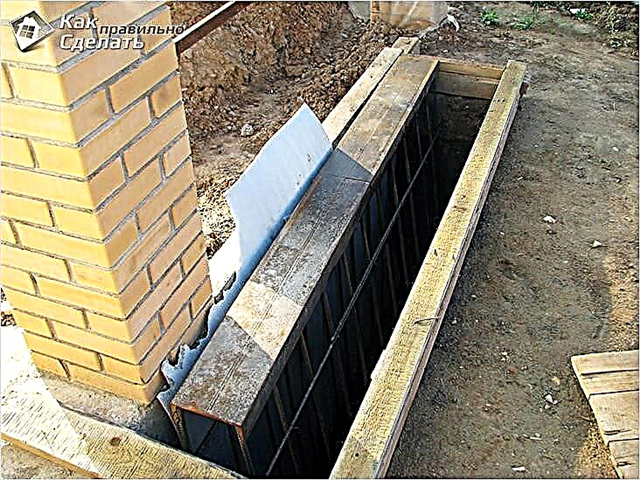
Stages of the construction of the foundation:
- First, markup is done. Measure 500 mm from the fence (foundation width). Also measure from the edge of the gate a distance equal to the rollback (foundation length). So, you will see the perimeter of the future foundation.
- Often it turns out to use the pillars of the fence support. If this is not possible, then from the opposite side, you should install a response pole. It must be installed so that it is inside the site, and not in the opening itself. Otherwise, it will reduce the width of the opening.
- If the gate will work on automation, be sure to arrange a place for wiring. For this, you can use a square metal or plastic pipe / box. The diameter of the pipes is not less than 25 mm.
- Now you can start digging the pit. The depth of the trench is up to 2 m, below the level of soil freezing (differently in each region).
- For the manufacture of the embedded element, you can use the channel 16. Its length should correspond to the length of the trench. Fittings Ø12 mm are laid in the foundation. The fittings must be welded to the channel and connected with transverse ties.
- Thus, the resulting embedded element is placed with the armature down. When laying, make sure that the side of the channel abuts against the column of the fence support. Also, the channel must be set strictly in level and exactly parallel to the line of opening the gate.
The mortgage element must be flush with the road surface. The minimum clearance allowed between the bottom edge of the gate and the road is 10 cm. This gap can be increased with the help of the adjustment platform. But to reduce this gap will be impossible without breaking the mounts.
 Mortgage Installation
If for one reason or another a gap of 100 mm is not suitable, then carry out a deep installation of the embedded element.
As for the concrete work, they are carried out when the installation of the embedded element is fully completed. Concrete level must be level with the embedded element.
Installation
 Gate installation
When the foundation has frozen, you can begin to install the gate. To do this, first of all, you need to make markup. Along the opening line, not reaching the reciprocal column of 30 mm, pull the cord. This cord is the path of the gate. Cord pulling height - 200 mm. Further work is as follows:
- Determine the extreme position of the first and second roller bearings. From the edge of the opening, retreat 15 cm along the plane of the mortgage element and draw a line of position of the extreme first carriage. The line of the second truck is calculated as follows: measure the entire length of the gate with the console part and subtract 10 cm from the edge of the counter column along the plane of the embedded element. As a result, you determine the location of the second trolley.
- Now insert the roller bearings into the supporting profile, placing them in the center.
After that it is necessary to weld the second trolley of the adjustment platform. Then roll out the gate leaf into the opening and make the final adjustment of the position. Make small tacks by welding the second adjustment pad, as a result of the action they look like this:
- Remove the canvas from the roller trolley.
- Next, remove the carts from the sites.
- Weld the pads to the embedded element.
- To them fasten roller carts.
- Slide the blade onto the roller bearings.
- Close the gate and adjust its position with a wrench.
 Sliding gate operator
Make holes inside the carrier profile, this is necessary in order to install the cart correctly. To do this, loosen the upper nuts that secure the carts to the platforms. After that, roll the gate back and forth. If the leaf moves freely, tighten the nuts. If there are some difficulties in the movement of the sash, then weaken the fasteners slightly and level all the design flaws, for example, correct the distortions of the trolley.
 Installing Rollers
- Now you need to install the end roller. It should be inserted into the supporting profile and tighten the bolts carefully. Also weld the end roller cover to the profile. This will allow the roller to play the role of the end stop in the case of manual control of the gate. But in this case, fastening by welding will be much better than a bolt.
- As for the plugs of the supporting profile, its installation is carried out from the inside of the gate and is welded in place. It is necessary so that the snow does not roll under the rollers.
- Now the upper retainer is mounted on the rollers. Therefore, loosen the fasteners of the rollers and install the brackets so that its side faces the support post and the rollers grab the top of the web. Given this, press the bracket to the post and lock it.
At the next stage of work, the door frame is trimmed. For this, profiled metal sheets can be used. They must be cut to fit the sash. Fasteners are made with rivets or self-tapping screws. Each subsequent sheet is mounted with an overlap.
 Truck
Truck
When the cladding is completed, it is possible to mount the lower / upper trap. The lower trap plays the role of reducing the load on the roller trolleys when closed. Therefore, they must be installed with a loaded gate. Bring the lower trap under the end roller with the doors completely closed so that the supporting plane of the trap is higher than the level of the end roller.As for the installation of the upper trap, this process occurs in the same way.
 Catchers
In conclusion, it remains to carry out the installation of automation. To do this, fasten the rack, which implies a universal part with an electric drive. Usually it is included with the fastener.
Automation selection
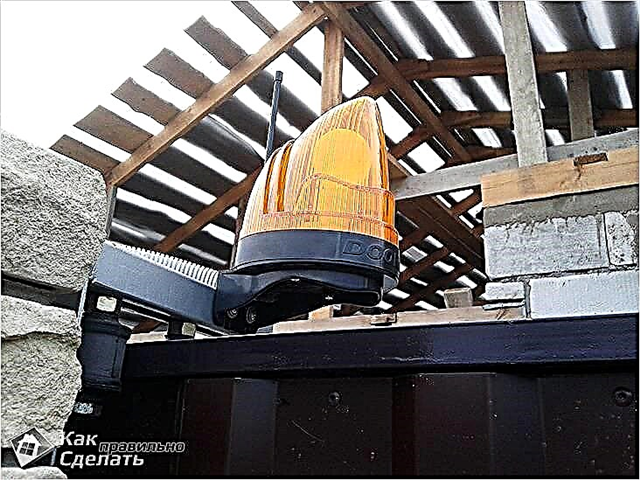
The choice of automation depends on the weight of the gate:
- For an opening of 4 m, a drive of 500-600 kg is used.
- For an opening of 4–6 m, a drive of 600–1300 kg is used.
- For cases with intensive opening of the gate, a drive of 1200–1800 kg is used.
Coloring
 Gate color
All metal elements of the door must be painted. Degrease the surface first. To do this, clean the surface and grind with a grinding disc on the grinder. Wipe some places, for example protected, with acetone. Now you can start the primer. It is applied evenly. Moreover, the primer must be applied so that there are no drops and stains. Thanks to such preparatory work, the paint will lie evenly. As a result, the entire door structure will be completely protected from corrosion.
The paint should be applied in two layers and only after the first has completely dried.
Necessary tools for work

To carry out all the work, you will need to have such a tool:
- Inverter welding material. Such a unit will not spoil the metal.
- Bulgarian.
- Air compressor for painting.
- Pliers.
- Drill.
- Roulette.
- Level.
- Riveter.
Common mistakes

If you do not have sufficient experience in performing such work, then there is a great risk of some errors:
- Not good foundation preparation.
- Incorrect installation and fixture of all components.
- Incorrectly selected gate weight for the support beam.
- If a creak is heard, then this is evidence of sand entering the bearings.
- Paint drips must not be allowed.
- Be sure to consider the depth of freezing of the soil. Otherwise, the posts may skew in one of the sides.
Photo: options for ready-made sliding gates
 Automatic forged gates
 Sliding Gate Automation
 Wooden sliding gates
 Forged
 Beautiful design of the gate
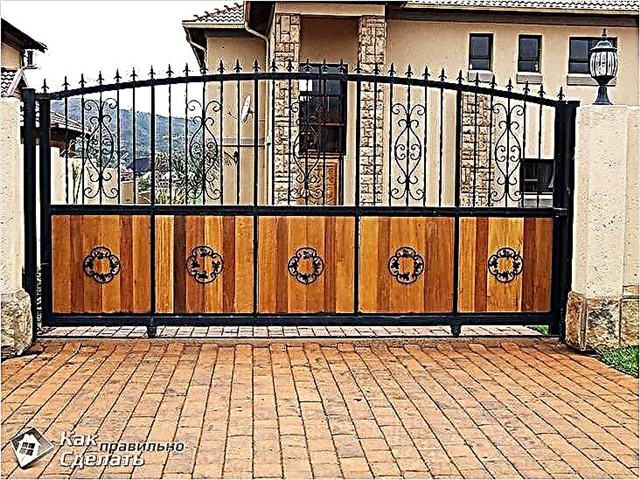 Mechanical
 Metal
Metal

 Sliding gates in the country
 With automation
 With integrated gate
 View from the yard
 Street sliding gates
Schemes
On the schemes you can find a lot of structural parts for the manufacture of sliding gates:
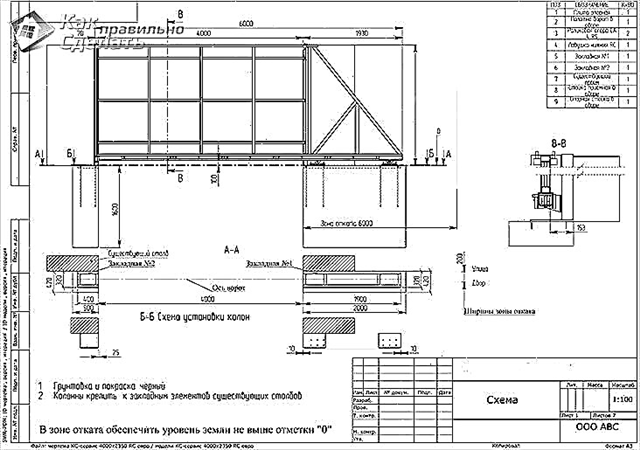
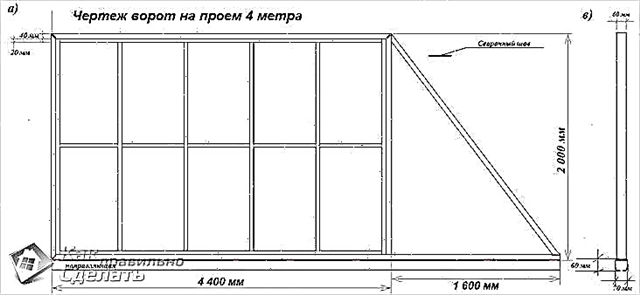 4 meter gate drawing
 Design
 Sliding Gate Attachment Methods
 Assembly drawing
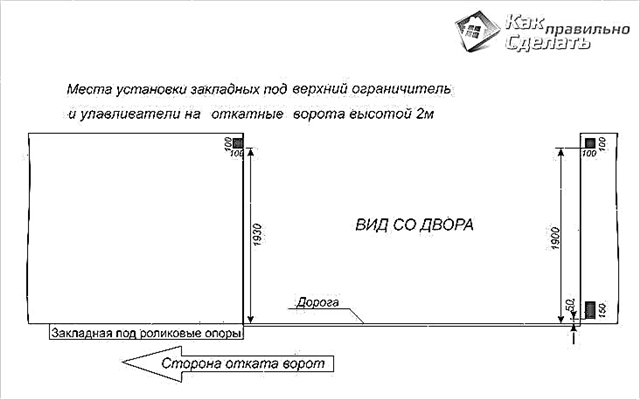
 Scheme of sliding gates and aperture
 Equipment
 Base under the gate
 Aperture preparation
 Construction scheme
 Column Installation
 Mortgage Installation Scheme
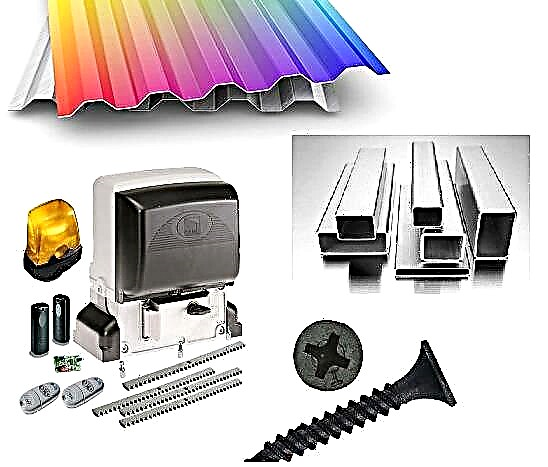
Do-it-yourself sliding gates. Choose materials
You will need painted corrugated board, rectangular pipes of different sizes, accessories, primer, self-tapping screws and automation. The most expensive items on this list are accessories that you can buy with a set and automation, which includes a drive with a control unit, rail and remote controls. If you wish, you can take care of security.
Therefore, you need to select a sufficient amount of material. First you need a drawing and size information so as not to overpay for excess goods. For example, if the gate is 3X2, then corrugated board will need 6 m2, and a certain number of kilograms of pipes.
Having learned the dimensions, making sure that this drawing is suitable, you can proceed with the purchase of the material. You can use the drawings from this manual, already proven circuits will not cause inconvenience. Next, you need to make sure that there are tools necessary for the construction of sliding gates with your own hands.
Tool preparation
Prepare or borrow from friends a grinder, grinder, concrete mixer, brick masonry tool, screwdriver, stepladder, shovels, hammer, level, wrenches, crowbar and tape measure.
The list turned out to be quite extensive and if you have not acquired any specific tool, you should not immediately buy it, perhaps your friends have it or you can rent it. Because with the purchase of equipment you are unlikely to save on the installation of sliding gates with your own hands.

When everything is ready, it is worth starting directly to work.
We are preparing - an important stage
To get started, do some preliminary work. The vegetative layer of the earth will have to be removed, if there is another coating in this place, you still have to get rid of it. For convenience, the layout of future sliding gates is needed.
Further, in the process of breaking, it is necessary to use four reinforcing elements of 1 meter each and electrodes - the axis (permanent and temporary). Before hammering the fittings, make sure that the diagonals of the rectangle match. After this, hammer, leaving 20 centimeters on the surface. Between the reinforcement is laid fishing line. You can create temporary axes from the main axes.
Next, you need to dig pits, there will be a foundation for poles, embedded parts and trenches for electrical wiring.
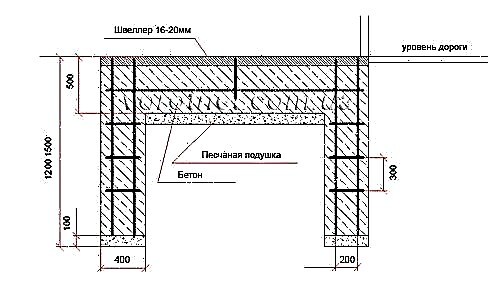
Tip. Do not forget that the hole for the pillar must be slightly wider than its size. For example, with a column size of 40X40 cm, the pit should be at least 42X42 cm. The foundation will be wider and it will become easier for you to lay the brick.
The embedded part also requires certain conditions from the foundation. The pit must be half the length of the doorway.
Tip. Consider the climate of your territory when creating pits. The depth must be large, greater than the depth of freezing. If the foundation is too close to the top, the soil, which is frozen, pushes it out, the design will be unreliable. Sometimes the depth can be almost one and a half meters, do not neglect at this stage.
When the walls crumble during the creation of the pit, formwork cannot be dispensed with. In this case, you can save by choosing the old material, so the boards are covered with soil.
Pour the finished sumps with water to achieve tamping. If further work continues later, take care to cover them and protect them from rain that could wash them.
In order not to spoil the passage later, dig a trench in advance, where a sleeve with an electric cable will be laid, so that later you can connect the sliding gate automation easily and quickly. For this work, you need an ordinary water pipe made of plastic, choose a diameter of about 20 mm. At the moment when the sleeve is laid, close the ends of the pipe with polyethylene, which will protect against dirt and moisture. When the sleeve has been laid and covered, pour the place where the installation took place in the same water to achieve compaction of the soil.
So far, the sketch of the sliding gates has been used little, but in the future it will still be very useful.
Cooking Pillars
The core function will be performed by metal products, in this case, pipes. It is better to take rectangular products with dimensions of 80X80 mm or 100X100 mm. Round metal pipes are also suitable, we take a diameter of 80 mm.
The pipe above the ground (its upper part) should be slightly below the column, a couple of centimeters is enough. If, for example, a pole is 2.5 m high, then the core must be 2.45 m. Part underground should not reach the bottom of the pit. It is also enough 5 cm. If the pit is 90 cm deep, then the lower part of the pipe is 85 cm.

Tip. To achieve maximum core strength, so that the design of the sliding gates with their own hands is strong, you can make a kind of strengthening by welding two reinforcing elements crosswise at the bottom. The length of the welded parts is 25 cm.
When the pipe is installed in the pit, provide it with moisture protection by covering it with something.
Do-it-yourself sliding gates: creating a mortgage part
Your work as a whole will depend on the quality of this element, because the embedded part affects the movement of the gate and the electric drive.
For this element, a channel is quite suitable, the width of which is about 20 cm, but not less than 16. The length should correspond to half the width of the doorway.
In order for the channel to reliably and durablely stay in concrete, it will be necessary to weld the reinforcement. The welding machine will come in handy again. To work, select 4 pieces of reinforcement, the length of which should be approximately 90 cm. Weld on both sides and tie with reinforcing jumpers, choosing a diameter of 10 mm.

Concrete foundation for sliding gates
The preparation of metal products has, in principle, been completed; we can proceed to a new stage of work. It is necessary to fill the foundation for sliding gates with your own hands. As a standard, it is better to take the M200 concrete brand. We prepare the mixture: 1 bucket of cement, sand - 3 in, crushed stone - 5 in. (fraction 5-20 or 20-40). Given the total volume of the batch, use 20% water.

Wait for the normal temperature, because in the cold you will have to use additional anti-freeze additives. If the outside temperature is normal plus, you can start the concreting process.
Before pouring concrete on the foundation for sliding gates with your own hands, make sure once again that all metal structures in the pits are not displaced and reliably located. They may shift under the weight of concrete; make sure that this does not happen. Using the level, check how smooth the installation turned out, checking horizontally and vertically.
Channel - exactly at the level of the horizon surface, if the passage is not ready, calculate the top distance. Ideally, 7 cm should remain between the sash and the surface, so that in snowy weather the gates, when they move, do not put snow.
Tip. The design of the sliding gates with your own hands should be strong, do not forget when filling each portion of the mixture, constantly tamp the concrete to avoid the formation of voids.

When concreting is completed, you can begin leveling to remove all irregularities. If it is very hot outside, the concrete should be protected from cracks by covering it. Water it a couple of times a day.
While the concrete is gaining its strength, you can rest for a week. This is a strong recommendation if your goal is a reliable and durable gate.
Brickwork of posts for sliding gates
Having dealt with the foundations and having waited until they become strong, you can proceed to the laying of bricks, installing mortgage elements for the nashchelniki. Use a corner 50X50 mm, whose length is approximately 8 cm, and reinforcement with a diameter of 8 mm is equal to half a column. Weld it to the core.

The lintel requires three tabs of three parts: 1 at the bottom after laying 3 rows of bricks, then the middle - in the middle, and 1 part at the top - knowing the upper edge of the gate in the future, do the styling a little lower.

DIY sliding door frame
To make it more convenient for you to create a wireframe, use pipes with a section of a rectangle or square. To create sliding gates with your own hands, drawings and schemes will still have to be used. Drawing - a detailed diagram of your work, which was discussed at the beginning, will now be very important. If you have a sketch of the sliding gate, there will be no problem. It also helps to save materials by using just as much as you need to make sliding gates with your own hands.
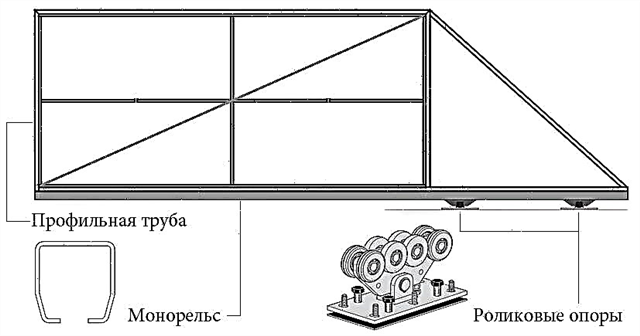
Clean metal pipes, all other elements from rust, degrease and prime. In the standard version for sashes and supporting elements, a pipe 60X40 mm or 60X30 mm is used. The second inner frame is 30X20 mm.
The entire assembly begins with a guide rail, which means that at this stage it must be prepared in advance. When recruiting a frame, ensure its stability in an upright position, weld two parts of pipes (square), they will serve as supports.
In the supporting frame, weld the lower pipe to the rail by tacks. Use a seam length of 15-20 mm, a pitch of 600-700 mm, on both sides, the order is staggered.

Tip. Do not make a continuous seam. This is not only impractical and leads to excessive consumption of electrodes, but also threatens with the fact that the guide profile will lead, the gates will become jammed, the movement will become heavy.
After that, we can set up vertical pipes, grabbing them with one weld. Using the level, check the resulting vertical evenness, when you are sure that everything is normal, only then do a continuous weld.
Next - installation and welding of the upper crossbar, then diagonal.
The supporting frame can be considered ready.
Further inside the perimeter it is worth welding the pipes of the second frame, not the main one, the corrugated board will be welded to them later. Pipes must be in the center of the supporting frame, so that the flooring, when it is already in the sash, drowned a little.
The welding work is over, you can grind the seams with a grinder, primer and paint them.
Tip. Painting is best done in three layers.
To fix corrugated board, use 19 mm special-purpose screws - for metal, to make it easier, you can attach it when the sash is already installed in the opening on the support. Each sheet must be customized separately, it must be adjacent to the frame. Leave the part of the leaf with the shape of a triangle without mounting profiled sheets, because this part will therefore not fall into the opening.
Everything is on the wings, but other equally important details remain.
There is very little left to complete the makeshift sliding gates.

From metal pipes 60X30 or 60X40 mm, strips are created and mounted.

To create sliding gates with your own hands, select the accessories:
- The guide rail is a profile of good quality, the surface is flat, without flaws, not rough, without scale. The metal must be specific, the composition should have more than usual carbon
- Roller carriages - with metal rollers, do not take polymers. Bearings with metal rubber anthers. A move without difficulty. Be sure to take care of corrosion protection.
- The top plate with rollers, there should be 2 or 4. It is better to take with a rubber coating that will not scratch the canvas.
- Lower end roller - either polymer or metal is suitable.
- Lower and upper catchers.
- Rubber plugs, preferably with a corrugated part.
- Mounting plates for roller bearings.
The device of sliding gates with their own hands will not be much difficulty. It remains to carry out the installation of these elements and do the installation of automation. The design of the sliding gates seems complicated, but you can do it yourself, without third-party paid assistance, using our instructions and watching the video instruction below.

